| Home | Open Account | Help | 269 users online |
|
Member Login
Discussion
Media SharingHostingLibrarySite Info |
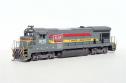
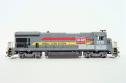
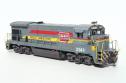
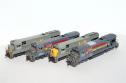
Model Railroading > Atlas L&N U23B's and Family Lines B23-7'sDate: 11/05/12 20:43 Atlas L&N U23B's and Family Lines B23-7's Author: GP35 Tonight I would like to share my custom HO scale Atlas factory painted CSX predecessor painted L&N U23B's and Family Lines painted B23-7's. I custom numbered all four GE's using Microscale decals. I also used some Herald King L&N decals for the numbers in the numberboards.
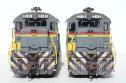
I made some modifications to the models such as blanking out the top front headlights and adding some Details West air horns. They closely resemble how the real CSX GE's looked back in the early CSX years, but as with almost all my models, they are not 100% accurate. My models may not please everyone but I build my models to my standards and not others. Constructive critism is welcome. We modelers always have room for improvement at times. I rewrote this last paragraph since my original version sounds a bit harsh. Hope this helps Bruce my buddy! Hope you enjoy, Gilbert. First three are of my pair of former L&N U23B's... Edited 1 time(s). Last edit at 11/06/12 08:04 by GP35.  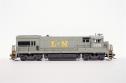 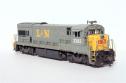 Date: 11/05/12 20:44 Re: Atlas L&N U23B's and Family Lines B23-7's Author: GP35 some more of the U23B's...
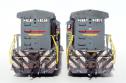
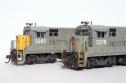   Date: 11/05/12 20:45 Re: Atlas L&N U23B's and Family Lines B23-7's Author: GP35 onto my pair of B23-7's...
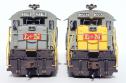
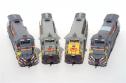
  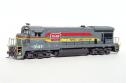 Date: 11/05/12 20:46 Re: Atlas L&N U23B's and Family Lines B23-7's Author: GP35 some more of the B23-7's...
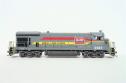   Date: 11/05/12 20:47 Re: Atlas L&N U23B's and Family Lines B23-7's Author: GP35 Last three. Hope you enjoyed, Gilbert.
   Date: 11/05/12 21:08 Re: Atlas L&N U23B's and Family Lines B23-7's Author: GP30Frank From an old L&N person, like me, those are nicely done.
Date: 11/05/12 22:27 Re: Atlas L&N U23B's and Family Lines B23-7's Author: NorfolkSouthern_37 Date: 11/05/12 23:59 Re: Atlas L&N U23B's and Family Lines B23-7's Author: Fizzboy7 Just the right amount of weathering. Excellent work!
Date: 11/06/12 03:01 Re: Atlas L&N U23B's and Family Lines B23-7's Author: funnelfan You have great models, but do you ever run them? Would love to see some photos of these on a layout.
Ted Curphey Ontario, OR Date: 11/06/12 05:36 Re: Atlas L&N U23B's and Family Lines B23-7's Author: brfriedm Gilbert,
I am not sure why you got so upset by stating the following. "if you are not happy with my standards for making models, just get your own and make them to your standards." Yea so a couple of people constructively pointed out how you can improve these nice models even more. I know you just want praise only but this is a public forum and it is called the Internet. So you will get praise and sometimes constructive criticism and in your case, a few recommendations. Also another recommendation is build a diorama and shoot these in a more realistic setting like track with scenery. Bruce Date: 11/06/12 07:19 Re: Atlas L&N U23B's and Family Lines B23-7's Author: GP35 No Bruce, I am not getting upset. I just want to point out I make my models to my standards and not others. I just like sharing my talent here just like other modelers do too. Trainorders would not be a great site if it were not for contributors like myself.
Date: 11/06/12 07:24 Re: Atlas L&N U23B's and Family Lines B23-7's Author: GP35 My models are built to be durable when running on a train layout. That means just enough detailing but not overdoing it. I leave very fragile details off that could be easily broken. For now, I do not run trains. I love making models now rather than the operations part of model railroading.
Date: 11/06/12 07:59 Re: Atlas L&N U23B's and Family Lines B23-7's Author: RFandPFan GP35 Wrote:
------------------------------------------------------- > My models are built to be durable when running on > a train layout. That means just enough detailing > but not overdoing it. I leave very fragile details > off that could be easily broken. For now, I do not > run trains. I love making models now rather than > the operations part of model railroading. I can appreciate your comments here. This hobby falls into all different categories and there is room for all of them. Some folks like to run trains right out of the box, some like to super-detail down to the last rivet. I can appreciate the detailed folks that buy a model then cut it all apart and rebuild and repaint it to exact details. I admire the hard work that goes into this and I enjoy seeing them at RPM meets. However, I fall somewhere in between. I like to add some details and weathering to the point that it looks more realistic but still runs on a layout without me having to worry about tiny detail parts falling off. I also believe in modifying those things that are obvious, for example, if the headlight is in the wrong place, or the exhaust stack or horn is the wrong one, then I change it. If there are 4 louvers on a hatch instead to 5 as on the prototype, I can look past that without losing sleep! Edited 1 time(s). Last edit at 11/06/12 08:07 by RFandPFan. 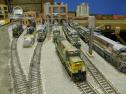 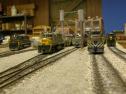 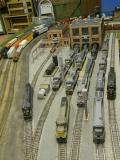 Date: 11/06/12 08:16 Re: Atlas L&N U23B's and Family Lines B23-7's Author: GP35 Very impressive locomotive facility and realistic looking models! Some day down the road perhaps I can build something similar to your masterpiece! Thanks for sharing, Gilbert.
Date: 11/06/12 08:54 Re: Atlas L&N U23B's and Family Lines B23-7's Author: RFandPFan Thanks, its a club layout, so I can't take credit for that. We have a great time with it and a great bunch of members.
Date: 11/06/12 09:03 Re: Atlas L&N U23B's and Family Lines B23-7's Author: TCnR Great photos, great models. Thanks for posting. It's interesting to see some of the older schemes outside of the Western roads as well.
I know what you're saying, I don't go beyond is it a metric or SAE rivet but it's important how many there should be. Either way it's a hobby, be happy. Edited 1 time(s). Last edit at 11/06/12 09:04 by TCnR. Date: 11/06/12 13:30 Re: Atlas L&N U23B's and Family Lines B23-7's Author: VirginiaMidlandRR Good stuff the last couple of weeks Gilbert. Can you tell me what you use to weather your trucks and fuel tanks on you locomotives? Maybe even elaborate on the weathering of the trucks themselves.
Thanks! Date: 11/06/12 17:18 Re: Atlas L&N U23B's and Family Lines B23-7's Author: alco539 GP35, You're models are KICK ASS.!!!
It's really cool that your modeling the early CSX era, it's really neat to see "patched" units of a different era and the mix-n'-match consists you can create will look really good. By the way you've posted a lot of GE units on here recently, you got any patched up EMD's, if so I'd like to see em'. KEEP UP THE GOOD WORK.!!, SEAN Date: 11/06/12 19:00 Re: Atlas L&N U23B's and Family Lines B23-7's Author: HB90MACH Anybody make a BQ cab to fit on the B23 shell?
Date: 11/06/12 19:49 Re: Atlas L&N U23B's and Family Lines B23-7's Author: GP35 My method for weathering the trucks and fuel tanks on my model locomotives is a bit labor and time intensive. I do not weather with an airbrush. An airbrush is a valuable tool, but I prefer to do weathering by paint brush.I basically break things down into different sections. After I finish adding most details and make some other cosmetic changes as necessary, I separate the shell from the frame assembly. I then remove the fuel tank.
Next, I gently and carefully pop the truck sideframes off. It can be easy to damage the mounting pins on the sideframes so great care must be used while removing. I use a small flat head screw driver for the job. If I damage any, I have a supply of spare truck sideframes I ordered from Atlas direct. I then give the fuel tank and truck sideframes a coating of Testors Dullcote from a rattle can. I let that sit and dry. The completely flat drying Dullcote adds "teeth" for adhering the acrylic paint washes and dry brushing that I use on my models. I go onto painting the wheel faces with Polly Scale roof brown acrylic paint. I usually use two thin coatings to have complete paint coverage. It has a nice deep rusty brown color that I prefer to use. If the frame is not in the right color, I carefully paint it with a fine tipped sable hair brush. An example would be a Union Pacific model that has an incorrect black painted frame that I paint over with Harbor Mist gray. If the frame is the right color but has a shiny surface, I use Polly Scale clear acrylic to add "teeth" for adhering the acrylic paint washes that I use on my locomotive frames. After I let the Dullcote on the fuel tank and truck sideframes dry, I start with the acrylic paint washes on both. I use disposable powder free latex gloves to protect my hands and fingers from getting paint on them. I thin the acrylic paint with water. I use more water for a lighter coat and less water for a more thicker coating. I use little cough syrup cups for mixing my paint to water ratio. I generally use several thin coatings to work my way up to the desired coverage. It does not take long between coatings for the washes to dry. I often use a small fan to speed things up. The fuel tank is weathered using both washes and dry brush methods. I generally use a couple thin washes then finish things off with some dry brushing. My weathering color that I use is something that I made myself from some Polly Scale acrylic paints. I looked for something off the shelf, but none satisfied my needs. I can not remember the ratio of each paint used but I make small batches using my eye to judge the proper paint mixture. I used Polly Scale dirt color, SP dark lark gray, a bit of roof brown, and a bit of reefer white to lighten the mixture. I add more white if I want a lighter coloring for weathering. Next, I weather the frame using both thin washes and the dry brush method. I use a couple of washes and finish up with some dry brushing. After allowing everything to dry, I first Dullcote the fuel tank and truck sideframes to seal the weathering jobs completely and check for any inconsistencies. If found, I touch things up and re-Dullcote to make sure the job is done to my liking. I then let everything dry and then reattach the truck sideframes and fuel tank. I test run the power assembly on my test track to make sure everything works properly and smoothly. After I weather the shell assembly and let things dry, I reattach the shell to the frame. I again test run to make sure everything runs smoothly. If I have any speed recorder or wheel slip modulators cables to attach, I do so at this time. If I need to add sunshades, I do this last since those details can be easily broken. I most often finish my locomotive models with a smooth coating of Dullcote. After all glass is carefully masked, I add a few layers of Dullcote to get even and smooth coverage. After letting the Dullcote to dry completely, I remove the masking tape the next day and the model is now finished, unless I go back at a later time to make changes. This is my method for weathering my locomotives. Other modelers methods will differ but this is how I go about weathering my units. Many here would most likely say to invest in an airbrush for ease of painting and weathering, but I am comfortable with my methods I used for many years now. It generaly takes me a day to weather one engine. I find modeling relaxing for the most part. Modeling is supposed to fun anyway. Hope this helps, Gilbert |