| Home | Open Account | Help | 392 users online |
|
Member Login
Discussion
Media SharingHostingLibrarySite Info |
Model Railroading > Completed more KatsDate: 09/15/14 20:03 Completed more Kats Author: SPED That's Katsumi engines, now the AC4 is done except for a little tweaking on the pilot truck. I saw this first picture was a little out of focus but it still looks OK. You can see more detail in this rather then the rest. I scratch built the plow and added the box (for the hose) below the headlamp.
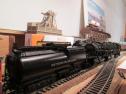
I used 12 volt lights in these engines, they ft the opening better and look good. The AC12 had an LED but I took it out because I thought it was too bright. Ed Edited 1 time(s). Last edit at 09/15/14 20:04 by SPED. 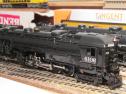 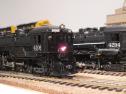 Date: 09/15/14 20:06 Re: Completed more Kats Author: SPED Couple more shots, I like the rear shot, you hardly ever see one form that angle.
  Date: 09/15/14 20:16 Re: Completed more Kats Author: superchief73 Another beautiful Brass engine given a new life! Awesome!
Javier Cervantes Castle Rock , CO Date: 09/15/14 21:02 Re: Completed more Kats Author: rschonfelder OK I have to bite on this one ... how do you scratchbuild a plow? Getting those curves right and to meet properly must be really hard.
Rick Date: 09/16/14 07:38 Re: Completed more Kats Author: atsf121 That is one nice looking engine, great work.
Nathan Date: 09/16/14 09:20 Re: Completed more Kats Author: Frisco1522 Great work, great paint job. Lookin good!
Date: 09/16/14 10:25 Re: Completed more Kats Author: SPED rschonfelder Wrote:
------------------------------------------------------- > OK I have to bite on this one ... how do you > scratchbuild a plow? Getting those curves right > and to meet properly must be really hard. > > Rick Rick, The plow is actually three pieces, the two plow halves soldered together with the little rib added in the middle. Originally I was going to leave it just pressed onto the pilot so I could remove it but it kept falling off so I soldered it on to keep it aligned and secure. Ed Edited 1 time(s). Last edit at 09/16/14 12:46 by SPED. Date: 09/16/14 12:50 Re: Completed more Kats Author: SPED I will sometimes take a picture of a model to see if there are any flaws. Seams like the lens finds everything that is not right! In this case I find the #700 M.V. Products lens for the classificaation lights are right-on, to bad I didn't light them up but you have to stop somewhere and say "that's good enough".
Ed Date: 09/16/14 12:50 Re: Completed more Kats Author: sphauler Excellent work!
Date: 09/17/14 07:53 Re: Completed more Kats Author: Frisco1522 I've done the picture taking routine for a long time while building an engine. You can stare at something forever while working on it and miss something obvious but the camera is ruthless.
Date: 09/17/14 07:58 Re: Completed more Kats Author: Kimball Any way to fill the slots on the screws on the rods?
Date: 09/17/14 09:43 Re: Completed more Kats Author: SPED Kimball Wrote:
------------------------------------------------------- > Any way to fill the slots on the screws on the > rods? You could fill them with a little strip of styrene and paint them, you'd have to make it removable for servicing though. Another way would be using a hex head with a shoulder but they might be hard to find, PSC may have them. Ed Edited 1 time(s). Last edit at 09/17/14 12:17 by SPED. |