| Home | Open Account | Help | 308 users online |
|
Member Login
Discussion
Media SharingHostingLibrarySite Info |
Model Railroading > Starruca bridge progressDate: 10/16/14 17:10 Starruca bridge progress Author: jobrazy It's coming along - Expect to install it next month when all the other stuff around it (hillsides, tunnels) get done. For the last 4 feet of this construction - it sure is taking a lot of time and is a major PITA!
J Joel Brazy Coatesville, PA 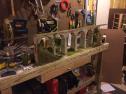 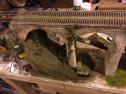 Date: 10/16/14 18:40 Re: Starruca bridge progress Author: icancmp193 Major achievement! Will the D&H run underneath?
Tom Y Date: 10/16/14 18:49 Re: Starruca bridge progress Author: barrydraper Wow! That is going to look great installed.
Barry Draper Date: 10/16/14 19:01 Re: Starruca bridge progress Author: warrenpweiss For some reason these projects always take significantly longer than expected, but in your case Joel, the result will be well worth. Outstanding attention to detail.
Warren Date: 10/16/14 19:37 Re: Starruca bridge progress Author: funnelfan Great Job!
Ted Curphey Ontario, OR Date: 10/16/14 22:46 Re: Starruca bridge progress Author: superchief73 WOW!!!
Javier Cervantes Castle Rock , CO Date: 10/17/14 08:48 Re: Starruca bridge progress Author: penncentral74 ...where's the D&H?
Date: 10/17/14 11:44 Re: Starruca bridge progress Author: jburek Outstanding ... Excellent...
Date: 10/17/14 13:24 Re: Starrucca bridge progress Author: toledopatch penncentral74 Wrote:
------------------------------------------------------- > ...where's the D&H? ....and the road, and the creek (hahaha) Edited 1 time(s). Last edit at 10/17/14 14:59 by toledopatch. Date: 10/17/14 14:42 Re: Starruca bridge progress Author: jobrazy And so that's where this bridge goes 'off the tracks'.
Because it is on an upper level deck, the road, and the true prototypical elements won't exist. I am still struggling with how to make the transition on both sides since it is 14" lower than the rest of the upper deck. The bridge will be on a hillside below that slopes to the lower level. I hope to get it installed by thanksgiving or so. Thanks for the compliments! J Joel Brazy Coatesville, PA Date: 10/17/14 14:58 Re: Starrucca bridge progress Author: toledopatch jobrazy Wrote:
------------------------------------------------------- > And so that's where this bridge goes 'off the > tracks'. > > Because it is on an upper level deck, the road, > and the true prototypical elements won't exist. I > am still struggling with how to make the > transition on both sides since it is 14" lower > than the rest of the upper deck. The bridge will > be on a hillside below that slopes to the lower > level. > > I hope to get it installed by thanksgiving or so. > > Thanks for the compliments! > > J It's a beautiful piece of work, that's for sure. Are you modeling a particular era? Date: 10/17/14 15:50 Re: Starrucca bridge progress Author: rschonfelder Good looking work. Is there any chance of a brief explanation of your procedures for getting to this stage? Is it scratchbuilt and how did you do it? I wonder if you hand carved each stone?
Rick Date: 10/18/14 02:32 Re: Starrucca bridge progress Author: jobrazy Hi guys,
No particular era, this is my first layout as an adult. I am about 4 years into it, and learning buckets. For Rick, This is a casting set that had been 'residing' in the owner (Paul) of Lin's Junction's basement for years. I was original going to build a double track steel bridge and we talked about it, then he mentioned this set. I took him up on the offer and here we are. It took a lot of sanding and matching, then mixing hydrocal for the joints and spaces and regarding the stone. About 3 weeks of work every night. It is assembled with white glue on a 3/4" plywood plank with 2x4's at each end for the end arches. It measures 48"l x 24"h x 8"w. Once built and dried, I used a combination of washes and powders (post several test fittings!) to color the hydrocal and now I am working on edge scenic aspects simultaneously with the surrounding spaces flanking the bridge to try and make a somewhat seamless transition. Not sure how that will work. Unfortunately, once it is installed, due to space limitations, I have to crawl under the layout, open my sliding door, crawl out and then work on the bridge from outside! I did not plan on an upper deck, so .....no plan, tough choices....part of my schooling I guess :). That's why I need to basically get it and the flaking areas complete prior to install or I am s.o.l..... JB Joel Brazy Coatesville, PA |