| Home | Open Account | Help | 167 users online |
|
Member Login
Discussion
Media SharingHostingLibrarySite Info |
Model Railroading > New LifeLIke P2K E6 - Failure to OperateDate: 01/27/15 19:37 New LifeLIke P2K E6 - Failure to Operate Author: rrman6 Being unfamiliar with the circuitry of this E6 unit, I'm not sure where to begin in analyzing. When I unpacked the unit, I found the packaging (styrofoam w/ tape) to be in mint condition with all parts included and the body and chassis like it had never been removed from the package. I first removed the motor/chassis assembly and found the wheels as mint condition also, like there were no signs of ever running on rail and were clean. I then placed this on my test track which is clean and had just been operating other locos. Turning up the speed control gently, I expected to see the unit move, so then dialed the speed higher and still no movement, although the headlight and Mars light do work. I rotated the flywheel several times thinking it was stuck and it seemed to turn freely. Again I tried power and nothing happened.
I'm in a rural area with no hobby shops within a hundred plus miles, so I think any testing is up to me. I'm open to suggestions as to where to start, but I've also never disassembled one of these motorized units. I'd know the PC board is mounted to the rear, as is the front with cab and crew, and that the weight is mounted to the frame with the screws. I guess I need a step-by-step tutorial if anyone is willing to assist me. Since LifeLike is no longer in existence, I'm without any assistance there. Any help would be appreciated. Date: 01/27/15 20:00 Re: New LifeLIke P2K E6 - Failure to Operate Author: fbe Remove the weight to gain access to the motor leads. Apply DC to the leads using test leads with alligator clips to see if the motor turns over.
Posted from Windows Phone OS 7 Date: 01/27/15 20:21 Re: New LifeLIke P2K E6 - Failure to Operate Author: rrman6 fbe:
Thanks! I'll have to give that a try tomorrow. Looks like bedtime now. I'll keep you advised here as I proceed. Date: 01/27/15 20:30 Re: New LifeLIke P2K E6 - Failure to Operate Author: fbe Thank you. Yes, it is always good to hear how suggestions from TO work out.
The next steps will involve a multi meter if you have one available. Posted from Windows Phone OS 7 Date: 01/27/15 20:40 Re: New LifeLIke P2K E6 - Failure to Operate Author: garr I have had a fair number of P2K locos in climate controlled storage over the years. All were bought new and never used. When I pulled
them out of their 5-10+ year year storage some ran like champs while others had issues similar to yours. These range from E units, PA's, GP's, SD's, & SW's. Does the motor make any noise at all, such as a hum? If so, you may want to change the direction switch a few times quickly. Then use your fingers to move the flywheel while close to full power is applied. This has unfrozen all but two of the P2K locos that have shown this problem for me(roughly 20 units). Jay Posted from Android Date: 01/28/15 01:48 Re: New LifeLIke P2K E6 - Failure to Operate Author: calsubd Same thing happened to a friend yesterday, bought on Saturday, didn't run at all, he called Life Like, (answered by Walthers) They told him it was made in 98 and to ship it back for free overhaul (pay shipping only), Just a matter of dried grease in the gears.
Ed Stewart Jacksonville, FL Date: 01/28/15 06:53 Re: New LifeLIke P2K E6 - Failure to Operate Author: up9116 I had what is likely the identical problem a few weeks ago--I bought four brand new, still in the box Proto2000 E6s and E8s from a friend. When I put them on the track, two ran, two did not. In both cases, the motor hummed, the lights worked, but the unit would not move. I tried the trick suggested by another response, moving the flywheels, and still nothing. The flywheels would not turn.
The problem is the copious amount of grease that Proto2000 uses in the factory. Too much lube is as bad as too little, and the stuff dries up over time and locks up the bearings. The fix is easy--clean the grease off with your favorite remover (I use WD40--works like a charm), and the problem is solved. The challenge is getting to the problem area. In each case, the problem was in the square bearings on the end of the drive shafts where they connect to the wheel tower. There are little bronze square bearings, then a tiny washer on either end of the worm gear. (Be sure you don't loose the washer--without it, the engine can buck on a downhill grade and the worm gear jumps around in its setting without the washers). The bearings were frozen so tight that I had to take a pair of needle nose pliers to them. To get at the bearings, as another thread suggested, you have to take the metal weights off--four large screws that are obvious are removed to accomplish that. Because of all the wiring, I did not completely remove the metal weights--I just removed the screws and loosened the weights to get access to the draft shafts and worm gear. Frankly, access wasn't easy, but it was possible. Then you pop off the plastic covers (use a small screw driver on the edge of the covers, and pry them off--they will just pop off when you get the angle on the screw driver right), and you have access to the offending bearings. The problem is the Proto2000 did not build these engines for easy maintenance. The wires that pick up electricity run to little metal tabs on either side of the front and rear wheels, and in the process of trying to get access to the problem area, I knocked off one of those wires and had to re-solder it. It might have been easier to just un-solder both wires on each wheel set (front and rear) and then re-solder when you are done and then you would have easy access. Also, you will have to remove the drive shaft from the flywheels in this process, and getting that back on can be a challenge as you maneuver a pair of tweezers on the drive shaft in a confined area. If you have plenty of experience working with the old Blue Box Athearn locomotives, the basic desire of the mechanism used by Proto2000 is almost identical, and you will ultimately have no problem. But if you haven't done much on the inside of the engine, this can be a frustrating job and you might want to take advantage of the factory and send the units back and let them fix it. Hope this helps. Regards, UP9116 Date: 01/28/15 07:51 Re: New LifeLIke P2K E6 - Failure to Operate Author: Chestnut If it older, probably the gear split. About 15 proto engines I had made 10+ years ago had split gears. Life Like will replace them if you have the original receipt but I just replaced them myself.
Posted from iPhone Date: 01/28/15 07:55 Re: New LifeLIke P2K E6 - Failure to Operate Author: fbe (I use WD40--works like a charm)
Use with caution and remove completely with Dawn brand dishwashing detergent. WD-40 is petroleum based and NOT PLASTIC COMPATABLE. If you leave it inside the gearbox area it will distort the plastic over time. So it is a great cleaner for caked grease but it has to be cleaned out in the long term. Posted from Windows Phone OS 7 Date: 01/28/15 09:33 Re: New LifeLIke P2K E6 - Failure to Operate Author: binder001 I'll second the comments made my UP 9116, the P2K lube is notorious for drying out and changing from a lubricant to almost an adhesive. I jsu installed a decoder in an older P2K CB&Q GP7 that I had not run for quite a while and I was astonished at how poorly it performed. I didn't do a full disassembly, but I was able to clean out most of the sudge from the gear boxes and relubed with Labelle and now it runs just fine. The E-units seemed less prone to the legendary split gears problem. Those were prevalent on the four-axle units.
Gary B. Date: 01/28/15 10:19 Re: New LifeLIke P2K E6 - Failure to Operate Author: grahamline Split gears can be detected by a thumping noise when running, and a stop-start progress down the track. The OP isn't up to that point.
I agree that the lube has probably failed and locked the worm gears solid. All of it has to come out and be replaced. If you can borrow an ultrasonic cleaner, that would be a good way to go. I have a stack of P2K GP engines bought for almost nothing because they wouldn't run. TCS makes an LL8 decoder that makes converting these engines to DCC very easy. Not sure if it works for the E units. Date: 01/28/15 11:40 Re: New LifeLIke P2K E6 - Failure to Operate Author: rrman6 I appreciate the input you folks are posting here. Some I've heard before about the compatibility to plastics, split gears-mostly on the 4 axle units, etc.
I did put the unit on the track and with my fingers on it feeling for vibration and my ear close to it, I felt no vibration nor humming of the motor when I upped the notches of power. After reading these postings this morning I did remove the plastic fuel tank where I could better access the flywheels and with the chassis on its back, I then used a wood pencil w/ eraser and found I could freely turn the flywheels many times while simultaneously watching the drive wheels turn freely at both trucks. I repeated the process in the opposite direction for several revolutions, so I don't think the gear grease is the problem. I noticed the motor and flywheels do pivot for the drive line which I wasn't aware of. Thanks to several of you, I've learned some concerning the disassembly process. Luckily, I learned on a non-powered E7 B unit the other day how the the trucks are held to the frame with the worm gearbox cover, so what UP9116 speaks of that portion of the disassembly I can fathom as well as the intricate handling of the bearings, washers, etc. I've learned the disassembly of the truck gears and axles so have the truck gearing down there pretty well understood. I'm thinking now the multi-meter as fbe's mentioned may be the next step. I'll await to hear further input meanwhile. Thanks to all! so far! Date: 01/28/15 15:49 Re: New LifeLIke P2K E6 - Failure to Operate Author: judahrice I'm gonna follow this thread - i have a friend, who has a P2K E6 with the same issues you described!
Date: 01/28/15 21:08 Re: New LifeLIke P2K E6 - Failure to Operate Author: rrman6 After "Private Messaging" some of you, I'm back to bringing everyone current to my findings.
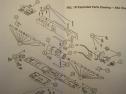
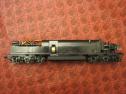
Now getting down to the problem E6 chassis. I just now proceeded with the testing the rails with the multimeter set at approximately 6v. and confirmed that. I then set the chassis on the track and measured at the two board terminals where the red and black leads from the trucks go. I got the same 6v. reading here so looks like we're good to that point. I then cut the power, removed the chassis from the track and traced the red and black wires from the motor itself back to the circuit board. They led to the opposite side of the board marked "COMP SIDE". I then placed the unit back on the track, cut in the 6v. power and read these two terminals. Again, the reading was the 6v., so it sounds like as you say, there most likely is a problem with the gear grease. Now for further tips on disassembly. It appears the lead truck beneath the cab might be a challenge. After viewing the cab features, I find the two metal extensions on each side of the frame that support the plastic cab panel, crew, and headlights. I've raised the two plastic pins that mate with these extensions, freeing that much. Now it appears the black plastic top lamp holder may be freed releasing some tension on the lamp and wires. The lamp may need to be pushed backward further at least enough to free the plastic cab panel at its backside where it mates to the metal weight. The Operating Instructions shows a leg beneath the cab floor on each side where a screw does the retaining, but mine doesn't have these legs and screws. I assume this panel will slide forward snuggly from this weight to free it. I don't want to break anything at this point. If I can free this plastic cab feature I'm thinking the #14 Worm Gear Retaining Cap will be free to pry off. As for the rear truck, again assuming, I think the circuit board and insulators wherever, should allow access to that Gear Retaining Cap. As I proceed in the next day or so, following the details UP9116 has given, I'm hoping the disassembly/re-assembly will provide some fine education and relief. I may be in for more advice should I find trouble at the motor. Carl  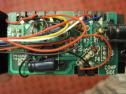 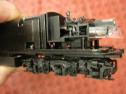 Date: 01/28/15 21:10 Re: New LifeLIke P2K E6 - Failure to Operate Author: rrman6 More pics.
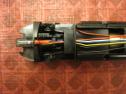 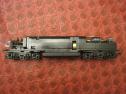  Date: 01/28/15 21:14 Re: New LifeLIke P2K E6 - Failure to Operate Author: rrman6 More pics #2.
  Date: 01/29/15 00:20 Re: New LifeLIke P2K E6 - Failure to Operate Author: calsubd Are you going to paint the cab figures while your in there ?
Ed Stewart Jacksonville, FL Date: 01/29/15 05:35 Re: New LifeLIke P2K E6 - Failure to Operate Author: rrman6 Probably not at this time but in the future once I get the unit in running condition. I'd like to replace those Chinese crewmen with their Communist service hats or re-hat them with a more typical U.S.A. Kromer railroaders caps of that era. Probably would be easier to reshape the caps of the existing crew but I don't want any Communists on my railroad!
Edited 1 time(s). Last edit at 01/29/15 06:00 by rrman6.    Date: 01/29/15 11:33 Re: New LifeLIke P2K E6 - Failure to Operate Author: rrman6 Here's my continuing education!
1. Removed the circuit board and accessed the rear gear box cover. Did not find gear grease to be a problem, but did remove some excess grease within. 2. Loosened the four screws holding the weight. Could raise the rear somewhat, but the front was still retained by wiring, so moved some wiring from the adhesive on top of weight to allow more freedom at front. 3. Found that there are two retaining screws under the front of the weight that retains the cabin features. Once these were removed the cabin feature moved with the weight. Now I had access to the front gear box cover. 4. I accessed the front gear box after prying off the cover and found the same grease situation, but nothing seeming to bind the worm gear. Worm gear was clean at both ends of the chassis. 5. Removed the worm gear/bearings/washers at both ends, keeping them and the male drive shaft attached and set aside. 6. Removed the balance of drive shaft from the flywheels at both ends. Set aside with worm gear assembly. 7. With the weight, circuit board free, I freed the red and black wires from the adhesive on top of weight to give more ability for weight to be free from chassis frame. 8. Now I realized both the red and black wires going to the armature on the motor has broken free, so now I will have to re-solder them. 9. I first attached two jumper wires to my power pack, gave about 1/4 throttle, then touched the ends of jumpers to each armature terminal. I found the motor to run freely and let it run for about 45 seconds. 10. Now it's back to re-soldering the wires to the motor armature terminals. Now the motor: 1. I find the motor has a zinc plated flat piece beneath it that appears to be retained at each side of the fuel tank area. Beneath this plate is the rubber cushion/insulator that has the four nubs that protrude from the bottom of the frame. This cushion allows the motor to gimble slightly and this is why I first thought there was a pivot action yesterday with the motor. 2. I'd like to remove the motor to better access especially the bottom terminal for soldering. Need help here - Question: 1. How do you remove the motor from the frame at this point? Does this plate beneath the motor move in some fashion to free the motor? I plan to add a bit more wire to the motor leads to allow more freedom when removing the frame in the future. Carl 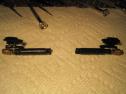 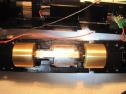 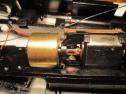 Date: 01/29/15 11:56 Re: New LifeLIke P2K E6 - Failure to Operate Author: rrman6 Now I've learned there is no zinc coated steel plate beneath the motor, but rather, this is a portion of the rubber cushion/motor mount beneath the motor. I used a small screw driver and pried until one side was free and I then lifted out the motor with most the cushion attached. Probably should have pushed the 4 nubs from beneath the fuel tank portion of the frame. I'll reassemble the entire rubber motor mount and push the 4 nibs in the frame when I put things back together.
Now I think I can remove the brass terminals off the motor and solder without melting the plastic motor frame, as if they were still attached. Whew!! Edited 2 time(s). Last edit at 01/29/15 19:44 by rrman6. 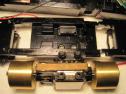 |