| Home | Open Account | Help | 369 users online |
|
Member Login
Discussion
Media SharingHostingLibrarySite Info |
Model Railroading > IAIS's West End - Hancock bridge completeDate: 02/09/16 23:18 IAIS's West End - Hancock bridge complete Author: iaisfan I finally finished the backdrop photos and scenery tonight for Iowa Interstate's bridge over the Oakland Branch and Hwy. 59 at Hancock IA and thought I'd share a few pics.
Photo 1 - Prototype photo of a 2002 BNSF detour with a CN leader at Hancock, showing a period when empty coal gons were stored on the Oakland Branch. By the May 2005 era I model, those had been pulled and empty pig flats were stored here to ease congestion at the Bluffs Yard intermodal ramp. 2 - Looking south toward Oakland on the layout, with the Oakland Branch trackage in the weeds on the right. The Rock Island herald on the bridge, just above the stock trailer, is just barely visible - much like its prototype. The yellow- and black-striped object marker signs leading up to the piers were sized and printed based on images I found on-line, then cut out and glued to wire posts. I Photoshopped the backdrop pics so the surrounding fields sloped slightly downward as they neared the highway, keeping the photo representation of the highway from creating perspective issues by extending too far up the backdrop. 3 - Larger view of the completed scene. Joe Atkinson Council Bluffs, IA www.iaisrailfans.org/../Sub4WestEnd  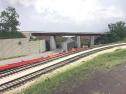 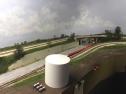 Date: 02/09/16 23:22 Re: IAIS's West End - Hancock bridge complete Author: iaisfan Photo 4 - An overview of Hancock, with Hillis siding on the fill against the backdrop. My plan for now is to continue the work on backdrop photos and scenery around the remainder of the layout, moving toward the right. Down the road, I plan to return to Hancock to build more elevator structures and complete Crop Production Services, to the left of the white storage tank.
Joe Atkinson Council Bluffs, IA www.iaisrailfans.org/../Sub4WestEnd  Date: 02/10/16 03:28 Re: IAIS's West End - Hancock bridge complete Author: acltrainman WOW, that rfeally looks great. Great looking layout also. love your shots of your layout, outstanding.
Stanley Jackowski Valrico, FL Date: 02/10/16 05:03 Re: IAIS's West End - Hancock bridge complete Author: RGDave As always, Joe, top-notch work! Looking great, glad to see this come together! Very effective sky backdrop, too.
Scenery installs are on the immediate horizon on my Onondaga Cutoff as well - late winter is a good time for larger projects like that. ~RGDave Modeling Conrail in Central New York in 1994 http://www.onondagacutoff.blogspot.com/ Date: 02/10/16 06:33 Re: IAIS's West End - Hancock bridge complete Author: bnsfbuff Looks great Joe! The backdrop scenery and horizon behind the bridge is very well done - looks like it goes on forever... Thanks for posting.
John Parker Longmont, CO BNSF Fall River Division Date: 02/10/16 06:59 Re: IAIS's West End - Hancock bridge complete Author: binder001 Great work Joe. Very inspiring to the rest of us
Gary B. Waverly, NE Date: 02/10/16 09:20 Re: IAIS's West End - Hancock bridge complete Author: funnelfan Looks great!
Ted Curphey Ontario, OR Date: 02/10/16 12:17 Re: IAIS's West End - Hancock bridge complete Author: imrl That last flat car under the bridge. Is that a picture or an actual model flat car? You do your backdrop transitions so well I really can't tell!
Date: 02/10/16 15:49 Re: IAIS's West End - Hancock bridge complete Author: upmodeler Looks good Joe.
Posted from Android Date: 02/10/16 20:28 Re: IAIS's West End - Hancock bridge complete Author: atsf121 Great work Joe, you captured the scene perfectly.
Nathan Date: 02/10/16 22:03 Re: IAIS's West End - Hancock bridge complete Author: iaisfan Thank you all very much!
imrl Wrote: > That last flat car under the bridge. Is that a picture or an actual model flat car? You do your backdrop transitions so well I really can't tell! Very kind of you! All four pig flats are 3D. Someone on another forum asked for a pic from the same vantage point as the prototype photo above, so I thought I'd share it here too. Joe Atkinson Council Bluffs, IA www.iaisrailfans.org/../Sub4WestEnd 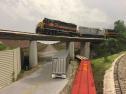 Date: 02/11/16 13:31 Re: IAIS's West End - Hancock bridge complete Author: bnsfsd70 Man, that looks great!
- Jeff Carlson Date: 02/11/16 13:49 Re: IAIS's West End - Hancock bridge complete Author: iaisfan Thanks Jeff! If I can ever get back to the point of holding formal op sessions again, there's a GE here with your name on it. I couldn't help myself. :-)
Joe Atkinson Council Bluffs, IA www.iaisrailfans.org/../Sub4WestEnd Date: 02/11/16 18:07 Re: IAIS's West End - Hancock bridge complete Author: hankbrank15 Looks fantastic, i thought that last car might be painted in too! On that last photo...how did you do that doulble yellow stripe in the center of the road? Looks awesome!
Date: 02/11/16 18:37 Re: IAIS's West End - Hancock bridge complete Author: iaisfan hankbrank15 Wrote:
> On that last photo...how did you do that doulble yellow stripe in the center of the road? Looks awesome! Thank you! I did all my road stripes using yellow and white Rock River brand paint pens, distributed by Fastenal. It can take some practice to get used to them, but what worked for me was to draw the line quickly using a steel rule, and without a lot of paint in the tip. Joe Atkinson Council Bluffs, IA www.iaisrailfans.org/../Sub4WestEnd Date: 02/12/16 09:44 Re: IAIS's West End - Hancock bridge complete Author: hankbrank15 Fantastic, thanks, I'll try that paint pen.
Date: 02/12/16 11:28 Re: IAIS's West End - Hancock bridge complete Author: trainboy03 Very nice Joe! You've outdone yourself once again. (still don't see 250, though!)
Erik Date: 02/12/16 13:49 Re: IAIS's West End - Hancock bridge complete Author: iaisfan hankbrank15 Wrote:
> Fantastic, thanks, I'll try that paint pen. Just be wary of getting too much paint in the tip. It can flow really quickly if you do. Helps to "write" with it a bit to get rid of excess before trying to apply it to the road, and then work in quick passes to keep from dispensing too much paint in one place. Erik wrote: > (still don't see 250, though!) He he he...Not in Hancock! :-) Joe Atkinson Council Bluffs, IA www.iaisrailfans.org/../Sub4WestEnd Date: 02/12/16 18:19 Re: IAIS's West End - Hancock bridge complete Author: Chad Looks great, can you share wow you did the clouds?
Date: 02/12/16 22:11 Re: IAIS's West End - Hancock bridge complete Author: iaisfan Chad Wrote:
> Looks great, can you share wow you did the clouds? Thanks Chad. The clouds were easy to do thanks to the guidance of my friend Charlie Duckworth. I used Liquitex artists acrylics (mostly Titanium White, but a bit of Payne's Gray for the shadowing) and dabbed them on with sea sponges. A really key concept to remember in painting with the acrylics is that when you first apply a color, i.e. the first time you tap the sponge to the backdrop, the color will be very opaque. The more you dab, the more the paint is spread out and thinned (or perhaps just picked back up by the sponge), giving it a much more thin, hazy look that's more blended with the surrounding colors. This is good to keep in mind as you move from very visible clouds in the foreground to very hazy examples near the horizon. I think my favorite clouds to paint are also the easiest and to me, they seem the most realistic. I don't know the technical term for the type of cloud with kind of a flat bottom and slightly billowy tops, but some examples are seen in the photo below. To paint the clouds, start with just a tiny bit of paint on the sponge, then add more as you get comfortable with how far it'll go on the backdrop. I first created just the basic cloud shape with a very thin application of white (i.e. lots of dabbing), then mixed a medium gray using the white and a very small amount of the Payne's gray, adding that along the bottom of the cloud. I then added some billowing by working in white in rounded shapes, dabbing less than on the first application to give more of an opaque look. At that point I also toned down and blended the gray by dabbing a bit of white over it. As a final step, I added more white with almost no dabbing, to create the "highlights" where you'd imagine the sun hitting the uppermost points of the billowing...if that makes any sense. The technique is easy, but you really just have to dig in and try it to get comfortable. The nice part is that, if you mess up, you just paint over it with your base sky color and start again. I never painted artistically before, but it didn't take long before I felt comfortable and was really enjoying myself. Joe Atkinson Council Bluffs, IA www.iaisrailfans.org/../Sub4WestEnd 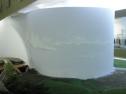 |