| Home | Open Account | Help | 314 users online |
|
Member Login
Discussion
Media SharingHostingLibrarySite Info |
Model Railroading > Battles with the Blue BoxDate: 04/25/16 23:11 Battles with the Blue Box Author: railstiesballast Here are my last Blue Box DCC conversions.
It is a lot of effort, but after reading books on DCC I thought I could do it. And indeed I can but it takes so long. Battles getting the decoder to fit, routing the headlight wires and resistors, and insulating the motor are one thing. Drilling holes to fit grabirons then cutting the inside bottom part off to fit the chassis takes time too. But trying to get a decent fit for the "Dress Up Kit" windshield and other glazing just did not suceed. But in the end they can pose for pictures of an NP train rolling through the layout. 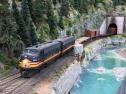 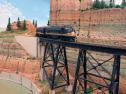 Date: 04/26/16 04:40 Re: Battles with the Blue Box Author: SPDRGWfan You've done a good job with that blue box F7. The windshields are the main give-away. I recall American Model Builders actually offered a kit to "frame" in the windshields to convert them from the oversized angular cornered stock window opening to one which looked much closer to the prototype.
I really like the stream in the first photo. Would you mind sharing your method of making it? I'm making one right now and have put down the base of it using drywall mud and sanding it smooth. Cheers, Jim Fitch Date: 04/26/16 05:17 Re: Battles with the Blue Box Author: Lighter > American Model Builders actually offered a kit to
> "frame" in the windshields to convert them from > the oversized angular cornered stock window > opening to one which looked much closer to the > prototype. Still available. Laser cut acrylic. Also available is a set that fits the F as is. I don't know about the F set install - those I have used on other locomotives press in from the outside. A dab of Future or Crystal Clear holds them. They'd take care of those window issues on the finished locomotive without a lot of work. About 6 bucks for all windows on one unit. 7 bucks for the scale "fix" window set. Date: 04/26/16 05:17 Re: Battles with the Blue Box Author: calsubd Engines look Great to me , along with the Scenery
Ed Stewart Jacksonville, FL Date: 04/26/16 08:33 Re: Battles with the Blue Box Author: SPDRGWfan Lighter Wrote:
------------------------------------------------------- > > American Model Builders actually offered a kit > to > > "frame" in the windshields to convert them from > > the oversized angular cornered stock window > > opening to one which looked much closer to the > > prototype. > > About 6 bucks for all windows on one unit. 7 > bucks for the scale "fix" window set. The scale "fix" window set really improves the frontal appearance of the Athearn blue box F unit. The molds must be too old or un-user friendly for Athearn to modify them to improve the windshields. Cheers, Jim Fitch Date: 04/26/16 09:46 Re: Battles with the Blue Box Author: Westbound In all your posted pictures, I keep looking at your tracks and support. Very well done. Nice layout too.
Date: 04/26/16 10:52 Re: Battles with the Blue Box Author: funnelfan To me the detailing and the electronics are all part of the fun. Sometimes frustrating, but that makes the satisfaction of a detailed operating model all that more enjoyable. I find that I am far more satisfied with the models I detailed myself versus a model straight out of the box.
Ted Curphey Ontario, OR Edited 1 time(s). Last edit at 04/26/16 10:53 by funnelfan. Date: 04/26/16 11:52 Re: Battles with the Blue Box Author: jridge railstiesballast - Looks good. How did you do the class lights on the nose?
Jeff Date: 04/26/16 16:13 Re: Battles with the Blue Box Author: warrenpweiss Westbound Wrote:
------------------------------------------------------- > In all your posted pictures, I keep looking at > your tracks and support. Very well done. Nice > layout too. I agree with Westbound. I love your layout and especially your track. How did you finally decide to treat the facia boards? Warren Date: 04/26/16 21:39 Re: Battles with the Blue Box Author: railstiesballast Thanks for the kind words.
The stream is a series of foamcore, lapped at the rapids. Then I put cast rocks and plaster to make the steeper slope there. The color is brush blended artist's acrylic watercolor. Then several layers of clear gloss acrylic. Painting the river took three and four cycles of trial and error. I would study pictures and paint what I saw. Then I would go look at some mountain rivers and see it was different and go back and repaint it. Finally I realized that rivers change color constantly with shifts of the sun, clouds, high or low flow, and season of the year (color of the greenery affects the reflection in the water. It really helps to take a picture of what you have done and compare it to a picture of a favorite scene, looking directly at your painted surface seems to be a different feedback loop. The classification lights on the F-7 are MV lenses, with aluminum back and clear epoxy "glass". The number boards are Microscale "Bug Boards", but the font is wrong, there was no room to put in the A following 6008. |