| Home | Open Account | Help | 373 users online |
|
Member Login
Discussion
Media SharingHostingLibrarySite Info |
Model Railroading > Touch Toggle InstallationDate: 10/21/16 14:34 Touch Toggle Installation Author: bigmc83 I finally had the chance to try out a new product I read about in MR some months back. The product is called Touch Toggles by Berrett Hill Trains and is a really sleek way to have turnout control on the layout facia. I have a small layout in a spare bedroom that utilizes Digitrax DS64s to control a total of 5 Tortoise switch machines. I like having the ability to throw the turnouts using my DT402 throttle, however the ability to have them controlled from the fascia also appealed to me, especially if I want to run with my UT4 throttle. I also just wanted to learn how it all interfaces together for future endeavors.
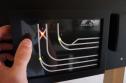
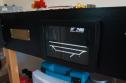
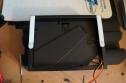
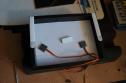
The Touch Toggles are traditionally designed as stand alone controllers for switch machines, however a new product known as the Universal Translator allows turnout control and feedback from a switch decoder and the Toggle, as well as displaying the correct aspect when thrown from the handheld. One Universal Translator can control up to 8 turnouts. The actual Touch Toggle plugs into the Translator board via a 3 pin connector. Berrett Hill sells a variety of extension cables and accessories to run the toggles wherever you need. My first mistake when hooking up the system was that I used a 12V wall wart instead of a 5V wall wart as recommended. An email to Kevin Hunter of Berrett Hill explaining my mistake got me a replacement and some technical help. Kudos to him for the great service and help. After overcoming my error, the process was pretty straightforward and I went through wiring my two DS64s with the UT8 on a piece of spare plywood with connector blocks to make life easier. The biggest challenge was wiring it all so that the DS64 and Toggle showed the same indication (Toggle: Green, DS64: Closed Position, etc) I then followed some directions by Berrett Hill they have on Youtube on how to easily make a turnout control panel using a picture frame and some Powerpoint graphics. By taping the toggle behind the paper track diagram, the light can shine through and still be touched through the glass. The finished product looks professional and cost ~$10 per panel. I then used Command velcro strips to mount it to the layout fascia. Overall the unit works very well and is unique way to incorporate turnout control into a railroad. Thanks for looking! Sean McCaffery Bel Air, MD Pics: The finished Panel, My DS64 and UT8 wiring, Back of a control panel with the Toggles taped in position. 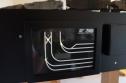 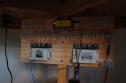 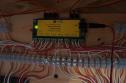 Date: 10/21/16 14:36 Re: Touch Toggle Installation Author: bigmc83 More pics of the finished product
   Date: 10/21/16 14:38 Re: Touch Toggle Installation Author: bigmc83 Pics of the board
 Date: 10/21/16 17:24 Re: Touch Toggle Installation Author: ChrisCampi Pretty cool. I also had seen these and was intrigued. Thanks for the write up.
Chris Date: 10/21/16 22:09 Re: Touch Toggle Installation Author: bearease Really cool!
I was thinking that panel was some kind of fancy plastic printing process or something. Sometimes the simplest solutions are the best ones! The electronics will take a bit more study-time for me to comprehend; but I'm definitely storing this away for future consideration! Thanks for sharing. Date: 10/21/16 22:56 Re: Touch Toggle Installation Author: atsf121 Way cool, I need to do that on my layout - one of these years.
Posted from iPhone Date: 10/23/16 07:16 Re: Touch Toggle Installation Author: DrLoco While your panel looks very sleek and professional, I'm most impressed with your wiring! That's something a signal maintainer would be proud of! Too often I see a rat's nest of wires under someone's layout, and wonder how they figure out anything when shorts happen. well done!
|