| Home | Open Account | Help | 365 users online |
|
Member Login
Discussion
Media SharingHostingLibrarySite Info |
Model Railroading > New Fascia Installation on the Onondaga CutoffDate: 02/22/17 05:18 New Fascia Installation on the Onondaga Cutoff Author: RGDave Fascia installation on the Onondaga Cutoff is coming along! Fascia is one of those construction projects that always takes longer than I expect, but then makes a bigger visual impact that I expect as well. Now that the signals are installed and working well for more than a year, and all the photo backdrops are up, a big 'critical path' roadblock is cleared and all sorts of scenery activity can begin. For me that starts with defining the edge of the layout, then working to fill in the areas with a rough ground surface. Finally after all that, I start from back to layout edge and install a basic coat of 'final' scenery.
While some of the fascia has been in for a year or two, a big chunk went in this past weekend and last night. I use 1/8" tempered hardboard for both backdrop and fascia. This particular spot was an area that was hard to visualize for me. The top and bottom levels are different scenes on the layout, so I wanted a positive fascia on the top level to differentiate it from the bottom. However, it needed to be thin enough not to detract from the bottom level or the Interstate highway scene to the right. Lots of visual lines come together here, and on top of that crews that switch at Iroquois Paper tend to lean over the layout to switch - so it needs to be sturdy. I installed a 2X3 timber stud across the main span on an angle, mounting it with screws into the benchwork on both sides. That will be strong enough to support switching activity. A smaller 1x2 is mounted to the left to support the lower fascia as it runs towards CP294. Installing the fascia sometimes requires some rather creative support techniques. More fascia will be next, finishing that installation hopefully tonight or tomorrow night. Next comes the gray paint to tie it in to the rest of the layout, then on to basic landform scenery! Some overviews of the recent work: 1. The overall scene now, with the new fascia in place. Even plain unpainted hardboard is a major improvement in appearance. 2. Looking the other direction, railroad west, towards CP294 (bottom level) and CP277 (the newly sceniced area at the top level). Smooth curves cut with a jigsaw tie it into the adjacent areas. 3. A closer look showing the two levels, including some of the bracing installed to add stability to the 2x3 supporting the lower level. Thanks for looking! Much prettier updates coming soon. ~RGDave http://onondagacutoff.blogspot.com/ 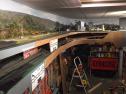 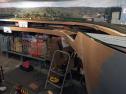 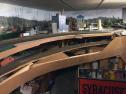 Date: 02/22/17 06:15 Re: New Fascia Installation on the Onondaga Cutoff Author: binder001 very nice. I was surprised by the improvement in appearance I obtained by adding a plain fascia, even though it is still unpainted Masonite. Thanks for showing us your work.
Gary B. Waverly, NE Date: 02/22/17 06:31 Re: New Fascia Installation on the Onondaga Cutoff Author: andrewcastle Great stuff as usual!
I like the pictures from a bit further back, they give a good overview of your layout and how the scenes fit together. That CP277 scene looks great both close up and a bit further away. Andrew C Date: 02/22/17 07:40 Re: New Fascia Installation on the Onondaga Cutoff Author: navarch2 Very nice work - as always.....graceful curves....very fair lines.....
Bob Date: 02/22/17 08:05 Re: New Fascia Installation on the Onondaga Cutoff Author: boejoe Never realized that the layout was two levels. Learn something everyday. Nice work.
Date: 02/22/17 10:11 Re: New Fascia Installation on the Onondaga Cutoff Author: boejoe Just noticed the Budweiser tank car on the lower shelf. HO? Didn't somebody once offer a retrofit to make a beer can into a tank car?
Date: 02/22/17 10:20 Re: New Fascia Installation on the Onondaga Cutoff Author: up421 boejoe Wrote:
------------------------------------------------------- > Just noticed the Budweiser tank car on the lower > shelf. HO? Didn't somebody once offer a > retrofit to make a beer can into a tank car? Walthers made a kit in HO and O scale, many years ago. Featured a very out of scale tap on the side. A fun kit to build and always got comments from visitors who saw them. I had a Coors in O scale and a Pabst Blue Ribbon in HO scale. Bob Date: 02/23/17 10:18 Re: New Fascia Installation on the Onondaga Cutoff Author: bluesboyst Nice Dave... Hope to see you at OTW next week....
Date: 02/24/17 04:59 Re: New Fascia Installation on the Onondaga Cutoff Author: RGDave Thanks, all!
Yeah, a regular operator donated that bud can tank car, converted using the O scale Walthers kit years ago. It's a hoot and about the only can of bud to every be present on the Onondaga Cutoff. Won't be at OTW, Stevie! Will miss you guys. But, family calls - a new baby will be coming any day now :-) ~RGDave Date: 02/25/17 12:17 Re: New Fascia Installation on the Onondaga Cutoff Author: SandingValve Nice looking layout and fascia. Getting the fascia up and painted really gives a layout a dramatic impact. I also chose an 'industrial gray' color siilar to yours for my old SP themed HO layout (sadly dismantled in 2003!). I used non-tempered Masonite so I coud get the flowing curves where I wanted them, adding support framing as needed. In many places I contoured the facia's top edge to follow the scenery which I feel helps get the operators/viewers 'into the scene'.
Some scenes from 15 yrs ago on my long since dismantled HO scale SP-DRGW-UP themed Central Sierra Railroad show the fascia. SV Images 1 & 2 show the sawmil at Woodfords from both sides, Image 1 has the scenery in the early stages, sawmill still under construction. Images 3 close up of a train exiting the tunnel and where a preposed snowshed was to be constructed at Woodfords, not the scenery as compared to Image 1.  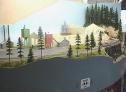 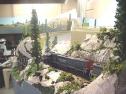 |