| Home | Open Account | Help | 380 users online |
|
Member Login
Discussion
Media SharingHostingLibrarySite Info |
Railfan Technology > Color correction - how to revive a faded or tinted imagDate: 03/22/14 07:40 Color correction - how to revive a faded or tinted imag Author: jonjonjonjon After scanning and color correcting hundreds of slides and other scans it's time to share a tip or 2….
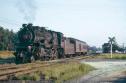
I have some older slides that have faded, or were not properly stored, and have taken on a tint (usually red) and lost contrast over the years. Here's an example of a slide bought on eBay - probably a duplicate slide of a Kodachrome original. I do a 3-step process in Photoshop using the Curves palette to get started. (This is applicable to other image editing software that uses curves, so if you have a similar tool in your scanner's software for instance, it may work for you too). Here's the original image - quite red, but not as bad as some that I have encountered. What to look for initially are where you define the white and black points, or the part of the image that should be darkest dark and the lightest light area. 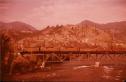 Date: 03/22/14 07:47 Re: Color correction - how to revive a faded or tinted Author: jonjonjonjon Here is the image with the Curves palette active, and after I've set the white and black points.
Under the Curve window you will see 3 eyedropper icons - one black, one half-black and one white. These tools are used to sample, or define the black, middle and white point on the image. To set the black point, I clicked on the black dropper and then used it to sample n area on the riverbank in the lower left that looked like it should be the darkest in the image. Then I did the same for the white point, and considering the clouds or the white house in the middle right, just above the bridge. Clicking on the clouds made everything look too washed out, so I chose the house. (If you click on an area, but then want to undo it, hold down the option key and the Cancel button turns into a Reset button - Photoshop only) 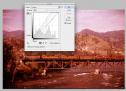 Date: 03/22/14 07:53 Re: Color correction - how to revive a faded or tinted Author: jonjonjonjon Now the magic happens! Using the middle eyedropper, find and area that should be middle gray - that is, part of the image that should appear with lithe or no tint, such as concrete, gray ballast or in some cases, a white area in shadow. chose the base of the right bridge abutment since I know it's concrete.
After the white, middle and black points are set, don't expect it to be perfect yet - you'll probably need to go into each color's individual curve and tweak it by choosing the color in the drop-down menu at the top of the window and then dragging the control boxes on the curve itself. In this case, I dragged the red and blue curves a bit back towards the centerline. 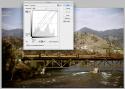 Date: 03/22/14 09:40 Re: Color correction - how to revive a faded or tinted Author: Sneebly For old extachrome it starts with the scanning
see http://www.trainorders.com/discussion/read.php?9,3265541 Sneebly Date: 03/22/14 11:15 Re: Color correction - how to revive a faded or tinted Author: chico Good read, both posts including the link back.
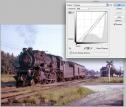
I recently came up with this after scanning w my Coolscan V, in Vue Scan, and did my fixes with the quick fix tools. Looks like something I want to study more. This is a John Dziobko shot from 1955, Ektachrome. It was really color shifted red, looked like the old Cisco kid reruns. I inadvertently posted at the end of the linked tab, meant to stick it here. I think I've some room to grow here... Chico  Date: 03/22/14 12:47 Re: Color correction - how to revive a faded or tinted Author: jonjonjonjon Here's what a quick black/white/mid point fix does to the post above….
 Date: 03/22/14 13:17 Re: Color correction - how to revive a faded or tinted Author: mp51w Mackinaw City, MI?
Date: 03/22/14 14:16 Re: Color correction - how to revive a faded or tinted Author: chico mp51w Wrote:
------------------------------------------------------- > Mackinaw City, MI? South New Jersey I believe. Edited to add: Tuckahoe Jct. NJ Chico Edited 1 time(s). Last edit at 03/25/14 10:15 by chico. Date: 03/22/14 14:17 Re: Color correction - how to revive a faded or tinted Author: chico jonjonjonjon Wrote:
------------------------------------------------------- > Here's what a quick black/white/mid point fix does > to the post above…. Nice job. Date: 03/22/14 17:53 Re: Color correction - how to revive a faded or tinted Author: engine3420 Here's my measly effort………..
 Date: 03/23/14 21:22 Re: Color correction - how to revive a faded or tinted Author: Starman92316 Here's a tip........change your color from RGB (red, green and blue) to CMYK (cyan, magenta, yellow and black). You can do this in Adobe Photoshop by clicking on the Image, then Mode button at the top of the screen. In CMYK mode you can change four colors, instead of three. I have found that you can get better color tones. Tom
Edited 1 time(s). Last edit at 03/23/14 21:29 by Starman92316. Date: 03/25/14 09:21 Re: Color correction - how to revive a faded or tinted Author: jonjonjonjon Starman92316 Wrote:
------------------------------------------------------- > Here's a tip........change your color from RGB > (red, green and blue) to CMYK (cyan, magenta, > yellow and black). You can do this in Adobe > Photoshop by clicking on the Image, then Mode > button at the top of the screen. In CMYK mode you > can change four colors, instead of three. I have > found that you can get better color tones. Tom I wouldn't necessarily recommend converting to CMYK (and most of the entry-level image editing apps don't support CMYK) - that is, unless you are planning on printing the images, or prepping them for print publication. The color range (gamut) of CMYK is significantly less than RGB (screen presentation), so when you convert from RGB to CMYK you will lose some color data. The gamut map below shows the difference in color range — any color outside of the labeled polygons will not display or print. You lose a lot of the shadow detail with CMYK. 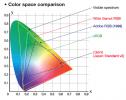 Date: 03/25/14 19:00 Re: Color correction - how to revive a faded or tinted Author: Starman92316 I see the chart. Maybe it's the way my monitor is calibrated, it just seems that when I change it to CMYK, the colors are richer, especially in photos that have little or no color. Also, I use the levels tools, instead of the curves. Thanks for the reply.
Date: 03/28/14 07:00 Re: Color correction - how to revive a faded or tinted Author: jonjonjonjon Calibration happens in your brain, too! If you get used to what your monitor displays, even if it is way off, it becomes the "norm" for you - the brain is an amazingly adaptive organ.
It's like when you put on tinted sunglasses - at first the colors seem strange, but after a few minutes everything looks "right"….until you take them off again. So, whatever looks good to you is the correct balance….until you print a photo, and then you may find your printer has a different idea of what is "right". Monitor calibration is an art and requires constant tweaking and special equipment. The pros I know who do this for a living are very particular about their methods, and rely on the numbers more than their personal perception of what their monitor is displaying. Date: 03/28/14 10:53 Re: Color correction - how to revive a faded or tinted Author: Starman92316 You are so correct on that. How many times have you done something photowise for someone and it just doesn't look right. But, the person you are doing it for says it looks perfect.
Date: 03/31/14 13:01 Some before and after Author: jbwest Photoshop is a very capable tool. My workflow is different (don't ask, it is different every time!), but I get some reasonably decent results. Some of my examples can be found at: http://www.lifewastedchasingtrains.com/main.php?g2_itemId=3168
JBWX Date: 04/02/14 22:59 Re: Some before and after Author: WP707 I prefer Photoshop v7 over v10...
With v7 besides the Auto Levels (which I use 1st) I also adjust the GAMMA in the curves section)... Date: 05/21/14 05:16 Re: Color correction - how to revive a faded or tinted Author: LV95032 Not correct. Store and edit images in RGB. Many colors can not be displayed correctly in CMYK (N&W blue (freshly painted as on NS 8103 and IT green are a couple)
Rich Starman92316 Wrote: ------------------------------------------------------- > Here's a tip........change your color from RGB > (red, green and blue) to CMYK (cyan, magenta, > yellow and black). You can do this in Adobe > Photoshop by clicking on the Image, then Mode > button at the top of the screen. In CMYK mode you > can change four colors, instead of three. I have > found that you can get better color tones. Tom |