| Home | Open Account | Help | 331 users online |
|
Member Login
Discussion
Media SharingHostingLibrarySite Info |
Steam & Excursion > Part 2 of the rest of track construction story.Date: 10/16/20 12:08 Part 2 of the rest of track construction story. Author: PlyWoody Some more observation and few more suggestion for anyone getting into new track construction as a Part 2:
Now that the will cut off the 2 to 4 extra damaging hits on the spike, the spiking will move along faster. This spiker will then need more volunteers to set those spikes in advance of his air gun. But I should start at the beginning again after the bare ground is level. I built three H shaped wood spacer that had a vertical post to handle and used it as the ties are placed along a string line. One person kept moving the spacer ahead for the next new tie placement. This protected the exact tie spacing and placement. Next step is to determine which side of track will look best to have the straight tie ending. This is called “Dressing the Track”. Outside of double track is always the straight tie line edge. It can be either side on single track. Every tie should then receive the drilling of a pre-spike hole not larger than ¼” diameter drill and not more than 2 inches deep. I built a 3 edged wooden box lid the fit over the end of the tie and have the hole where the tie should be drilled. This will give exactly the same measurement every time as only measured once making the lid, template. Spiking pattern In most cases with narrow gauge or other museum trackage only 4 spikes will be used on each tie, each straggled around the rail on each side. (Exception here for the 2926 which needs 6 or 8 spikes per tie). If you draw a line through the spikes on both sides of the rails, the lines should cross in the middle of the track. This is called the locking spike patter. The other pattern is those line are all parallel and it is called the picket fence pattern and it fails like a picket fence will all fall over that way. XXXXXXXXX is must stronger than //////////. This XXX pattern is obtained by reversing the spikes on each adjacent tie. Each inside gage spike should be on the same side of the wood tie and the next tie switch to other side. Setting the first field spike. Preferably with no rail on the ties, the first field spike can be driven with a heavy hammer. A spike will try to turn account of the grain, especially when even a drill hole is made. I suggest getting a half dozen 8” Vice Grip prier and someone in advance clamps the vice grip on to the center of the new spike shaft and the person driving that spike can easily control the turn of the spike and keep it correct. The prier give you leverage to twist the spike correctly and keep the hand clear of the hammer. Safety Rule Detour Detour a minute for a little safety rule if you hold a spike with your hand to hammer in that spike, the palm of your hand must be up. Almost everyone tries to hold the spike with your knuckles up and many injuries happen with a mis-hit of the hammer. The muscles in the thumb are not injured if hit with the hammer, but the knuckles and back of hand are too vulnerable for damage. Also note that Safety Rule prohibits spiking over a rail with a spike maul. And if you hit and nick a rail with a spike maul, that nick may be a defect that will require the rail be removed from track. It like a scratch on glass and cause it to break. I have done it too, but dual spiking of the same spike is prohibited. The sound also changes with spike mauls driving a spike and a quick stop can be determined as you near the base of the rail. Time to lay the Line Rail Each one of these field spike should be hammered deep enough that a manuals spiker will not send the spike flying if he hits the edge of it. Now when you have all the ties with one secure spike sticking up, lay the line rail onto and against these spikes. Always build track in one direction and begin where the first spike was entered into the tie and now spike the locking inside gage spike on that same tie. Someone with lining bars should hold the rail against the line of spikes. And now the next function is the Nipper person. The EBT discovered they have a great nipper tool which is like a lining bar but has a big tung on the end for good leverage. Normally a lining bar is used but a block of wood needs to be moved to give good leverage and pressure under the tie to aid the person spiking to get the rail secured. Safety detour regarding a lining bar. The lining bar is long and heavy and when not held by a strong hand must be laid flat on the ground. Never lay it sticking up where it can fall over and hurt someone. In use it must be held with both arms straight out at the end of the bar. Your teeth will not like the flavor of cold steel. AND never hold a nipping bar down with your ass. MAN, you do not want to saddle a jumping nipping bar when someone is driving spikes. That video of fellow doing that is shocking, but it happened. So there is a specific safety rule against the painful mistake. Time to adjust the location and alignment of that track. Now, hopefully before the second rail weight is on the track, built with one rail, use lining bars or track jacks and move the half track to the exact position you want. Everyone must hold lining bar at top end and pry under the one rail to move the track around. Most often it will be fairly easy with several persons. A bar can give a lot of pressure with the leverage it offers. Lay the gage rail onto the ties. Now that you have the track where you want it, lay the gage rail onto the ties and starting back at the original beginning obtain two strong gauge tools and always have one ahead of the tie being spiked and one behind. A quicker method when you have many workers, spike every other tie to gage so you advance faster and a second spiking process can proceed later behind without the use of gauge tools, as they have already built the solid track. A person using a lining bar should hold the rail by prying it against the gauge tool in advance of spiking that gage rail. Someone should be assigned to keep moving the gauge tools for each tie spiked. It the track is going to be on a curve over 10 degrees, than the correct gage will be ¼” wider for each 10 degrees. The change of ¼” must be over 31 feet of track so some gage widening may be needed on tangent track in advance of the curve. Spiking the gage rail should not need to be pre-drilled unless the oak has gotten very hard, but a spike supply crew should clamp the spike in the vice grips and give it to the fellow setting the spike with a hammer or spike maul that is driven in with a air gun and secured before moving ahead. Always have the rail pried tight against the gauge tool for good track. If someone has worked the track on the WW&F they have seen the ties with the first spike preset. They have a skilled construction gang. A few years after they were using their track I heard they found it wobbly so when I saw a video of them tamping their new track I saw some tamp in the center of the track. I passed the word to them that they were center binding their track and reason for it being wobbly and unsecure. They then issued direct instruction to never tamp stone further than few inches from the rail. Never tamp any track in the center and center bind it higher than the stone under the rails. Used spikes should never be used if there is any rust or wear around the neck under the head. Bent spikes should never be driven again, but just straighten then in a press or work over with a hammer. If lucky enough to have a black smith around, pay him for saving you the cost of new spikes purchased from Keystone Spike Company of Lebanon, PA. Just Google it as they will sell you any size at any quantity, even one. Care should be taken when dumping stone from a hopper car to never unload just one side, which might happen if part was still frozen but the sunny side of the car, flowed. A SG car and especially a narrow gauge car can be unstable and turn over. The EBT has a few side door hopper cars that can be use for lay out a nice beed of shoulder stone but both sides must be worked to keep the load balanced. Don’t ever work a air dump car if there is any chance of any frozen content. The Catskill Mt. Ry turned one over few years ago, and my crew turned one over once and luckly no one was injured but their pride. If you had to use a air dump in the winter, sometime many bags of salt were used in advance, or drum of Crisco cooking oil if salt was restricted. Sincere thanks for the reception of Part 1 about how to seat a spike. 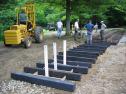 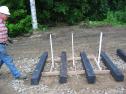 Date: 10/16/20 13:30 Re: Part 2 of the rest of track construction story. Author: callum_out I like your tie spacing tool, and your treatise is well written. Now you need a tool for that tree in the picture.
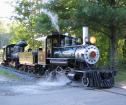
Out Date: 10/16/20 14:40 Re: Part 2 of the rest of track construction story. Author: PlyWoody There was no problem with the tree that is still there as it cleared both locomotives. Not really a doubleheader as the Argent Lumber #4 needs a new boiler and lots of other work. It is on display at entry. The long ties in the other photo are for the grade crossing we all built in one day.
 |