| Home | Open Account | Help | 212 users online |
|
Member Login
Discussion
Media SharingHostingLibrarySite Info |
Steam & Excursion > Treating overheated crown brass on driver axles.Date: 11/17/22 08:09 Treating overheated crown brass on driver axles. Author: wcamp1472 The typical challenge with crown brasses that act-up is
the 'fit' between the 'brass' and the axle. Too 'perfect' a machine-job during the machining of the crown brass and axle is the culprit. What happens, most commonly, is a result of the newly-machined bearing surfaces are not PERFECTLY POLISHED, yet.. That is the function of break-in runs, of decent distances, medium speeds and light trailing loads. Another factor is the new edges of the crown brass act as 'wipers', and remove the lubrication, as the axle rotates. The Fix? Ensure that the new edges are scraped, to form a 'trapping wedge' so that the lubrication ( grease or oil) is brought BETWEEN the axle and the brass. The biggest factor is to machine the two surfaces with liberal spacing between the two bearing diameters. There should be a wide 'numerical' difference between the two diameters, when machined 'cold' As new bearings are breaking-in, they heat each other during the break-in period.... that's normal and expected of new axle applications, with plain bearings. Also, you can get similar problems from plain bearings that have not been moved in decades.. If axles are rusted...you'll need to remove them and get the rust removed and the axle polished.. A few thousands-of-an-inch smaller diameter is inconsequential -- re-use the same brass.. Don't create more problems for yourself... Yes, many RRs used a thin layer of lead babbet ( on the 'brass' bearing) to protect against break-in problems. However, it's still a good idea to machine the crown brass about 1/4" to 3/8" wider than the axle..... Remember that driver axles are typically about 12" in diameter, so that tight clearances, on cold-machined metals when the being manufactured, will disappear when normal break-in temperatures are reached ---- 180- degrees ,or more During break-in runs , the two bearing metals will heat-up from attendant friction.. During the heating process the brass closes-in, clamping tighter tighter onto the axle.. The heating is local --- at the location where the rubbing is most severe, which is why the brass tends to contract tighter onto the axle.... the other 2/3 of the brass may be 'cold', which is why the contracting action is towards the axle.. The whole brass, later might heat-up and expand, but at the early stages of heating, the brass expands inward, clamping tighter onto the axle, At the same time, the heating of the axle causes it to begin to swell in diameter, as it heats-up... The combined swelling --- brass and steel--will quickly make any 'normal' clearances ( of, say, .012" to .015") become wayyy too tight upon normal heating and running temperatures.. A little extra 'wear" built-in, now ---- will become inconsequential at distances of 100,000 miles or more.. [ If, during normal heating, the 12" axle journal expands by 1/8" and the brass closes-down by 1/8" -- --- you're now at that 1/4" 'allowance' you thought you had! ] Soon, at normal break-in heating temperature, that supposed 'liberal allowance', during the machining process, disappears...yet, eventually the two new surfaces wear-in and mate to each other. Your job is two fold: To ensure liberal clearances during the machining --- by design, AND, make sure that the new surfaces have about 1/8" to 1/4" different diameters. Tight tolerances, here , on cold-machined bearings will become too tight during normal breaking-in heating. Most machine shop employees are used to much smaller plain bearings....so, their concept of loose allowances, are wayyy too tight for RR-sized axles and such.. If, after road testing, you are facing driver bearings that are running too hot, you must take corrective action. Preferably over an inspection pit, ---- first, remove the grease-block ( or oil cellar), then, using a long wedge --- on the rsil-- and two stout props, run the engine up the wedge, separate the brass from the axle. With the axle and brass raised, apply the two stout journal box supports either side of the axle to support the brass away from the axle. With the spring-props in place, roll the engine down, off the wedge--- that should give you about 1-inch to 2-inches space between the brass and the axle. In that space you're going to insert several ( 3 or 4) long strips of a soft metal like tin or solder-bars between the two metals. The strips should be parallel with the axle. The lead strips should be flattened and thin, inter-spaced with strips of dense, stiff, rod-grease between the lead strips... Also, 'doctor' the grease strips with powdered yellow sulphur ( we used the material from new 'highway fusee' warning flares).. When in place, run the engine, up on the wedge again, remove the spring-props, then back-down, off the wedge. Apply the lubrication cellar ... ( Dick Jensen used to pour STP on top of his grease blocks, on engines that had been stored for extended periods, before going-out on runs.....a 'good idea") Now, the two "hot-running" surfaces will wear to each other, finishing the job that should have been prevented ---- when boring the new brass... Relax and put the engine to work ..you will have cured the "problem" bearing.. Only a few bearings will cause you problems...so, knowing this cure, it will make your life easier. The sulphur, at higher temps will melt & form a 'temporary, smooth, bearing surface' on the axle, allowing the bearing temperstures to cool down... The lubrication steps you have taken will take a couple of hundred miles to cure the problem and polish each other, and allow the two bearing surfaces to 'mate' together. As the axle cools-down DO NOT disturb the the two bearing pieces, as they continue to wear-in to each other...it could take a thousand miles of trips, or so, to get 100% 'happy'.. At Frankfort, Indiana, the NKP early Berks used Hennessy oil-cellars, and crown brasses before the newer Berks arrived equipped with roller bearings, on the drivers and pilot truck axle. Too often, after loco rebuilding, the Hennessy equipped axles ran HOT, and the above 'doctoring' cured Frankfort's intermittent problems. When, during break-in runs, they got 'hot bearings', they'd apply the lead/ grease/sulphur cure, put the full weight on the axle, then send the engine and its train -- headed to Bellevue----- full speed.. Never had failure There IS a way to cure 'hot' axle problems.... but, they only show-up when in operation... so, local, test runs of 10 to 25 miles, or so --- are a way to find the problems, before sending them "down the road", on longer future trips.. You must seek and find the problems early; once you're underway to a distant destination, it's too late ---- if you haven't done your 'home work'... W. Edited 10 time(s). Last edit at 11/17/22 14:56 by wcamp1472. Date: 11/17/22 11:36 Re: Treating overheated crown brass on driver axles. Author: LarryDoyle Here's what an engine "driving box" looks like, and its parts. Note that the axle is not surrounded by the brass bearing - the axle is held in place by gravity.
-LD 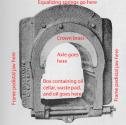 Date: 11/17/22 11:56 Re: Treating overheated crown brass on driver axles. Author: wcamp1472 ... and by about 25 tons of loco weight, per journal box...
Thanks, so much, LarryDoyle.. The illustration is perfect. While we're on the subject of driving boxes, do you have any pictures of the wheel's hub, and tthe box's hub-liner? W. Edited 1 time(s). Last edit at 11/17/22 12:53 by wcamp1472. Date: 11/17/22 12:54 Re: Treating overheated crown brass on driver axles. Author: callum_out Agreed, nicely done and so different than the roller applications.
Out Date: 11/17/22 15:08 Re: Treating overheated crown brass on driver axles. Author: LarryDoyle wcamp1472 Wrote:
------------------------------------------------------- > ... > While we're on the subject of driving boxes, do > you have any pictures > of the wheel's hub, and tthe box's hub-liner? > > W. This shows a hub liner and its mounting to a driving box. No pics of a hub -LD Edited 1 time(s). Last edit at 11/17/22 15:09 by LarryDoyle. 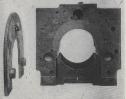 Date: 11/17/22 16:25 Re: Treating overheated crown brass on driver axles. Author: wcamp1472 LarryDoyle posted a picture of the bronze hub liner (above ), which attaches
to the driving box with the three round bosses , for securement. The back side of the driver set has a flat circular steel section that matches the hub liner, above. The crown brass only handles the rotating motion of the axle, there is also, the end-to-end motion, at right angles to the rotary motion. It is the hub liner that takes the end-wise pounding of the axle thrusts from the tracks' curves and bends. It is important that the wheel hubs do not continuously rub against the hub-liners. Lubrication of the hubs is problematic... and is the reason for the engineer's use for the traditional long-spout oil can ..to reach-in and oil the wheel hub and hub liners.. The main advantage of roller bearings, like Timken's, uses tapered rollers. and transfers the forces to the journal boxes and the frames. Timkens require that they be used in pairs, back-to-back. The rollers take all the rolling components of tne axle motion, and "roll" the forces to the frame members. The most crucial places for using rollers is at the pilot truck axles, then the drivers' axles Roller bearings did a lot to 'modernize' steam locos.... matched with one-piece, cast steel frames, they did a lot to eliminate so many of the problems of older locos. Solving hub-related problems was a constant challenge as locos got larger and heavier. W. Edited 1 time(s). Last edit at 11/18/22 05:32 by wcamp1472. Date: 11/18/22 09:34 Re: Treating overheated crown brass on driver axles. Author: Drknow Thank you, Wes.
I’m a dumb engineer that is also a shade tree mechanic. Trucks, tractors, motorcycles… I might even volunteer to get real dirty at a museum when I “retire”. IMHO a person has to keep learning until we die, and I appreciate your willingness to help dummies like me. Thanx a bunch! Regards Posted from iPhone Date: 11/18/22 10:42 Re: Treating overheated crown brass on driver axles. Author: wcamp1472 A lot of this stuff is not readily apparent to regular machinists.
Unless you've experienced the physical aspects of the ways rates-of-expansion can affect your bearing, you wouldn't expect the need to anticipate making allowances. Another area of misunderstanding is the 'value' of surface pits in bearing surfaces... often times with steel and sleeve bearings, folks want a perfect, smooth bearing surface.. I've found that tiny pits and rust spots in the steel surface that are 'minor recesses' actually act as oil and grease tiny 'reservoirs' of lubrication.. Yes, i'll polish and remove any rough protrusions in the surface, but recesses and cavities are ideal lubrication aids. Machining them-out means reducing the diameter, and a significant loss of area... whereas, the actual 'loss' of surface area, due to tiny 'surface pits', is minuscule. The surface pits act like thousands of oil pools as the bearing is spinning.. Thats 'a good thing'... There are many times where brass bushings are pre-drilled on purpose, to act as grease retention holes.... so, if other, rough, surfaces ( and 'wells') have no rough protrusions that will destroy the thin oil film, they'll do fine in actual service.. That thin oil film is crucial... and any surface pits that retain lubricants will be of great value in service. So, it's not a matter of being, 'dumb', it's a matter of both experience and imagination.. AND, a certain willingness to experiment, rather than to tinker excessively, and aim for 'factory-new' precision... We'll NEVER be as good as they once were... And. we then try to not get caught with a failed repair. Use your best judgement and trust your instincts....you'll do FINE... Wes Camp Edited 1 time(s). Last edit at 11/18/22 10:46 by wcamp1472. Date: 11/18/22 12:59 Re: Treating overheated crown brass on driver axles. Author: callum_out I remember a set of shots that Tomkins-Johnson used to use in their hydraulic and pneumatic cylinder presentations.
Shots were of the top layer of their hard chromed piston rods, you'd look at it and gasp. Won't all those rough edges wear out the seals? Then they'd explain it was shot at 100X and the surface porosity cost them a fortune to develop and it was the utmost on preservation of the lube layer that Wes described. Standard NFPA seal life ratings for the rod seals were on the 10M range, the T-J stuff easily ran 30M cycles. Out |