| Home | Open Account | Help | 237 users online |
|
Member Login
Discussion
Media SharingHostingLibrarySite Info |
Model Railroading > Blue Foam Mountains - Part 3Date: 04/14/17 02:18 Blue Foam Mountains - Part 3 Author: MrMRL Continuing from thread 2, three weeks back... http://www.trainorders.com/discussion/read.php?3,4255875
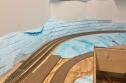
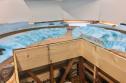
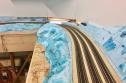
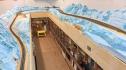
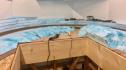
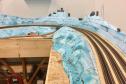
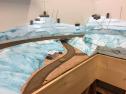
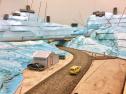
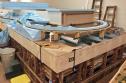
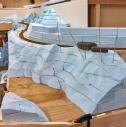
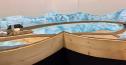
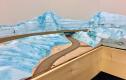
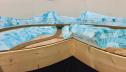
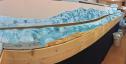
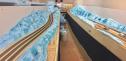
It's been 21 days now since the last thread, here are a truck load of updated pics as the blue foam continues to expand across the upper level at the HO scale California Southern Model Railroad Club. Lost of photos below, some pulled back panoramas, some closer up detailed shots... They're all basically in chronological order from March 25th up until late last night, April 13th. Enjoy! 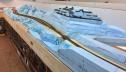 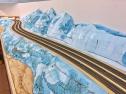 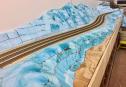 Date: 04/14/17 02:18 Re: Blue Foam Mountains - Part 3 Author: MrMRL ~
   Date: 04/14/17 02:19 Re: Blue Foam Mountains - Part 3 Author: MrMRL ~~
   Date: 04/14/17 02:20 Re: Blue Foam Mountains - Part 3 Author: MrMRL ~~~
  Date: 04/14/17 02:21 Re: Blue Foam Mountains - Part 3 Author: MrMRL ~~~~
 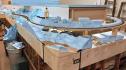  Date: 04/14/17 02:22 Re: Blue Foam Mountains - Part 3 Author: MrMRL Layout looking slick with it's new upper deck skirting installed...
Edited 1 time(s). Last edit at 04/14/17 02:33 by MrMRL. 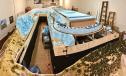 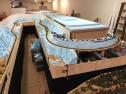 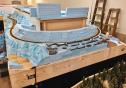 Date: 04/14/17 02:28 Re: Blue Foam Mountains - Part 3 Author: MrMRL For scale's sake in the pics above, that isleway now surrounded with blue hillsides is roughly 25 feet long... Also, the single track horseshoe curve has a 50" radius...
   Date: 04/14/17 02:29 Re: Blue Foam Mountains - Part 3 Author: MrMRL ~ ~ ~ ~
   Date: 04/14/17 02:32 Re: Blue Foam Mountains - Part 3 Author: MrMRL Last couple pics below taken just a couple hours ago at the end of another mountain making session. Gotta give that wood glue a chance to setup.
Thanks for looking folks! Feedback always welcome! ~ Mr. MRL - whew... 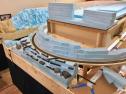 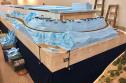 Date: 04/14/17 02:36 Re: Blue Foam Mountains - Part 3 Author: RNP47 Wow... It is the table work that I find most amazing!
Date: 04/14/17 03:02 Re: Blue Foam Mountains - Part 3 Author: MrMRL RNP47 Wrote:
------------------------------------------------------- > Wow... It is the table work that I find most > amazing! Thank you! This 22' x 70' double-decked layout is being constructed in the heart of earthquake country, Norwalk, California in a now 125+ year old unreinforced masonry historic storefront. The lower level was built off a steel 2x4 framework anchor-bolted through the building's 6" concrete foundation. Then more wood 2x4s, 2x3s, and 1x4s than I care to count. The lower level decking is primarily 3/4" and 1/2" plywood, lower backdrop is made with 1/2" drywall boards. Fascia across both decks is rock-solid 3/4" pine board. The upper level has been cantilevered out and over the lower level (mushroom style) off the lower level's vertical 2x4 backdrop studs. The upper level framework is lighter, consisting of 3/4"x4" plywood cross beams connected to 1x4" pine boards. Upper backdrop is built out of 2x3s with 1/4" white vinyl treated MDF. The upper level track is supported on 3/4" plywood sub-roadbed, additional flat terrain is on 3/8" plywood until we reach the layout's summit where the decking transitions back to 3/4" plywood. All the upper level mountain work is being fabricated out of the blue foam seen above to save on weight. At it's present point, if you picked up all that finished foam-work and set it on a scale, it easily weighs less than 100 lbs... Yeah, this layout is tough as the nails and screws that hold it together. You know when you bang into it, it fights back. And that's the way we like it too, idiot proof. : ) ~ Mr. MRL Edited 1 time(s). Last edit at 04/14/17 03:06 by MrMRL. Date: 04/14/17 03:15 Re: Blue Foam Mountains - Part 3 Author: MrMRL To get a sense how far we've come, here are a few threads from around three years back showing what little was up here at that point...
3/30/14 - http://www.trainorders.com/discussion/read.php?3,3365883 04/5/14 - http://www.trainorders.com/discussion/read.php?3,3371859 04/15/14 - http://www.trainorders.com/discussion/read.php?3,3381876 * Pic below of our 50" horseshoe curve (before track) and still loosely propped up with scrap bits of wood was taken April 15, 2014... ~ Mr. MRL Edited 1 time(s). Last edit at 04/14/17 03:17 by MrMRL. 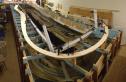 Date: 04/14/17 04:04 Re: Blue Foam Mountains - Part 3 Author: perklocal Beautiful work ! I like your collection of Ingots and Antique Irons too.
Date: 04/14/17 04:37 Re: Blue Foam Mountains - Part 3 Author: SPDRGWfan That cut foam really reminds me of the scenery in a computer game I once played called Icewind Dale - it really has the artic look to it when cut and hot wired!
Cheers, Jim Fitch Date: 04/14/17 05:04 Re: Blue Foam Mountains - Part 3 Author: inCHI So you are using wood glue to glue the foam together? Any issues with it not drying or leaving gaps?
Date: 04/14/17 06:13 Re: Blue Foam Mountains - Part 3 Author: rschonfelder I would like to ask how you are cutting and shaping your foam? I do not see any "blue foam dust" in any photos so I supect you are using a hot knife.
Any chance you can provide picture of the tools for cutting ? I also wonder how much these blue foam cost per sheet? Thanks for the great insight on the construction of your layout. Rick Date: 04/14/17 06:23 Re: Blue Foam Mountains - Part 3 Author: electromac WOW!............OUTSTANDING!
Cant wait to see trains running........ Date: 04/14/17 07:16 Re: Blue Foam Mountains - Part 3 Author: M-420 I have the same question as below:
What tools do you use to cut and form? Terrific series of photos. Brian E rschonfelder Wrote: ------------------------------------------------------- > I would like to ask how you are cutting and > shaping your foam? I do not see any "blue foam > dust" in any photos so I supect you are using a > hot knife. > > Any chance you can provide picture of the tools > for cutting ? > > I also wonder how much these blue foam cost per > sheet? > > Thanks for the great insight on the construction > of your layout. > > Rick Date: 04/14/17 08:14 Re: Blue Foam Mountains - Part 3 Author: march_hare That's going to be some first class scenery!
Allow me to make a suggestion, if it's not too late. There's no need to use ordinary glue, and wait many hours for it to dry. A hot glue gun (set at the low temp setting) works just fine, and sets up in a minute or less. And you can cut it with your hot wire tool easily. With a large scale project like this, it would probably help to have two guns going simultaneously. One can be warming up while the other one is in use. But they're only about 15 bcks each at Walmart, so this isn't much of a drawback. Date: 04/14/17 09:40 Re: Blue Foam Mountains - Part 3 Author: 4400horsepower WOW, Looks fantastic. Can't wait to see some finished pictures with trains running. Keep up the GOOD work. Model Railroading is suppose to be fun, looks like you guys are having a wonderful time.
Brian Burlington, Iowa |