| Home | Open Account | Help | 291 users online |
|
Member Login
Discussion
Media SharingHostingLibrarySite Info |
Model Railroading > Designing new layout, duck-under question and more...Date: 02/16/18 02:45 Designing new layout, duck-under question and more... Author: Fizzboy7 The time has come, after decades of wait, for my own HO layout. The room used will be a spare 18' x 11' bedroom. My main priorities will be getting the maximum length trains and widest possible radius. In order to achieve those things, I'm thinking of wrapping the track all the way around the perimeter of the room, and connecting the "oval" by having a section of track near the room's door entrance. This would have to utilize some sort of duck-under. I'm not super hot on the idea of having to crouch down entering the layout everytime (health/body is fine), but it's a sacrifice I feel worth it in order to have more track mileage and longer trains. Where I see future problems would be when I invite family/friends over to see everything. They are in their older years and I can't see them wanting to make the move underneath. I thought about one of those gardening seats that have wheels. But the room may be carpeted, so not sure how easy it would be to sit on one of those and roll under the duck-under.
So having said that, are there any other layout configurations that would gain a lot of track mileage without having to have loops at every corner of the room? Elevation gain/loss is also something I rather avoid if possible. I also thought of a u-shaped layout, with open access in the middle, and half-loops at each end bringing the train back around. But I fear that would look redundant and cause turns to be too sharp (Want to run 89' flats and racks without it looking silly.) Long straight-a-ways with a train spanned out is the look I am hoping to have. Or if an 18' x 11' room is too small to achieve this, it's better I hear it now than later. Thanks for any advice... Date: 02/16/18 03:34 Re: Designing new layout, duck-under question and more... Author: SeaboardMan Even a healthy you will tire of a duck under. Your best bet is a swing up bridge ( 1x3 ) firmly hinged on one end with guide pins on the other.
John Date: 02/16/18 03:59 Re: Designing new layout, duck-under question and more... Author: WrongWayMurphy Don't build it with a duck under. You will need to do what
the above poster suggests, use a swing or lift out section. Just don't build it with a duck under. Just .... don't. Date: 02/16/18 04:10 Re: Designing new layout, duck-under question and more... Author: BCutter I would strongly recommend you avoid a duck-under in your room as well. I installed a movable section in my layout room -- it can be taken out and replaced fairly easily (locating bolts, etc, separate wiring). BUT, when it is in place, I use an old office chair and roll back and forth under the section. Pain in the rectal orifice since -- as I get older and less flexible -- I end up banging my head or back on the section. I am seriously considering replacing that with a swing down section.
Bruce Date: 02/16/18 04:28 Re: Designing new layout, duck-under question and more... Author: goneon66 i have 2 "duck unders" on my layout. i bought an inexpensive adjustable height chair on rollers. i just sit on the chair, lower my head, and roll under the "duck under." hey, it works for me........
66 Date: 02/16/18 04:55 Re: Designing new layout, duck-under question and more... Author: calsubd My duckunder lasted 2 weeks before I went to a lift out,
Ed Stewart Jacksonville, FL Date: 02/16/18 07:20 Re: Designing new layout, duck-under question and more... Author: BAB Was at a friends layout in Montana, it in a 30x55 building and to follow your train he says you will walk 400ft. There is one duck under that requires the down on the knee deal the other just duck your head to walk under. Took a few runs for me to realize that if I stood on the other side of the low one it worked much better coming out of the main yard.
My own layout has no duck unders but to service or repair two different loops one at each end of it requires an automotive creeper. Works but I do look long and hard before going under. Date: 02/16/18 08:09 Re: Designing new layout, duck-under question and more... Author: JeffZCT I have seen some excellent vertical lift bridge designs on model railroads. If you have the wood working talent they open like a window. The only possible negative is that they need a frame on both sides of the opening.
Date: 02/16/18 10:45 Re: Designing new layout, duck-under question and more... Author: Jeff_Johnston I would highly recommend a lift or drop bridge as alternatives to a duckunder although we seriously considered a duckunder for one spot on our layout. Our layout uses two lift bridges, although technically one drops down and the other will lift up. They are a compromise that we can live with. In our example, they are both on infrequently-used routes rather than mainline trackage that's used by every train that runs. The lower bridge provides access to the lower South end staging yard via the helix, so it's only used when trains enter or leave the layout via staging. Both bridges span the gap in the only access aisle to the layout room. This lower-level drop bridge is shown in photo #1. You can read about the construction of this lift bridge in my article, "Trackwork for a fold-away access bridge," in the May 2008 Railroad Model Craftsman.
The upper bridge, shown by the location of the board in photo #2 because it's under construction, accesses the upper-level logging area. The upper level benchwork is about 68-1/2 inches high so technically we could have built in a "nod-under" that would be easy for most modelers to pass under without any significant crouching, but I'm 6'6 tall and at an age that makes me not want to build in any bend-down situations when I can avoid them. We chose a lift bridge because the logging area features a full array of switching operations, including a small woods staging yard that's more of a marshalling yard that's sceniced and part of the daily log train operations. With the upper lift bridge raised, the operator(s) can stand roughly where the bridge connects and have access, using movable footstools for average-sized people, to the logging area operations. The attached track plan, from my article in Kalmbach's "How To Build More Layout in Less Space," gives you a bit more perspective on how the access bridges fit into the big layout picture. The logging area plans have changed somewhat since that article was published. The trick, for us, is the upper lift bridge also includes the vertical curve transition from the 3-percent logging grade to the flat yard area. That aspect will be fun to engineer. Jeff Johnston www.trainvideosandparts.com 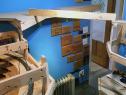 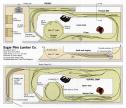 Date: 02/16/18 10:48 Re: Designing new layout, duck-under question and more... Author: SPDRGWfan Fizzboy,
Your room dimensions are very similar to my basement room in my townhome (10x18'). I wanted to maximize curves and maximum length trains etc. I actually squeezed in 11 staging tracks with lengths ranging from 13' shortest to 22' longest. Here are the staging tracks under construction photo 1 and photo 2, and main yard above under construction, photo 3. Cheers, Jim Fitch  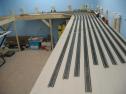 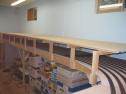 Date: 02/16/18 10:48 Re: Designing new layout, duck-under question and more... Author: Jimmies Lance Mindheim has an excellent removable bridge, with detail photographs, featured in the "how-to" on his website.
Jim Date: 02/16/18 10:55 Re: Designing new layout, duck-under question and more... Author: SPDRGWfan Additional photo's of what I fit into 10x18' With a design change, you could do a lift out on one side.
This layout I could run 20-25 car trains. The maximum grade (no-lix design) was 2.9% Minimum radius 32-inches. The staging yard radius curves are in the 36 to 38 inch range mostly. All turnouts #6 or larger. Staging track code 100, visible track code 83 and some code 70 in yard. Edited 1 time(s). Last edit at 02/16/18 11:02 by SPDRGWfan.  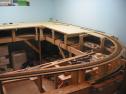  Date: 02/16/18 10:58 Re: Designing new layout, duck-under question and more... Author: SPDRGWfan Three more. Other side of yard and scenery going in on opposite side.
That's about as much as I could cram into an 18x10' space. Fizzboy has a slightly wider space so even better! Cheers, Jim Fitch    Date: 02/16/18 11:57 Re: Designing new layout, duck-under question and more... Author: railwaybaron SeaboardMan Wrote:
------------------------------------------------------- > Even a healthy you will tire of a duck under. > Your best bet is a swing up bridge ( 1x3 ) firmly > hinged on one end with guide pins on the other. > John Only consider a duckunder that is ADA compliant with person-in-wheelchair clearance, because eventually you may need it yourself! Date: 02/16/18 14:52 Re: Designing new layout, duck-under question and more... Author: Fizzboy7 Wow, thanks all for the wonderful info. It's clear no one likes duckunders. I wanted to consider a lifting piece, as suggested, but my fear is hiding the seams and not getting a good track connection (gaps). I've seen this on many layouts and the seam just seems too obvious. But may consider it anyway if there's a good way to hide it.
Thanks for all the links and photos. Very helpful and I may steal some ideas from them. My goals are long trains, long tangents, and reliable running. Got till the end of the year before my room is built, but I think now is the time to hammer all the plans and details out. Date: 02/16/18 17:00 Re: Designing new layout, duck-under question and more... Author: LarryDoyle I agree with the others to do whatever necessary to avoid duck-unders.
Here's how I handled it. https://www.trainorders.com/discussion/read.php?3,3599400,3599400#msg-3599400 -John Date: 02/16/18 18:16 Re: Designing new layout, duck-under question and more... Author: Bob3985 One of the members of our Sherman Hill Model Railroad Club, a fine carpenter, designed a section with a bridge that swings up on hinges on one end with a door closer for a means to be sure it is held down tight. And he wired cut off switches so that when the bridge is raised up it kills the power to both mains on both sides far enough back so that trains will not get into a raised bridge situation until it is lowered and trips the detector switches.
Bob Krieger Cheyenne, WY Date: 02/17/18 06:40 Re: Designing new layout, duck-under question and more... Author: BAB Also seems that if it isn't exactly perfect in fit why worry so much? The main thing is getting rid of having to duck under. Why should the layout suffer because it has a little seam? Doubt if other things will be perfect but if its done to that degree you will never finish it and it will be a long time before you even operate. Have fun don't stress so much.
Date: 02/17/18 07:08 Re: Designing new layout, duck-under question and more... Author: Dieselpower HI Jim,
I really like what you managed to accomplish in a relatively small space. The staging yard is huge. I am currently trying to build a layout and I have always wondered when I see a layout where the main deck is about 12" above the staging yard, how you would ever fix problem like buckled track or defective switch? I like the idea of 12" of clearance because it avoids a helix but it seems like it would have other maintenance issues. I would really like to get past this stage of my planning so if you have any thoughts I would appreciate them. Thanks Rodney Date: 02/17/18 07:49 Re: Designing new layout, duck-under question and more... Author: SPDRGWfan Dieselpower Wrote:
------------------------------------------------------- > I have always wondered when I see a layout > where the main deck is about 12" above the staging > yard, how you would ever fix problem like buckled > track or defective switch? I like the idea of > 12" of clearance because it avoids a helix but it > seems like it would have other maintenance issues. > I would really like to get past this stage of my > planning so if you have any thoughts I would > appreciate them. > > Thanks > Rodney I did have problems with buckling in a garage layout but it had temps ranging from 0 - 95 degree and humidity swings as well. In the basement shown in the photo's, humidity was limited to about 55% and temps mabye 50 - 70. No issues with buckling. I did have a 3-way turnout underneath which jammed and I literally cut a hole in the benchwork above to access it, and ended up removing it and re-installing. The clearance in the layout shown is only 7.5 above the rail. If you are going with 12-inches, that is much more generous should give you better access for maintenance. In my case, I simply didn't have room for a helix so I went with a nolix design and grade of 2.9% to ascend to the top and back down again. Two SD45's could pull 22 cars up with no problem. It would probably take 3 4-axle diesels. Cheers. |