| Home | Open Account | Help | 312 users online |
|
Member Login
Discussion
Media SharingHostingLibrarySite Info |
Model Railroading > Semaphore Install ProductsDate: 06/18/18 21:37 Semaphore Install Products Author: DelMonteX I've been working on a project for a while now. Mainly for the PSMRE (Puget Sound Model Railroad Engineers) layout at the Washington State History Museum. The plan from the beginning was to install signals, including Semaphores. We just didn't do the best job of planning for it. So the signal project is being done well after all the scenery was completed.
We decided what was needed was a method of drop-in/plug-n-play installation. After a lot of trial and error, a 7/8" hole became the standard, as it was the smallest hole that could accommodate our goals. Those goals were reached with 3D printing. While Tomar Signals and Semaphores are a great product, the product ends at "how do I install these to make them work". For the Semaphores and Train Order Signals, I designed mounts that accept the Tomar product, as well as 1 or 2 servo motors. PC board ties are used as a solder point, so more durable (and longer) wires can be used to reach the electronics. There are even tiny hooks to wrap the LED magnet wires around so there is no need to cut and strip those wires. The semaphore can then be setup off the layout using a Tam Valley Dual 3-way Servo controller. Once the controller is trained, the servo wires are disconnected and the semaphore can be installed on the layout and reconnected to the controller board. If there's a need for maintenance, then the entire assembly can be removed and repaired or replaced. We use Digitrax TL1's to power the LED's so we can turn them all on/off at once, since our layout is left on all the time. Alternatively the Tam Valley product can supply the power for the LED's. In the photos, you may note that the Double Blade Semaphore has a relay base. The Tomar product does not. I designed 3D plastic Relay bases to fit around the Tomar product. The Relay bases are available for purchase on Shapeways. The semaphore mounts will be soon. I also designed a mount for the Tomar Signals. It's not quite ready for prime time, but will be soon. 1) Side view of the Semaphore and mount, showing the LED wire solder points, without the wires for connection to the power source 2) Head on view. 3) The "waiting for approval" install at the layout. Once the height of the semaphores relative to the rail is agreed upon, they will be "permanently" installed and the scenery re-done. Steve Carter Gig Harbor, WA My Photography 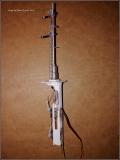 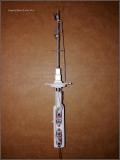 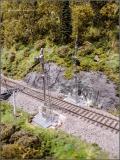 Date: 06/18/18 22:41 Re: Semaphore Install Products Author: NS7214 Dayum!!
Posted from Android Date: 06/19/18 09:59 Re: Semaphore Install Products Author: TCnR Great idea. A neighbor went a similar route to install a lead and connector on searchlight signals. Made a world of difference being able to unplug it from the Layout wiring then move it to the workbench for troubleshooting or reworking the modified searchlight signal. Much less complex but demonstrates how fixturing was a great help.
Date: 06/19/18 16:22 Re: Semaphore Install Products Author: atsf121 Spectacular work
Date: 06/19/18 17:23 Re: Semaphore Install Products Author: wabash2800 Thanks for sharing.
I'll be showing some of my work soon including a scale size operating semaphore on a cantilever signal bridge in HO. I model semaphores that were driven by a motor behind the signal head. From what I've seen, servos don't model that well as the motion is not smooth but I stand to be corrected. They look fine for combination motor and chain prototypes like the SP lower quadrant or mechanical semaphores though. I too will turn the lights on and off on my semaphores, because on the prototype the roundels don't appear to be lit in the daytime. Stay tuned. Victor A. Baird http://www.erstwhilepublications.com Edited 2 time(s). Last edit at 06/19/18 17:33 by wabash2800. Date: 06/19/18 19:57 Re: Semaphore Install Products Author: SP4360 wabash2800 Wrote:
------------------------------------------------------- > Thanks for sharing. > > I'll be showing some of my work soon including a > scale size operating semaphore on a cantilever > signal bridge in HO. I model semaphores that were > driven by a motor behind the signal head. From > what I've seen, servos don't model that well as > the motion is not smooth but I stand to be > corrected. They look fine for combination motor > and chain prototypes like the SP lower quadrant or > mechanical semaphores though. > > I too will turn the lights on and off on my > semaphores, because on the prototype the roundels > don't appear to be lit in the daytime. > > Stay tuned. > > > Victor A. Baird > http://www.erstwhilepublications.com SP's semaphore were approach lit and most of them had the voltage turned down on the bulbs so unless it was dark it was almost impossible to see if it was lit. They did not have a photocell or any other device to turn them on when it got dark. When I took a Maintainer position out of Carrizozo NM, first thing was to to get my house in order, check voltages, reflectors etc. I found most of the semaphores had the lamp voltage set around 5 1/2 volts. Great for water consumption in the old DMP9 battery banks, but a candle would have been better. So, voltage went up to 9.2, where it should have been, lenses and reflectors were cleaned and the the complaints started from the crews. That's right, they were too bright! They told me they ran on blade position at night too. Yeah right, maybe at 10 carlengths but not a mile away. Anyway, after a couple of weeks, things settled down and they would let me know whenever there was a bulb out, as it should be. Things were simpler back then. Date: 06/19/18 20:14 Re: Semaphore Install Products Author: EsPee1229 I especially like the blasting holes in the rock cut. Very nice touch.
Date: 06/19/18 21:49 Re: Semaphore Install Products Author: DelMonteX EsPee1229 Wrote:
------------------------------------------------------- > I especially like the blasting holes in the rock > cut. Very nice touch. Yes it is a nice detail. Not my work, we have a very talented scenery engineer. I'm attempting to put back one or two in the area where additional blasting was required to install the semaphore. Steve Carter Gig Harbor, WA My Photography Date: 06/23/18 14:59 Re: Semaphore Install Products Author: spnudge Officers hated semaphore signals. Couldn't pull a light out test with them. If you could see the indication of the blade, keep on going. We had some on the Siskiyous where the light wouldn't be fixed for almost a year, to hard to get to.
Nudge |