| Home | Open Account | Help | 292 users online |
|
Member Login
Discussion
Media SharingHostingLibrarySite Info |
Model Railroading > ST SD40T-2 – Inside the Beast – Phase 4 - “Front Wall”Date: 05/03/19 23:52 ST SD40T-2 – Inside the Beast – Phase 4 - “Front Wall” Author: tmotor Looking at the front wall of the model, a pair of ribs runs down the face of the wall. These match the location reasonably well, but are more pronounced on the prototype. The model ribs have a slight taper to them, which is “draft” required for ejecting the part from the mold.
Scribe a line into the floor to mark the location of each rib. (The floor will be covered later, so don’t worry about the scribe lines.) Remove these ribs, flush with the wall surface. Keep the lower left area free of scraping or filing marks, since it will be visible. Edited 1 time(s). Last edit at 05/04/19 00:12 by tmotor. 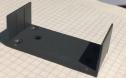 Date: 05/03/19 23:53 Re: ST SD40T-2 – Inside the Beast – Phase 4 - “Front Wall" Author: tmotor This is an image of the front wall of the prototype:
Edited 1 time(s). Last edit at 05/04/19 00:13 by tmotor. 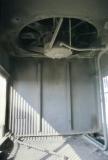 Date: 05/03/19 23:55 Re: ST SD40T-2 – Inside the Beast – Phase 4 - “Front Wall" Author: tmotor In the lower right corner is an access opening. A cover panel is installed onto the face of the opposite side of the wall. It is obscured by the shadows in the above photo, but is clearly seen in the image below.
With the cover panel removed, the outline of the square access opening is obvious. The right side of the opening is approximately ½ the distance between the rib and the edge of the wall. This right side is 0.110” from the edge of the rib. The opening is a 0.090” x 0.090” square. Edited 1 time(s). Last edit at 05/04/19 00:13 by tmotor. 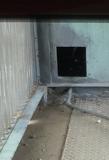 Date: 05/03/19 23:57 Re: ST SD40T-2 – Inside the Beast – Phase 4 - “Front Wall" Author: tmotor Merely scribing the dimensions of the square opening onto the wall is an option, but the cover panel is not flush with the wall. Instead, some 0.005” Evergreen sheet was glued to the face of the wall. A square cut-out in the lower corner of the sheet represents the access opening. MicroMark offers a chisel with a narrow (approximately 2mm) blade, which just happens to match the opening needed. Cut just inside the lines, then CAREFULLY square them up with a hobby knife. The stock wall surface exposed inside the square access opening represents the cover panel. Clamp the sheet against the handle of a small T-square to ensure it remains flat.
Testor’s model cement worked fine when gluing the 0.010” thick sheet to build-up the rear wall (in Phase 3), but for this 0.005” sheet it deformed the sheet. For the rear wall the glue was applied to the stock wall, and the sheet was positioned dry. However for the front wall the glue was applied to the backside of the sheet in order to ensure glue would not be applied to the area of the stock wall that would be exposed in the square opening. It appears the toothpick agitated the molten plastic when the glue was being applied to the back of the Evergreen sheet. Even with a solid flat metal surface clamped against it, the result looked like the surface of Mars. Turns out the opening needed to be a tad to the left anyway, so I decided to not salvage what was there. The surface was run over a flat file to remove the sheet and glue. The second time slow-setting CA was used (which won’t attack the thin plastic sheet) with much better results. The centerline of the square opening was matched with a line scribed onto the floor. This ensured the opening would be in the correct spot this time. Trimmed the outer edges of the sheet to match the stock wall, so it will mate with the shell as a friction fit. Edited 1 time(s). Last edit at 05/04/19 00:14 by tmotor.   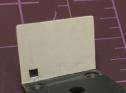 Date: 05/03/19 23:58 Re: ST SD40T-2 – Inside the Beast – Phase 4 - “Front Wall" Author: tmotor The ribs were cut from 0.01” x 0.02” Evergreen Strips, with the 0.02” side glued to the face of the wall. The ribs on the stock wall are a bit narrow, and tapered which made it even thinner as it went up the wall. The replacement ribs cast a much more realistic shadow. On the prototype the ribs stop a few inches shy of the very bottom. (The stock model has the ribs going all the way to the floor to simplify the mold design.)
The bottom of the ribs line-up with the bottom of the square access opening. An Evergreen strip 0.020” x 0.030” (0.030” side flat against the wall) was used as a spacer to keep the bottoms of the ribs a consistent 0.030” distance above the floor. Use the scribe lines in the floor to align the new ribs. A small T-square helped maintain plumb. The side edges of the wall are tapered to match the inside of the shell. Use the floor as a reference, NOT the tapered edges of the wall. Edited 1 time(s). Last edit at 05/04/19 00:15 by tmotor. 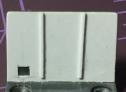 Date: 05/05/19 01:36 Re: ST SD40T-2 – Inside the Beast – Phase 4 - “Front Wall" Author: SD40T-2 Museum Quality 2.0?
'Can't wait to see your completed model... Cheers, Mark Date: 05/05/19 12:49 Re: ST SD40T-2 – Inside the Beast – Phase 4 - “Front Wall" Author: PHall Your problem with the .005" material warping is that you didn't wait long enough.
You have to wait until all of the liquid has evaporated, then you can put them together. The big dips are where there was "puddles". Date: 05/05/19 23:23 Re: ST SD40T-2 – Inside the Beast – Phase 4 - “Front Wall" Author: tmotor SD40T-2 Wrote:
------------------------------------------------------- > Museum Quality 2.0? LOL, indeed! ;-) Admittedly it is a bit over the top, but I've had these ideas rolling around in side my head for a while and had merely put them on my T-Motor Modeling Bucket List. I had assumed no mfg would offer another T-Motor, so the first order of business was to hide the gear tower on the Athearn version; and keep the rear truck powered. This was going to be a HUGE undertaking, so it was put on the back burner. When ScaleTrains announced this T-Motor, I was excited at the possibility they had saved me the trouble. Sure enough, when I got my first look at one I knew it is a WINNER! This advanced my T-Motor project to the front burner. Dave Date: 05/05/19 23:40 Re: ST SD40T-2 – Inside the Beast – Phase 4 - “Front Wall" Author: tmotor PHall Wrote:
------------------------------------------------------- > Your problem with the .005" material warping is > that you didn't wait long enough. > You have to wait until all of the liquid has > evaporated, then you can put them together. > The big dips are where there was "puddles". Attaching thin plastic material has always been an issue for me. If this can be a teaching moment, I'm all ears. ;-) The glue I used was Testor's Model Glue. So please help me understand the technique: First the glue is applied to the .005" material, and it is allowed to off-gass until it gets tacky? (Like when using contact cement?) Can glue be applied to just one surface, or do both surfaces need an application of the glue? Thank you in advance for lending me the benefit of your experience. Dave  Date: 05/06/19 09:26 Re: ST SD40T-2 – Inside the Beast – Phase 4 - “Front Wall" Author: PHall Do not put the liquid cement on the .005 styrene. You put it on the thinker material, wait until you don't see any liquid and then join the materials.
The object is to not have any "puddles" trapped between the surfaces when you join them. Edited 1 time(s). Last edit at 05/06/19 09:27 by PHall. Date: 05/06/19 10:58 Re: ST SD40T-2 – Inside the Beast – Phase 4 - “Front Wall" Author: tracktime I use Tamiya "Extra Thin" Cement for gluing .005 styrene sheet. Works well, especially when used sparingly.
Date: 05/06/19 14:16 Re: ST SD40T-2 – Inside the Beast – Phase 4 - “Front Wall" Author: tmotor 4thDistrict Wrote:
------------------------------------------------------- > I use MEK (Methyl Ethyl Ketone) that is delivered > using a #16 fine tip syringe bottle > ( https://hobbymasters.com/hobbymasters-stainless > -needle-point-applicator-bottle/ ). MEK is a > solvent that will slightly melt the contact > surfaces and when set, will blend the two pieces > into one. It flows better than water, sets > quickly, and if some lands on a surface, it will > evaporate without leaving damage if not disturbed. > Renowned modeler Jack Burgess of the famous > Yosemite Valley RR layout suggested this solvent. > In your case, I would have held the plastic sheet > to the floor side and applied the MEK to the joint > at the top. It would have flowed to the bottom, > providing a very thin, even distribution of > liquid. Make sure you use it with good > ventilation. > > Another tip: instead of modeling putty, I take a > scrap piece of styrene, puddle the MEK in the > middle, let it soften the styrene by swirling a > toothpick in the puddle, and the result is melted > styrene that can be applied to the gap. After it > sets, it will act like plastic and will sand > exactly the same way. Where putty fills in the gap > with a different material, this technique will > fill the gap with the identical material, much > like a gap in a steel welded joint will be filled > with melted steel and become the same > amaterial. > 4thDistrict - So instead of using the "liquid weld" glue (from Plastruct, or MicroMark), use MEK. Certainly will be cheaper. I like the idea of melting ABS as filler material. Should create an invisible repair. Nice! Thanks for the tip! ;-) Dave Date: 05/06/19 14:19 Re: ST SD40T-2 – Inside the Beast – Phase 4 - “Front Wall" Author: tmotor PHall Wrote:
------------------------------------------------------- > Do not put the liquid cement on the .005 styrene. > You put it on the thinker material, wait until you > don't see any liquid and then join the materials. > The object is to not have any "puddles" trapped > between the surfaces when you join them. PHall - Makes sense that the thicker material will be less affected. Thanks for the tip. ;-) Dave Date: 05/06/19 17:49 Re: ST SD40T-2 – Inside the Beast – Phase 4 - “Front Wall" Author: tmotor tracktime Wrote:
------------------------------------------------------- > I use Tamiya "Extra Thin" Cement for gluing .005 > styrene sheet. Works well, especially when used > sparingly. tracktime - I'll give it a try. Always been a big fan of Tamiya products. Thanks for the tip. ;-) Dave Date: 05/08/19 04:49 Re: ST SD40T-2 – Inside the Beast – Phase 4 - “Front Wall" Author: SPDRGWfan 4thDistrict Wrote:
------------------------------------------------------- > A quart of MEK > will last a lifetime and cost about the same as a > 1 ounce bottle of hobby type liquid cement. Of course you need to keep it tightly sealed or, being a VOC, it will evaporate from the container in much less than a life time! I had a small bottle and the plastic lid cracked - after I moved I pulled out the bottle and it was dry as a bone! |