| Home | Open Account | Help | 311 users online |
|
Member Login
Discussion
Media SharingHostingLibrarySite Info |
Model Railroading > It's WET! Finally some Water on the Onondaga CutoffDate: 02/14/20 10:01 It's WET! Finally some Water on the Onondaga Cutoff Author: RGDave After finally making time to envision all the details and research methods to add water to the layout, we now see that Snooks Pond outside Fayetteville, NY is fully 'hydrated'. This is the foreground scene along CP 277 on my Conrail Onondaga Cutoff, a shallow scene that has benefited quite a bit from recent scenery progress. I went back and forth on this for more than a year trying to decide just how to do it, and in fact it's still not complete (some waves will be added soon!) but it's far along enough now to share with you all.
1. First, I added some sculptamold banks to shape the edge of the pond. 2. Banks built up and curing. 3. Due to the too-close proximity of the signal bungalo to the water, I added a retaining wall to suggest the foundation of the tower that would have been here in the past. I feathered in the sculptamold around it. More! 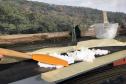 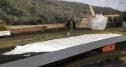 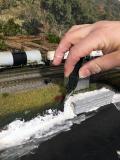 Date: 02/14/20 10:04 Re: It's WET! Finally some Water on the Onondaga Cutoff Author: RGDave 4. I built a 'dam' of clear acetate, cut from report covers, and secured it in place with clear adhesive caulk.
5. The area was painted a flat brownish-black and covered with static grass. 6. Here we are after some reeds, cat tails, and swamp grass is added to the banks and shallows. These are projects from Model Power, Martin Wahlberg, Noch, etc. More!  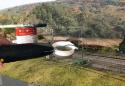 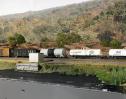 Date: 02/14/20 10:10 Re: It's WET! Finally some Water on the Onondaga Cutoff Author: RGDave 7. After everything dries, it's time to - GULP - pour the 'water.' I used EnviroTex Lite, a two-part epoxy, after doing some homework for the effects I wanted. I followed the directions exactly, warming the bottles ahead of time etc and had no issues. I used old sprue to guide the pour from the middle of the pond to the sides.
8. I had to tease the wet epoxy into the some of the smaller spots, which wasn't difficult. It levels out albeit with a bit of a wicking effect at the edges. 9. I put up aluminum foil 'tents' to keep dust out and let it cure for 72 hours, and the effect is striking once you see it in place! Going forward, I will take a small brush and flat brown paint along the edge to make some of the wicking disappear, and will come back over the deeper parts and add small ripples using modge-podge to get the look of a gentle breeze. It's not often still in Central New York! Enjoy & thanks for looking! There's some more detailed info on the blog if you're interested. ~RGDave https://onondagacutoff.blogspot.com/ 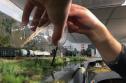 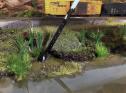 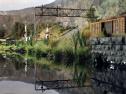 Date: 02/14/20 10:35 Re: It's WET! Finally some Water on the Onondaga Cutoff Author: NYSWSD70M Very nice!
Posted from Android Date: 02/14/20 10:40 Re: It's WET! Finally some Water on the Onondaga Cutoff Author: santafedan Very well done.
Date: 02/14/20 11:23 Re: It's WET! Finally some Water on the Onondaga Cutoff Author: algoma11 Excellent work, will you come do mine next?
Mike Bannon St Catharines, ON Date: 02/14/20 11:31 Re: It's WET! Finally some Water on the Onondaga Cutoff Author: mcdeo Great work, thank you for sharing the details and step by step.
Mike ONeill Parker, CO Date: 02/14/20 11:52 Re: It's WET! Finally some Water on the Onondaga Cutoff Author: SPDRGWfan Nice looking pond. What did you use for a bottom/base?
Edited 1 time(s). Last edit at 02/14/20 18:00 by SPDRGWfan. Date: 02/14/20 12:26 Re: It's WET! Finally some Water on the Onondaga Cutoff Author: Betsy My goodness Dave, you did such a fabulous job, I thought is was finished in the photo before you poured the "water!"
Elizabeth Date: 02/14/20 15:51 Re: It's WET! Finally some Water on the Onondaga Cutoff Author: atsf121 Dang that looks good!
Posted from iPhone Date: 02/14/20 20:14 Re: It's WET! Finally some Water on the Onondaga Cutoff Author: ChrisCampi Looks like you now have a great little place to cool off in during those hot summer months!
Date: 02/14/20 20:27 Re: It's WET! Finally some Water on the Onondaga Cutoff Author: grandroad Dave, you get a gold star.
Paul Brennecke Golden, CO Date: 02/15/20 09:04 Re: It's WET! Finally some Water on the Onondaga Cutoff Author: bnsfsd70 That looks great!
- Jeff Carlson Date: 02/15/20 09:05 Re: It's WET! Finally some Water on the Onondaga Cutoff Author: JUTower I can't help but to notice and appreciate the deliberate use of color saturation to enhance the perception of distance. The foreground is vivid, the background hills - the real ones - are less vivid, and the photo backdrop is intentionally desaturated to give the impression of a hazy summer day or perhaps just additional distance. Whatever it is, it works really damn well.
Date: 02/15/20 18:17 Re: It's WET! Finally some Water on the Onondaga Cutoff Author: holiwood That is very nice looking
Date: 02/15/20 18:29 Re: It's WET! Finally some Water on the Onondaga Cutoff Author: toledopatch RGDave Wrote:
------------------------------------------------------- > Going forward, I will take a small brush and flat > brown paint along the edge to make some of the > wicking disappear, and will come back over the > deeper parts and add small ripples using > modge-podge to get the look of a gentle breeze. > It's not often still in Central New York! Aha, but as is true in many places, it's often wonderfully calm right after sunrise in central New York before the wind picks up during the day thanks to daytime heating. So in conjunction with your daytime vs. nighttime operations, I'm counting on you to develop a method for your pond to be flat and beautifully reflective in the morning, but develop ripples or even waves in the afternoon! Date: 02/18/20 04:45 Re: It's WET! Finally some Water on the Onondaga Cutoff Author: RGDave All,
Thanks for the kind words and all the encouragement! This was a leap of faith project for sure - even with good directions available online and in print, it is a rather permanent step in a prominent area of the layout. Jim, the base was furniture-grade 1/4" plywood, with foam landform around the pond and all seams caulked. I used the sculptamold to blend in the banks. The base was painted flat black with thick first coat, and I came back once that was dry with a blend of deep, dark flat green that was blended along the edges with acrylic sienna brown to suggest shallows. My wife helped with that step as we had to make sure the blending happened before it dried - it was challenging to get a smooth blend but it came out well. Finishing steps were the various swamp grasses and plants ahead of the pour. Patch - temporary ripples - boy, that would be sweet, especially for photography and those operating sessions that go from dark to dawn to morning. Hmmm. :-) ~RGDave |