| Home | Open Account | Help | 350 users online |
|
Member Login
Discussion
Media SharingHostingLibrarySite Info |
Model Railroading > One way to fix Athearn's CA8,,,Date: 09/14/20 10:04 One way to fix Athearn's CA8,,, Author: binder001 Fo r 30+ years I have wanted a UP CA8 type caboose in plastic. Over the years I have had brass import versions, but wasn't impressed with their rolling qualities (or LACK thereof) plus the extra weight they add at the end of a train. You can imagine my joy when Athearn announced a UP CA8 in the Genesis line! Unfortunately the model has received some bad press due to the fit of the cupola against the car side. I was generally OK with the car as delivered, but have pondered several approached to making it look "better". The top photo shows an unmodified car with one that received a little minor surgery.
Like many modern modelers I finally read the instruction sheet to look at how the cupola might be removed. To my surprise the cupola has an extra outer sidewall! This will allow Athearn to tool up variations on the cupolas between early and late CA8s as well as the upcoming CA9 and yet-to-be announced CA10. So the REAL problem is a poor fit of this cupola side into its space on the car body. I decided to see about chamfering the lower part of that cupola wall and, in my opinion. it helps take away the "too wide" look. Plus, it doesn't take too long. I GENTLY pried at the cupola side with a #17 blade and gently worked it loose from the carbody. Warning: the two side window pieces like to launch themselves into space, so plan ahead! Once the cupola sides are free it's just a few minutes with danding sticks and sanding block to thin down the lower sides of the cupola walls. I found that the wind defelctors can be gently pried away and that makes it easier to sand the sides. I used a modelers' chisel to clean out the corners of the space on the car body. The cupola should be test fitted as you progress. I did all mine by eye, but I estimate that the final thickness of the lower cupola side wall is about 0.010" or so when you are done. On my cars the upper sides didn't need any sanding. On reassembly I glued the lower cupola sides in place first, trying to get good alignment. The tops will bow out slightly as the bottom is glued in, but they seem to fit right in when cemented into place. I'll add the usual caveat about not getting and cement on your fingers or clamps when adding solvent cement to a model with painted parts. My clumsy moments involved the side windows and I actually spent more time messing with them than on the rest of the project. Add the wind def;ectors and any other small details that might have been damaged from handling and you can be back in business. Athearn produced a nice caboose that is specific to UP. This doesn't absolve them of not correcting that part fit in the production sample. My only real gripe with Athearn is that they continue to use those crappy McHenry couplers on their premium Genesis line. I understand (but still don't like) their use in the RTR and Roundhouse lines, but Genesis SHOULD have Kadees! By the way, I was able change out the couplers on my CA8s and my two CB&Q NE13s with no problem. Gary B. Waverly, NE 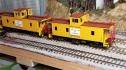 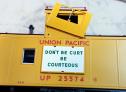 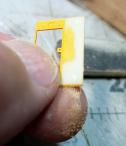 Date: 09/14/20 10:06 Re: One way to fix Athearn's CA8,,, Author: binder001 A couple more photos from the project.
Gary B. 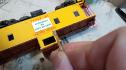  Date: 09/14/20 10:23 Re: One way to fix Athearn's CA8,,, Author: SPDRGWfan Gary,
Kudos and thank you for your discussion and photos on correcting the Athearn "too wide" cupola. Athearn has has taken the stance of absolving themselves of any errors or issues with a recent statement here and at another forum: "The cupola on our Union Pacific CA-8 caboose was measured from actual prototype drawings. It is the correct width. There is no error to correct." But as shown by your discussion and photos, improvements can be made and seeing is believing. I'm a little disappointed Athearn is taking this stance, rather than acknowledging there could be improvements made. It looks like modelers are going to have to correct the issue themselves, which is too bad considering the cost of these models. Date: 09/14/20 10:52 Re: One way to fix Athearn's CA8,,, Author: EL-SD45-3632 Can you post a before photo of what you did so I can see it before the fix? Thank you.
Date: 09/14/20 12:00 Re: One way to fix Athearn's CA8,,, Author: up421 Gary,
Thank you for posting a description and photos of what you did to address the issue. Cheers! Bob Date: 09/14/20 12:43 Re: One way to fix Athearn's CA8,,, Author: TCnR Interesting find, any idea what the thickness of the plastic is?
Perhaps it can be replaced with thinner styrene or flat brass. t4p. Date: 09/14/20 12:58 Re: One way to fix Athearn's CA8,,, Author: funnelfan Not sure why Athearn insists on giving itself a black eye by refuting a issue that is clear as day to anyone that bothers to look. But I think where they went wrong was insisting upon operating cupola side windows. In trying to cram inner and outer walls with a pair of sliding glass windows between them in such a way as they wouldn't show up in the end windows of the cupola, they had to add a few extra inches to the cupola width. And somehow that was preferable to just moving the end windows closer together. But hats off to Gary B for fixing the issue! I went through a similar issue with a Rapido Caboose recently, as shown in a thread below.
Ted Curphey Ontario, OR Date: 09/14/20 13:01 Re: One way to fix Athearn's CA8,,, Author: hawkfather A couple of shots of 25509 (6/27/82) in Salt Lake City. Weekend of the 3985 excursion.
John Hawkins  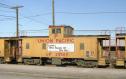 Date: 09/14/20 13:31 Re: One way to fix Athearn's CA8,,, Author: binder001 EL-SD45-3632 Wrote:
------------------------------------------------------- > Can you post a before photo of what you did so I > can see it before the fix? Thank you. It's hard to see, but in the top photo 25574 was modified and 25506 wasn't (at that time). The extra width is not as gross as some would have you believe from internet postings. The cupola sides on the factory model do stand proud at about 0.010 to 0.015 (just a personal estimate). After sanding, you can get the cupola to be flush with the body side. Not as tight and nea as the prototype photo shows, but IMHO it's an improvement and the method shown does not requre repainting (or even paint matching if you work carefully). Gary B. Waverly, NE Date: 09/14/20 15:41 Re: One way to fix Athearn's CA8,,, Author: tracktime Most Excellent, Gary B.! Thank you for sharing.. This is something I'll definitely have to try out.
For those curious, here is a shot of the bone-stock unmodified Athearn Genesis CA-8 I purchased the other day. Cheers, Harry Edited 1 time(s). Last edit at 09/14/20 17:59 by tracktime.  Date: 09/15/20 00:19 Re: One way to fix Athearn's CA8,,, Author: DGOLDE Once upon a time Bob Wiegner, creator of Details West, V. P. of the company that produced most of Athearn's tooling when Irv was alive and after Irv died, master model maker, and many other things told me and some others who worked on his model layout almost every Friday night in the 1970s and early 1980s one Friday evening after the layout work was done that drawings alone are worthless. That railroad drawings maybe a starting point for creating the working drawings to create a plastic model but you also need good photos and actual measurements of the real thing to produce working drawings that actually matches the prototype.
I would like to thank Gary B. for coming up with a way to correct Athearn's error on the UP CA8 cabooses Date: 09/16/20 10:29 Re: One way to fix Athearn's CA8,,, Author: Athearn_Trains Thank you for your feedback and the interesting story, Don. For the record, we also used measurements of the prototypes to determine the dimensions.
DGOLDE Wrote: ------------------------------------------------------- > Once upon a time Bob Wiegner, creator of Details > West, V. P. of the company that produced most of > Athearn's tooling when Irv was alive and after Irv > died, master model maker, and many other things > told me and some others who worked on his model > layout almost every Friday night in the 1970s and > early 1980s one Friday evening after the layout > work was done that drawings alone are worthless. > That railroad drawings maybe a starting point > for creating the working drawings to create a > plastic model but you also need good photos and > actual measurements of the real thing to produce > working drawings that actually matches the > prototype. > > I would like to thank Gary B. for coming up with a > way to correct Athearn's error on the UP CA8 > cabooses Date: 09/16/20 10:50 Re: One way to fix Athearn's CA8,,, Author: DGOLDE Do not forget using a many phoitos as possible. Bob told us that prototypes photos shows details on the real thing that may not show clearly on the drawings until the caboose/engine.car is actaully built.
Also do you have a copy of the excellent UP Hhistorical Society book titled Cabooses of the Union Pacific Railroad by Don Strack and James L. Ehernberger. This book explains very clearly the differencess between the various classes of UP steel cabooses. If you or anyone does not have a copy of this book there are copies still available from the UPHS. Price is $50 or $40 for members. Note I am not trying to be a salesman but when you, Athearn, announced these models a year ago I realized that I needed a reference book on UP cabooses and I found this book still available from the UPHS which surprised me since this book was published in 2002. I would have figured that it would have been out of print by now. Date: 09/16/20 11:42 Re: One way to fix Athearn's CA8,,, Author: binder001 Athearn_Trains Wrote:
------------------------------------------------------- > Thank you for your feedback and the interesting > story, Don. For the record, we also used > measurements of the prototypes to determine the > dimensions. Yes, it seems to my eyes that it is less about a measuring error as it is a simple parts fit problem. I build military models as well as model trains and parts fit problems seem endemic to all types of plastic models. It's too bad that it slipped through, but at least it's fixable. HOWEVER, I am curious about the truck journals. My three UP cabooses all came with friction bearing journal boxes (Athearn part G4563) where all CA8/9/10's came with roller bearings (Athearn part G4566). I HOPE there might be some parts made availble to fix this? The trucks as delivered are right for CA5. Gary B, Waverly, NE Date: 09/16/20 14:43 Re: One way to fix Athearn's CA8,,, Author: grahamline For the record, the parts diagram included with the CA8 lists three types of bearings and some other truck variations. Whether Athearn has the different parts available separately now or in the future is an open question.
Date: 09/16/20 20:19 Re: One way to fix Athearn's CA8,,, Author: DGOLDE Very good catch according to the UP caboose book both in the text and photos of CA8 afer delivery, between 1964 to 1968, the CA8 cabooses were delivered with roller bearing trucks. Does the latter paint scheme version of Athearn's CA* have roller bearing trucks?
Today I received my UP CA8 caboose number 25535 in as built paint scheme and the overhang is much less than one on the model shown on the Athearn Website and my model also has friction trucks instead of the correct roller bearing trucks. I sure hope that Athearn has the the correct roller bearing trucks available. Date: 09/16/20 21:20 Re: One way to fix Athearn's CA8,,, Author: grahamline The CA8 data sheet lists friction bearing (presumably a plain brass bearing) & friction bearing cap, oil-fill bearing w. oil-fill bearing cap, and roller bearings with a roller bearing cap plus a version with an axle generator. Their terminology, not mine. I have 25540 which has replica flip-up plain bearing journals. Mine is ATHG78514, which is described as a "early caboose" numbered 25540.
One of these posts had a link to PDF sheets of the variations. Edited 1 time(s). Last edit at 09/16/20 21:21 by grahamline. Date: 09/16/20 23:12 Re: One way to fix Athearn's CA8,,, Author: tracktime DGOLDE Wrote:
------------------------------------------------------- > Very good catch according to the UP caboose book > both in the text and photos of CA8 afer delivery, > between 1964 to 1968, the CA8 cabooses were > delivered with roller bearing trucks. Does the > latter paint scheme version of Athearn's CA* have > roller bearing trucks? I have a later-version Athearn Genesis CA-8, and it has roller bearing trucks. Cheers, Harry Date: 09/17/20 02:17 Re: One way to fix Athearn's CA8,,, Author: DGOLDE Grahamline,
Whose data sheet? All the photos of CA8s in the UP Caboose book show these caboose riding on roller bearing trucks. The text in the section of the book about the CA8 "class" the authors state the CA8s were the first class of UP cabooses delivered with roller bearing trucks. Lastly the UP railroad drawing dated 6-19-64 presented in the book in the data section say that the journals are roller bearings from Timken. Just a side comment I think that is strange that UP one of the first users of roller bearings on all their modern steam did not order all their classes of steel cabooses built after the CA3s and CA4s with roller bearings. Harry, Should we just send the friction bearing trucks to Atheran and ask them to send us the correct roller bearing trucks for our early version or really as built CA8 cabooses? Date: 09/17/20 04:42 Re: One way to fix Athearn's CA8,,, Author: binder001 I called Athearn for some parts. I got the usual very nice person on the phone. I explained the problem and asked if the had the different bearing caps (these are separate parts on these models). Unfortunately they don't. Maybe they could bring some in with next years' CA9s?
Gary B. Waverly, NE |