| Home | Open Account | Help | 304 users online |
|
Member Login
Discussion
Media SharingHostingLibrarySite Info |
Model Railroading > New 3D Printer (Part 1) – New Learning CurveDate: 04/05/21 01:44 New 3D Printer (Part 1) – New Learning Curve Author: tmotor This is the 2nd chapter on my recent experience with 3D printers. Last year I purchased an AnyCubic “Photon S” 3D printer, and documented my journey. This year I upgraded to a Phrozen Sonic Mini 4K 3D printer.
For those that have not seen the threads from last year, you can search for “3D Printer” with “tmotor” as the author. There are 20 parts to that series. It not only outlines my experience, but also explains the basics of 3D printing (as I understand it). I won’t repeat that background here, and will assume the reader is up to speed on 3D printers. As with any new technology, advances will eventually render equipment obsolete. My Photon S printer is only a year old, and still works, but can’t hold a candle to the Phrozen Mini. For basically the same price, I now have a 3D printer with higher resolution. Does this matter? YOU BET! When printing parts that are highly detailed, the parts have crisp edges and amazing detail. This is an HO Scale Tie Plate. Not only are there holes for the spikes, but the holes are square! INSANE!! :-0 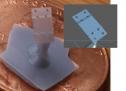 Date: 04/05/21 01:44 Re: New 3D Printer (Part 1) – New Learning Curve Author: tmotor When I first printed the Tie Plate, I had low expectations. I assumed the square holes would be too difficult, and the best I could hope for would be reasonably well-defined oval holes. Though the printer specs implied a high level of detail is possible, that is all theory. To my utter amazement, the Tie Plate detail was rendered faithfully!
Though metal etching can create parts that are similar, they tend to lack the raised flange (to help maintain the rail’s gauge), and are on the thin-side. This 3D printed part is as close to the prototype as I have ever seen in a Tie Plate as an individual part. Not only is this exciting for printing Tie Plates, but opens-up possibilities for part details that were previously only possible with injection molds. How can it do that? The secret is the LCD screen. It has twice the number of pixels, and they are closer together. The LCD of the Phrozen Mini has 4K pixels, vs. 2K for the Photon S LCD. Also, the XY distance between the pixels on the Mini is 35 microns, vs. 47 micros on the Photon S. The earlier LCD screens were color, but these 4K LCDs are monochromatic. A black and white silhouette is all that is needed to create the mask. Monochromatic LCDs are also more resistant to the UV light generated by the LEDs shining through them; so they will last longer. This allows the LEDs to be brighter, which reduces the exposure time. The Photon S required about 6 seconds per layer, but the Phrozen Mini only needs 2 seconds with the same resin. It also can have a layer as thin as 10 microns, vs. 50 microns for the Photon S. Thinner layers + higher resolution = Insane Details. At first I thought the shorter exposure time would mean part runs would be 1/3 the time, but I couldn’t resist taking advantage of the thinner layers. Reducing the layers from 50 to 20 microns requires about the same time to print, even with a 2 second exposure time. But I have plenty of time, and the resulting parts are worth the wait. If I want to produce the same parts in repeated runs, I will increase the thickness of the layers as a test to see if it makes a difference. If not, fine, run with fewer layers. However, if there is a difference, I back it down to 20 microns. (So far, I have not printed a part that requires 10 microns, but it is nice to know that is an option for future parts.) The Phrozen Mini does pay a price for that extra resolution, which is a smaller Build Volume (hence the name “Mini”). Most manufacturers kept their XY resolution around 50 microns when they went to monochrome 4K LCDs, but Phrozen offers the Mini for those wanting more detail in their parts. Am I ever glad they did! The Build Volume of the Mini is slightly less than the Photon S, but is a trade-off I am willing to accept when parts with this high level of detail are possible. I’m sure in the future there will be an 8K LCD, which would increase the Build Volume, but for now I’m happy to FINALLY see the details in my CAD geometry printed as a part I can hold in my hand. I will add a few more threads for this new series that share some things that I have discovered with the Phrozen Mini printer. They will cover some fine-tuning I have made to my skills at printing 3D parts. Edited 6 time(s). Last edit at 04/05/21 03:00 by tmotor. Date: 04/05/21 05:04 Re: New 3D Printer (Part 1) – New Learning Curve Author: SeaboardMan That's pretty amazing. Not that I'll ever have one but if you wanted to mass produce those how many in a layer can you print and how long would it take?
john Date: 04/05/21 05:32 Re: New 3D Printer (Part 1) – New Learning Curve Author: briancdn Could you specify the resin and settings that you used for the tie plates? I also have a Mini, but I'm not getting that reolution in my prints.
Looking forward to hearing more about your progress with the Phrozen Mini. They now have a larger one with a 9.5" print area. Brian N. It may be time for a new category on T/O just for 3D printing. We could all learn a lot from shared experience. I know thare are Facebook groups on the subject Edited 1 time(s). Last edit at 04/05/21 05:39 by briancdn. Date: 04/05/21 07:26 Re: New 3D Printer (Part 1) – New Learning Curve Author: tmotor SeaboardMan Wrote:
------------------------------------------------------- > That's pretty amazing. Not that I'll ever have > one but if you wanted to mass produce those how > many in a layer can you print Hey John! Those Tie Plates are pretty small. I would create 10x10 clusters of them and then duplicate them across the Build Plate. Probably could print 200 at a time. .>and how long would > it take? Each run would be less than 2 hours. To maximize production, a scaffold could be created, and the clusters would be stacked 4 high. This way a single run could begin when you go to sleep, and you wake up in the morning to a full Build Plate. Dave Date: 04/05/21 07:54 Re: New 3D Printer (Part 1) – New Learning Curve Author: tmotor briancdn Wrote:
------------------------------------------------------- > Could you specify the resin and settings that you > used for the tie plates? I also have a Mini, but > I'm not getting that resolution in my prints. > > They now have a > larger one with a 9.5" print area. > > Brian N. > > It may be time for a new category on T/O just for > 3D printing. We could all learn a lot from shared > experience. I know there are Facebook groups on > the subject Hey Brian! > Could you specify the resin Elegoo Standard Gray https://smile.amazon.com/gp/product/B07Z986566/ref=ppx_yo_dt_b_asin_title_o01_s00?ie=UTF8&psc=1 >and settings that you > used for the tie plates? Please find a snapshot (below) of the "Print" tab in Chitubox, which shows the Setting used. Also, a snapshot of the "Advanced" tab, which shows the Anti-Aliasing selected, and cranked all the way up to 8. Other than those, the Settings of the other tabs are defaults. >I also have a Mini, but > I'm not getting that resolution in my prints. The only other thing I can think of is I have wrapped my Mini in an electric blanket, and kept it at nearly the max setting. The resin doesn't have a bad smell, but the IPA is not my favorite thing to smell, so I keep it in the garage (unheated). > They now have a > larger one with a 9.5" print area. > That is the big brother to the Mini, they call the Mighty. It does have a larger 9.5" (diagonal) 4K LCD, but the XY resolution is 52 microns https://phrozen3d.com/products/sonic-mighty#specs > It may be time for a new category on T/O just for > 3D printing. We could all learn a lot from shared > experience. I did suggest it to Todd Clark last year. He suggested I start a group.io just for Model Railroaders instead. That would work, since trying to do a search in Shapeways or other similar sites is hit and miss for Model Railroad related items. Dave D. Edited 3 time(s). Last edit at 04/05/21 08:00 by tmotor.   Date: 04/05/21 08:00 Re: New 3D Printer (Part 1) – New Learning Curve Author: aehouse At my age, when I encounter the term "learning curve" in relation to new technology I stop right there. I'm happy that 3D printing is evolving so fast and producing such terrific products, but I'm more than happy to purchase any I need from people who want to wrestle with that curve and chase after ever-more-exotic technology.
Art (old Fart) House Date: 04/05/21 08:25 Re: New 3D Printer (Part 1) – New Learning Curve Author: tmotor aehouse Wrote:
------------------------------------------------------- > At my age, when I encounter the term "learning > curve" in relation to new technology I stop right > there. I'm happy that 3D printing is evolving so > fast and producing such terrific products, but I'm > more than happy to purchase any I need from people > who want to wrestle with that curve and chase > after ever-more-exotic technology. > > Art (old Fart) House Hey Art! > At my age, when I encounter the term "learning > curve" in relation to new technology I stop right > there. LOL! I don't blame you. When I was struggling with my Photon S printer last year, I nearly chucked it off of a cliff. > I'm happy that 3D printing is evolving so > fast and producing such terrific products, but I'm > more than happy to purchase any I need from people > who want to wrestle with that curve and chase > after ever-more-exotic technology. Here's one Modeler that started a website for parts he printed for himself. Cool idea. He generated the geometry of the part for his own use. Might as well offer it to others. https://gothamrailmarine.com/3d-printed-parts/ Dave Donaldson Edited 1 time(s). Last edit at 04/05/21 08:26 by tmotor. Date: 04/05/21 10:13 Re: New 3D Printer (Part 1) – New Learning Curve Author: BAB I am also into 1/14 scale semi trucks and most of what is printed for them is crap way too rought taking too much time to finish. Also the price for a cab is around 200.00. Know all takes time to set up and do but finished product is too labor intensive. I bought from a fellow ratchet tie downs for my semi trailer. They were great in quality two piece designed with mounting holes in 1/14 scale so know even some of the older printers can do the job. Will be great to see if those will update there printers and give us who dont want to use filler and thick primer with the resulting sanding can get items.
Date: 04/05/21 11:57 Re: New 3D Printer (Part 1) – New Learning Curve Author: tmotor BAB Wrote:
------------------------------------------------------- > I am also into 1/14 scale semi trucks and most of > what is printed for them is crap way too rought > taking too much time to finish. Also the price for > a cab is around 200.00. Know all takes time to set > up and do but finished product is too labor > intensive. I bought from a fellow ratchet tie > downs for my semi trailer. They were great in > quality two piece designed with mounting holes in > 1/14 scale so know even some of the older printers > can do the job. Will be great to see if those > will update there printers and give us who dont > want to use filler and thick primer with the > resulting sanding can get items. If the new printer accepts the same file format, it is relatively seamless. Otherwise, take the original CAD file, run it through the Slicer, and feed it to the new printer. Date: 04/05/21 15:13 Re: New 3D Printer (Part 1) – New Learning Curve Author: briancdn tmotor Wrote:
> I did suggest it to Todd Clark last year. He > suggested I start a group.io just for Model > Railroaders instead. That would work, since > trying to do a search in Shapeways or other > similar sites is hit and miss for Model Railroad > related items. > > Dave D. > Thanks very much for sharing this information Dave, much appreciated. Brian N. Date: 04/07/21 06:39 Re: New 3D Printer (Part 1) – New Learning Curve Author: BAB tmotor Wrote:
------------------------------------------------------- > BAB Wrote: > -------------------------------------------------- > ----- > > I am also into 1/14 scale semi trucks and most > of > > what is printed for them is crap way too rought > > taking too much time to finish. Also the price > for > > a cab is around 200.00. Know all takes time to > set > > up and do but finished product is too labor > > intensive. I bought from a fellow ratchet tie > > downs for my semi trailer. They were great in > > quality two piece designed with mounting holes > in > > 1/14 scale so know even some of the older > printers > > can do the job. Will be great to see if those > > will update there printers and give us who dont > > want to use filler and thick primer with the > > resulting sanding can get items. > > If the new printer accepts the same file format, > it is relatively seamless. > Otherwise, take the original CAD file, run it > through the Slicer, and feed it to the new > printer. Sorry I dont have one rely on others to sell products that can be used with little or no rework. Also there is no way to have any details on them due to the amout of rework needed. I spent over 100.00 on the parts for my truck as others were buying them and found how poor the finish was and finally gave up on it. Looked later at some pix other had of theres and you could clearly see every print line I guess they are called. So they would be a ten foot scale model. Date: 04/07/21 07:28 Re: New 3D Printer (Part 1) – New Learning Curve Author: RRTom Thanks tmotor for these posts.
Got a simple 3DP but haven't had time to use it yet. The possibilities are great as you note. Date: 04/07/21 08:18 Re: New 3D Printer (Part 1) – New Learning Curve Author: tmotor RRTom Wrote:
------------------------------------------------------- > Thanks tmotor for these posts. > Got a simple 3DP but haven't had time to use it > yet. The possibilities are great as you note. Hey RRTom! > Got a simple 3DP but haven't had time to use it > yet. It took me a while before I could run my first 3D printer. It sat in the box while I watched videos and read manuals. Hands-on experience is invaluable, and you will gain lots of confidence when you are holding a part you printed in your hand. One bit of advice is if the printer you have is a Photon S, and it is new, and it came with resin, do NOT use the resin that came with it. That resin is from a bad batch. (Guess how I know this...) Level the Build Plate, shake the resin, pour it in the Vat, and print a part. You will never look back. > The possibilities are great as you note. This Phrozen Mini has turbocharged my modeling ability, and energized my desire to learn more about Fusion 360 to create geometry for parts I want to print. It is a total Game Changer. A quantum leap. Being able to print parts that I design, with the quality of injection molds, in my garage, UNBELIEVABLE!! Dave D. |