| Home | Open Account | Help | 246 users online |
|
Member Login
Discussion
Media SharingHostingLibrarySite Info |
Model Railroading > New 3D Printer (Part 7) – CalibrationDate: 04/22/21 00:28 New 3D Printer (Part 7) – Calibration Author: tmotor This is Part 7 of a series on my recent experience with a Phrozen “Mini 4K” 3D printer. (Parts 1 thru 6 were posted earlier.)
(A shout-out to 4thDistrict for mentioning this concept in an earlier post.) Each 3D printer will have different characteristics, as will resins. Trying to determine the Sweet Spot of how long to expose each layer can be an Easter Egg Hunt. I was using the NSC Well Car as my test part, and looking at how well the different features printed. Adjusting the exposure time up or down, to see if that makes a difference. However, there is another way that takes less resin and less time per print. The YouTuber “3D Print Farm” has been a great source of inspiration and information. His advice is pretty solid, and presented in a user-friendly manner. In this video he explains the use of a test part that is specifically designed to calibrate a resin to your printer. In the comments section, he provides a link to download the .STL file, so it can be imported into your Slicer. https://www.TUBE.com/watch?v=r9GwPEJ8Lq8 (You will need to substitute "youtube" for the "TUBE" in that URL, and cut-n-paste that into your browser, since TrainOrders won’t allow live links to YouTube. BTW, if someone has a work-around to this, please do tell. I spent a while trying different permutations to get it to work, but right before I save the changes, the live link to youtube is automatically removed.) The key is the center of the Infinity symbol, where the points meet. However, the circles along the left side are also an indicator. After using whole seconds to find the basic the range, fractions of a second can be used to fine-tune the accuracy of the part. 2 Seconds The top 4 circles did not print on the part, and remained on the FEP. 2.5 Seconds Three more circles appeared, but the very top circle was still on the FEP. 3 Seconds All of the circles now printed properly. 3.5 Seconds The center of the Infinity Symbol is beginning to blend, which implies it is being over-exposed. Edited 18 time(s). Last edit at 04/22/21 13:02 by tmotor. Date: 04/22/21 00:29 Re: New 3D Printer (Part 7) – Calibration Author: tmotor So approximately 3 seconds seems to be a winner. It could be fine-tuned to get closer to 2.5 seconds (such as 2.75 seconds), which could save time on a long print with nearly 4,000 layers. The Tie Plate did fine at 4 seconds, but 3 seconds was not enough time (presumably because the part is very thin). So the 3 second exposure time is merely a guideline, for Elegoo Standard Gray resin on a Phrozen Mini. Use it as a starting point, and adjust as necessary to obtain good results. The test part is “flat” and each print run is relatively short, like 20 minutes. I labeled each part (using a Sharpie) with the exposure time on the front, then on the backside noted the resin and printer, for future reference.
Blobs The downside of these test prints is some are purposely underexposed to find the low-end of the exposure range. This means there will be blobs on the FEP. When I perform this test again in the future (for another resin), I will be sure to use a Vat with an old FEP that is nearly ready to be replaced. When the small circles stayed on the FEP, they are exposed through multiple cycles and are tough to remove. The rubbing to remove them dimpled the FEP. To avoid that defect in the FEP, the test part is merely moved to a different part of the Build Plate, so more test parts can be printed. But now that the test parts are done, the FEP will need to be replaced. AnyCubic If you have an AnyCubic printer, such as the Photon S, a different test print file comes with their printers (loaded on the thumb drive). It is sophisticated, and has duplicate test parts side-by-side. Each part will be exposed for a different length of time, during the same print run. Pretty neat trick! I have no idea how to perform this feat of magic with the Chitubox Slicer, so I will just use the test part shown in the video and print them one at a time. It isn’t as high-tech, but gets the job done. Edited 9 time(s). Last edit at 04/22/21 08:15 by tmotor. 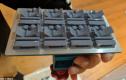 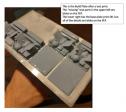 |