| Home | Open Account | Help | 245 users online |
|
Member Login
Discussion
Media SharingHostingLibrarySite Info |
Model Railroading > Building Bridges - Part 2Date: 10/07/21 16:36 Building Bridges - Part 2 Author: CNW Since January of this year, I've been involved with building a new section of my HO scale layout. In a nutshell, my layout is based on the C&NW's Winona Subdivision in southeastern Minnesota in the 1976-era. The new part of the layout is based on the area west of Winona, MN, where the railroad climbed a westbound 1.7% grade through rugged terrain out of the Mississippi River Valley. The layout was built like the prototype, with the 1.7% grade. I'm about 90% finished with the new section, which has a couple of neat bridges. Here is bridge M-31 which was built using two Micro Engineering 50-foot spans. The abutments and pier were scratchbuilt using PVC ceiling tile material. Follow the link below to see my post that shows the abutments under construction:
https://www.trainorders.com/discussion/read.php?3,5267744,5267744#msg-5267744 In the future, I hope to make additional posts showing more details of my new layout section. Dennis Edited 1 time(s). Last edit at 10/07/21 18:26 by CNW. 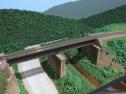 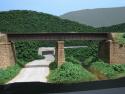 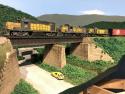 Date: 10/07/21 17:17 Re: Building Bridges - Part 2 Author: Frisco1522 Your work is impeccable!
Date: 10/07/21 17:27 Re: Building Bridges - Part 2 Author: BNModeler Boy is that beautiful!!!!
Date: 10/08/21 06:55 Re: Building Bridges - Part 2 Author: boejoe Great weathering job on the motive power.
Date: 10/08/21 11:51 Re: Building Bridges - Part 2 Author: SP1984 Incredible looking scene!!! Just beautiful!! How deep is the bench-work at this location? To my eye it has a lot of visual depth.
Date: 10/08/21 14:49 Re: Building Bridges - Part 2 Author: SP4360 Very nice and convincing scene.
Date: 10/08/21 15:18 Re: Building Bridges - Part 2 Author: LarryDoyle PVC Ceiling Tile. What a concept! I rushed out to Menards and bought some today, pushed my wifes stuff aside in HER workroom and started playing with it. You've solved a problem for me - how to model a cut stone (ashlar) structure for a feed mill on my G scale road.
Thanks!! -John aka Larry Doyle Date: 10/08/21 15:42 Re: Building Bridges - Part 2 Author: CNW SP1984 Wrote:
------------------------------------------------------- > Incredible looking scene!!! Just beautiful!! How > deep is the bench-work at this location? To my eye > it has a lot of visual depth. The benchwork is 12" deep at that location. The narrow benchwork keeps the amount of scenery to a minimum. Dennis Date: 10/08/21 16:58 Re: Building Bridges - Part 2 Author: dmaffei CNW Wrote:
----------------------------------------------------- > The benchwork is 12" deep at that location. The > narrow benchwork keeps the amount of scenery to a > minimum. And when it's done correctly like yours with backdrop, it looks wider than 12 inches. Nice job! Date: 10/08/21 20:17 Re: Building Bridges - Part 2 Author: UPguy Awesome Work!
Date: 10/09/21 10:46 Re: Building Bridges - Part 2 Author: RFandPFan Excellent modeling!
Date: 10/09/21 14:27 Re: Building Bridges - Part 2 Author: TomG CNW what are using for lighting in the third picture? Spot on for brightness and color.
Date: 10/09/21 16:19 Re: Building Bridges - Part 2 Author: CNW TomG Wrote:
------------------------------------------------------- > CNW what are using for lighting in the third > picture? Spot on for brightness and color. The third photo was taken after I installed the 3000k flood lamps. Dennis  |