| Home | Open Account | Help | 203 users online |
|
Member Login
Discussion
Media SharingHostingLibrarySite Info |
Model Railroading > BNSF 72’ Frostline Reefer (Part 9) – Riveted Plug DoorsDate: 11/11/22 00:00 BNSF 72’ Frostline Reefer (Part 9) – Riveted Plug Doors Author: tmotor This is Part 9 of a series on the BNSF 72’ Frostline Reefer project. (Parts 1 thru 8 were posted earlier.)
Plug Doors have been around for decades. Youngstown Steel Door (YSD) set a new standard with this very innovative design. As the name implies, the door acts like a plug to “cork” the door opening (vs. the usual sliding door). Being able to create a reliable seal protects the load from the elements. For reefers, it keeps the cold in, and the heat out. All BNSF Frostline Reefers have a 12’ YSD Plug Doors installed. There are 3 versions: 1) Riveted construction. 2) Riveted/Welded construction, with exterior insulation on the upper 2/3rds. 3) Welded construction (on the Econo Frost units), no extra insulation. Rib Cage The most obvious features are the vertical ribs along each side, and the 4 horizontal ribs in-between. What is not so obvious is how they are assembled. Upon close examination, I was able to mentally disassemble it, with a few unexpected discoveries. I had assumed the ribs were rectangular tubular steel, but instead they are formed sheet metal. I had assumed where the ribs intersect, they were butt-welded, creating a flat transition across their faces. However, the horizontal ribs slide into a notch in the vertical ribs, and they overlap. The flanges are cut so they do not overlap each other. The flanges are butt-welded where their edges meet. The ribs are formed from sheet metal that is 1/8” thick. In order to keep the flanges so they meet edge-to-edge, the vertical ribs are formed to stand 1/8” farther away from the door (than the horizontal ribs). So, even though the vertical ribs overlap the horizontal ribs, all flanges are in the same plane. This allows the flanges to form a flat surface to attach the face (sheet metal) of the door. Door Rods On a container (or semi-trailer), the doors have locking rods to secure the doors. These are solid rods that rotate within the brackets that hold them against the door. Along one vertical edge of the door are hinges that bear the weight of the door. The locking rods do not carry any of the door’s weight, but merely keep the door closed and locked shut. Though a Plug Door might look like a larger version of a door on a container, the design is very different. There are a pair of large tubes running the height of the door. The tubes are static, and do not rotate. The Door Rods inside the tubes do rotate. The horizontal ribs have a half-moon notch cut in them to cradle the tubes. A bracket is attached over the tube to secure it to the rib. These tubes are 2” diameter, and very stout. They not only become the “hinge” to open the door, but will bear the entire weight of the door in the open position. Open Sesame Spinning the Handle engages a gear train that drives a pair of crank arms, which shove against the pivot on the Door Rods to rotate them. As the Door Rods rotate, short arms (at each end of the Door Rod) push the door away from the car. The entire door is now a few inches away from the car, and suspended from the short arms attached to the ends of the Door Rods. The upper arms ride in the overhead guide track. The lower arms rest on large rollers that ride on the door rail. Disengage the lock (on the left roller), and the door can now be pushed along the door rails. At the right-end of the door rail is a locking mechanism. The door travels down the door rail until it engages this lock (on the right roller). The door is now safely locked in the in the open position. This BNSF video discusses the operation of a plug door. www.youtube.com/watch?v=LXg7Jg5Ilfw (Copy and paste that into a browser. TrainOrders does not allow live YouTube links.) Feel the Heat The Frostline Reefers with plastic roofs have Plug Doors with riveted construction. Old school thinking was that welding metal will always cause a warp. Rivets introduce no heat, and keep the door as flat as possible. This is critical to maintaining a positive seal along all 4 door edges. However, the use of an alternative welding techniques has changed this. The Econo Frost doors do not use rivets, but are welded. Instead of using a continuous weld bead, short (about 2”) beads are welded, with 6” (or more) “skipped” in-between the 2” beads. The pattern is similar to stitching with a thread and needle; hence the name “stitch welding”. This introduces a minimal amount of heat, so warping is controlled. The mini-welds are made at the edge of the flange, so there is little to no effect on the rib that is 1.5” away. The flange acts like a heat sink, and wicks-away the heat before it can warp the rib. Stitch welding will be faster than installing rivets. (No holes to drill. No rivets to line-up with the riveting equipment.) The welding could be performed by robots, making the process not only faster, but more consistent. Seals All Plug Doors have a weather strip seal around the perimeter of the door. The seal is attached with small bolts. The bolt shaft and nuts are visible on the outside of the door. If the seal becomes worn, the nuts are removed, and the old seal is replaced. Super-Detailed DIY Parts If this were a scratch building project, the best option was to use a super-detail part for the Plug Door, or start with the shell of a donor car for a kitbash. The trick is having enough in stock of the design that most closely matches the prototype. Until about a year ago, this would have been my only option. However, now, by investing some CAD time, the geometry can be generated to EXACTLY match all 3 Plug Door versions. The level of detail in the geometry is only limited by the time invested in generating it. (Do you want to add rivets? Where? What size? How many?) Also, the geometry for the part can be “reused” for free as many times as you like; now or on future projects. The geometry can also be the basis of other variants, so a similar part doesn’t have to be started from scratch. I prefer the Door Rods not be molded into the face of the door, but stand away from the door as it does on the prototype. The Handle should also stand away from the door. They cast shadows that add to the visual 3D quality of the model. Of course, the Handle is fragile if scale sized. If the car is handled often, the Handle may become damaged. Get it Handled To deal with this, here are a few possible options: -Make the Handle a separate part, so it is easier to replace. -Instead of being a 3D printed part, it could be an etched metal part, which would be quite robust. However, to keep it from being too thin, the sheet it is etched from would need to be thick. -3D print the Handle a bit beefier than scale, so it can better resist abuse. -Mold the Handle into the door, which makes it practically bullet-proof. (This is what ExactRail did.) For an initial run, I plan to print the Handle in-place, scale sized. Some tests will be run to see how much abuse it can take before failure. Most materials get weaker as the profile gets thinner. Compared to ABS, I have been impressed with most 3D resins’ ability to bend, but not break, given the same thin cross-sections. (Grab irons come to mind.) Shooting Gallery On previous trips to gather measurements, I neglected the Plug Doors, other than shots to document the lettering. I had assumed an off-the-shelf Plug Door would be used, so detail shots and measurements of the prototype doors were minimal. (This was is the days of film cameras, when I would think twice before expending a frame of film. Of course, now with digital, I practically hold-down the shutter button as I walk around.) On a recent trip to Bakersfield, I shot images of every nook and cranny of all 3 versions of the Plug Doors. For good measure, I also shot close-up video, with narration of observations and measurements. Combined with the measurements K-Pack shared (Thank You, Kevin!), that oughta do it. :-D Dave Edited 2 time(s). Last edit at 11/11/22 00:13 by tmotor. 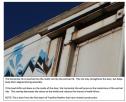 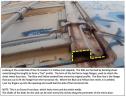  |