| Home | Open Account | Help | 300 users online |
|
Member Login
Discussion
Media SharingHostingLibrarySite Info |
Railfan Technology > Question DPI's for slide scanningDate: 04/16/17 14:47 Question DPI's for slide scanning Author: highgreengraphics Question - On a Nikon Coolscan LS-5000, should you scan slides at 4000 DPI to try to get maximum clarity, or does this large amount of DPI's tend to magnify or over-clarify the grain in the slide? I can see that amount of DPI's mapping out grain and making it look grainier whereas a lesser DPI setting would tend to meld it together more, possibly with resulting clarity loss. I am getting some grainy-looking results that appear to be more than the FUJI RD-100 slide film I started with. Does anyone who is scanning slides have a favorite DPI setting, and if so, why? Am I scanning too sharp? (On here I did even out the nose top by averaging in Photoshop, but the sky is still grainy-appearing even though I hit the noise-reduction twice on it after selecting it, and further sharpening in Photoshop just brings the grain back.). === === = === JLH
Edited 4 time(s). Last edit at 04/16/17 14:54 by highgreengraphics.  Date: 04/16/17 16:54 Re: Question DPI's for slide scanning Author: nomosantafe highgreengraphics Wrote:
------------------------------------------------------- > Question - On a Nikon Coolscan LS-5000, should > you scan slides at 4000 DPI to try to get maximum > clarity, or does this large amount of DPI's tend > to magnify or over-clarify the grain in the slide? > I can see that amount of DPI's mapping out grain > and making it look grainier whereas a lesser DPI > setting would tend to meld it together more, > possibly with resulting clarity loss. I am getting > some grainy-looking results that appear to be more > than the FUJI RD-100 slide film I started with. > Does anyone who is scanning slides have a favorite > DPI setting, and if so, why? Am I scanning too > sharp? (On here I did even out the nose top by > averaging in Photoshop, but the sky is still > grainy-appearing even though I hit the > noise-reduction twice on it after selecting it, > and further sharpening in Photoshop just brings > the grain back.). === === = === JLH I scan all my slides at 5400 dpi and save as 4000 dpi TIFF's Did you sharpen your photo when after processing in Photoshop? I sharpen 1, ONE, time after all adjustments have been made. I sharpened your photo and it looks better. Hope you don't mind. Nomosantafe Portland, Oregon "Pacific Wonderland" Edited 1 time(s). Last edit at 04/16/17 16:58 by nomosantafe.  Date: 04/16/17 18:41 Re: Question DPI's for slide scanning Author: highgreengraphics Thanks - Yes, it does look better, did you sharpen it in PS? I previously sharpened it in the Nikon LS-5000 before copying, then again in Photoshop; no doubt your sharpening is sharper. It just seems that whatever I am doing is accentuating the film grain too much and making the finished photo look too processed. Secondarily, I am having trouble with color balance on TO when the photo looks perfect on our chat group and email, then on TO sometimes yellows will turn to a maize color and the whole photo has a dull cast to it, I have yet to figure out that one yet, either. === === = === JLH
Date: 04/16/17 20:26 Re: Question DPI's for slide scanning Author: BRAtkinson While I am hardly a photo imaging expert by any stretch of ones' imagination, I have learned a couple of things the hard way.
One of those is what DPI to use for scanning. It comes down to a couple of 'limiting factors' from my point of view. #1 is what is the DPI/Pixels per inch of the monitor(s) you intend to view the pictures on? When I started scanning my slides, I too, picked a high number...maybe 2000 DPI, and didn't like the results. I tried a number of settings and came down to 300 DPI and found I liked what I saw on my screen. #2 is actually 1a...how high a DPI can your printer print? Again, 300 DPI is quite sufficient using my Epson R380 photo printer. I don't know if it can go any higher. #3 is how much storage space do you have available? Times 3 (THREE) so there's at least 2 backup copies in case the first one goes bad or your house burns down or a tornado takes it away. I keep a monthly backup copy (actually, a full clone image so I can simply swap drives and be up and running in less than 1 minute as my drives are on slide racks) and a usually monthly, but not always copy offsite with a friend. The more DPIs used per picture, the more hard drive space will be consumed. #4 is are you going to email the image(s) and/or post them on this or any other website? Most ISPs (Internet Service Providers) have some arbitrary size limit on attachments. Companies like Comcast may have one maximum, Verizon another, and AOL something different. Also, most peoples' mailboxes have a limit on number of bytes of storage, and sending them 10 'monster DPI' images would fill their mailbox! Various websites, ebay included, have limits such as 2000 pixels (dots) on the long edge of an image. Anything bigger will either be rejected or 'crunched' by the website, not always with the best results. I found a bulk image resizer program online and use that if I'm going to email or post images. It solved a LOT of aggrevation in posting images here and there. Technical explanation: From what I've read at various photography-oriented web sites (and this very question pops up in various forms on all of them), it comes down to the conversion algorithms (software) used to display or print an image. If your image is, say, 100 DPI and your screen is 300 DPI (pixels, actually), it has to effectively triple every 'dot' into 9 dots/pixels. No problem - your image will show on the screen with 3x3 pixel 'tiles' as if it were zoomed in a lot! But what about downsizing from 3000 DPI to 300? It's not so simple to take every 10th dot and display that as a pixel. Or how about 3000 DPI to 775 DPI? Now the screen driver software has to do far more than simple interpolation or averaging of every 4.2 dots (or whatever the number works out to be). The screen driver must 'consider' various adjacent dots and 'decide' on whether the resultant pixel should be be more bluish or redish, etc. In other words, it treats areas of someones' face differently than it treats sky, or mountains, etc. The same holds true when printing. So, what I ended up settling on is doing scans at 300 DPI. To my knowledge, very few printers can produce higher resolution, especially those priced for home users/hobbiest photographers. While screens can handle higher resolution, I strongly doubt that most viewers could tell the difference between an image scanned at 300 DPI and one at 1200 DPI, both displayed on a 1200 DPI capable monitor. And, as you discovered, the higher DPI scan rate started showing more flaws in the original image (film grain, dust, scratches, etc). Oh...and don't forget...using scanner supplied or purchased image processing software, using 'dust and scratches' filter(s) and even 'noise' reduction options will effectively combine adjacent pixels degrading overall image quality slightly. I'm still 'on the fence' whether I use scanner company supplied software for scanning (Epson, Canon, etc) or a purchased product - VueScan - to perform the scan and some general image adjustment. There's merits and drawbacks to each. But once scanned and saved, I take the images into Adobe Lightroom and make quick corrections for exposure, white balance, fix 'tilted camera' disease, and even re-compose/crop the image if needed. Then I go after various enhancements such as brightening/darkening highlights, shade areas, etc. I may add some 'pop' to the picture by using the 'clarity' and 'saturation' sliders, too. If there's some 'small size' dust in the image, I use the 'heal' function to clean those up one at a time. Lastly, I do some sharpening, and do my best not to over do it. I then export the pictures and bring them into Photoshop Elements for additional processing. I start using the 'clone' function to repair the 'larger' dust in the image. I may also manually remove (clone out) distractions in the image (ie, pole filter!). I then use a purchased Photoshop 'addin' program: Noiseware to both 'clean up' any noise in the image (especially my own photos that I shot at high ISO speeds (I do mostly indoor event shooting these days)) and use its sharpening capabilities at the same time. If I'm going to print the picture, I like the fixed size cropping capabilities in PE over that in Lightroom, so I do it there and save both the uncropped and cropped images. Cropping for printing myself ensures I get what details I want in the printed image, and can crop out what I don't want. Letting the printing software decide usually comes out wrong! Date: 04/17/17 06:59 Re: Question DPI's for slide scanning Author: highgreengraphics Thanks - I will try to digest all of that information - Nikon does not support its slide scanners any more so the only choice for Windows 10 is Vuescan, which I purchased and am using. I will incorporate some of these great ideas and keep experimenting! === === = === JLH
Date: 04/17/17 07:27 Re: Question DPI's for slide scanning Author: mopac1978 I'll second the thanks for the info as I'm in virtually the same situation as highgreengraphics in regard to having an older Nikon Coolscan and using the Vuescan software.
MAB Date: 04/17/17 07:35 Re: Question DPI's for slide scanning Author: nomosantafe highgreengraphics Wrote:
------------------------------------------------------- > Thanks - I will try to digest all of that > information - Nikon does not support its > slide scanners any more so the only choice for > Windows 10 is Vuescan, which I purchased and am > using. I will incorporate some of these great > ideas and keep experimenting! === === = === JLH I use a Minolta Elite 5400 scanner and the Minolta software would not work with Windows 7. I purchased Vuescan a couple of years ago and have been very happy with it. Nomo Date: 04/18/17 07:35 Re: Question DPI's for slide scanning Author: robj My thoughts which work for me:
I would start with maybe 3 very well exposed, focused photos, rail or not, to test settings. I know you wanted to show the sky problems but a big zoom photo can introduce many problems not directly related to the scan. Problems with the sky are to expected, something you see often. There are different ways to get results so what you find may differ from someone else but I think you need to start with the best possible samples. I think it is common for people to find their slides are not actually as good as they thought. The first step is to view the slides critically. The best way is using a magnifying loupe and a light table. I just have a nice little magnifier and hold it up to a white light. I generally do nothing in the scanner as far as image adjustments, others do, so that could be part of your testing. Cleaning should be at least with a light brush and a blower. I have been give slides to scan where they are so dirty I am more aggresive but not something I want to recommend. Scan size as noted does depend on your use and also if you expect to crop or even level the image. I find 2400 to be a good scan size for general use. The scan time and file size will be reasonable. I usually scan to a TIFF and keep as a TIFF until I have a good version. Remember if you are saving as a jpg and processing mulitple times, the image will degrade with each save. I have P/S so with recent versions you can load the TIFF or jpg into the raw converter and do some good adjustments. Latest P/S has noise reduction. I use the clone tool and the spot healing brush to get rid of dust as I normally don't use the dust removal in scanner but you may find using the scanner dust removal works well for you. Sky - I also use the blur tool on the skies or even use layers, adjusting the sky seperate from the rest of image. When you have a finished image you want ot resize yourself, here 1000 wide or elsewhere 1024 or ???? Generally you don't want to email someone your full scan for several reasons. I only sharpen the final product afte I resize for a use, and that is a whole topic. Again, only my ideas. Bob I have attached a sample and note I missed a couple speck, I used this one as it is a 1971 slide and had spent years in a tray so was a challenge. 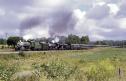 Date: 04/21/17 08:49 Re: Question DPI's for slide scanning Author: eatontm We've been spoiled by ultra clean DSLR images. Even the best film scanned at low resolution, the grain structure is blatently obvious. I only exposed Sensia and Provia and I've noticed that even though I much prefer the color balance of Sensia, it is not nearly as fine grained as Provia when scanned. Everything you've posted to me looks great. Plus the subject matter of what's on the film is going to far and away distract from some grain in the sky haha!
T Date: 05/07/17 16:53 Re: Question DPI's for slide scanning Author: LV95032 The size at which an image appears on your screen depends only on two things - the pixel dimensions of the image and the display resolution of your screen. As long as you've set your screen to its native display resolution as we discussed earlier, then an image will be displayed pixel-for-pixel. In other words, each pixel in the image will take up exactly one pixel on your screen. For example, a 640x480 pixel image would fill a 640x480 pixel area of your screen. An 800 pixel-wide banner on a website would appear 800 pixels wide on the screen. No more, no less. And no matter what you set the image's resolution to in Photoshop, whether it's 72 ppi, 300 ppi or 3000 ppi, it will have no effect at all on how large or small the image appears on the screen.
That's because image resolution affects only one thing - the size of the image when it's printed. By setting the resolution in Photoshop, we tell the printer, not the screen, how many of the pixels in the image to squeeze into an inch of paper. The more pixels you're squeezing into every inch of paper, the smaller the image will appear when printed. And generally speaking, the more pixels you're printing per inch, the higher the print quality. For archival purposed for printing (not screen display)you need a scan that is at least 3600 pixels in the wide dimention. Given that 35mm film is about 1.125" on the long side you divide that into 3600 and you get your scan dpi. In this case that would be 3200 dpi. Anything less is no good for print publication. Rich J BTW - It is too much contrast in that UP image which is making it look bad. Edited 1 time(s). Last edit at 05/07/17 16:57 by LV95032. |