| Home | Open Account | Help | 324 users online |
|
Member Login
Discussion
Media SharingHostingLibrarySite Info |
Model Railroading > How to paint an Overland Brass DieselDate: 09/09/14 22:19 How to paint an Overland Brass Diesel Author: georgiaroad I am a pretty experienced custom painter when it comes to plastic locomotives and rolling stock, but I have yet to attempt finishing an undecorated brass model. I got a deal on some Overland undecorated SOU SD24s and bay cabooses a year or so back, and I would like to paint these for my freelanced Georgia Road. These have never been out of the box, still wrapped and sealed until I got them. I have read about pickling them in vinegar, baking on the finish after painting and a laundry list of other "dos and don'ts" but all my Google searches only find steam projects or vague postings that do not tell the whole story. I would rather not learn by trial and error. The models are too expensive and my time for modeling and painting is limited. I seem to remember an MR article in the 1990s that gave a step by step process, but I cannot remember when exactly it was published.
Are there any experienced modelers out there willing to give me a general step by step as to how to prepare the locomotives and paint them? I use a cheaper Paasche single action external mix airbrush due to ease of cleaning and the fact that I can replace it with a new one if it starts having issues. The paint scheme is two color Cornell Red and Weathered Black, with a Platinum Mist undercarriage. I make it a point to prime my models also. These are the Flat Top Mountain units I mentioned in a recent post. It is time to bring the models to a finished form. Any suggestions or help would be greatly appreciated. H in AL 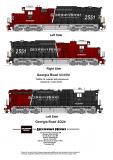 Date: 09/09/14 23:13 Re: How to paint an Overland Brass Diesel Author: fbe You will find these are not much different than newer plastic diesels in most ways. The handrailings are not soldered into the cab, they just pull out to release the carbody from the walkways after the screws are removed. Masking around the grab irons is challenge unless you take the risky task of removing them with a resistance soldering tweezer tool.
Remove all of the primer, brass color or clear coat. It is a poor primer and is generally thick enough to fill details in the model. I have had great luck with acrylic paints from Badger without primer. The color of the final color determines if i use grey, white, yellow or silver as an undercoat. If you use a common air hair dryer to set the paint you can mask and paint 3 or 4 colors in a weekend day. Have fun. Posted from Windows Phone OS 7 Edited 1 time(s). Last edit at 09/09/14 23:19 by fbe. Date: 09/09/14 23:53 Re: How to paint an Overland Brass Diesel Author: fbe Your choice of paint layout looks to be pretty easy to set up, I don't see you will have any masking beneath details. I am sort of wondering why the high short hood unit is painted nearly reverse of the low nose diesels.
SD24 diesels low nose from the factory had a sloping nose like a GP20. The only flat nose SD24 I have seen was a wreck repair of BN 6253. Factory low nose units could be found on the UP and ATSF. High nose roads were Sou, CB&Q (BN) and a couple on the UP. I have a blast booth to strip brass. I find it takes about 45 minutes to strip factory clear coat off a brass caboose. After two coats of acrylic are applied to the bare brass model and set with a hair dryer it takes 4 hrs of booth time to remove the paint and try again. So try a caboose first then see if the paint and method you use is rugged enough for you before you try a diesel. Posted from Windows Phone OS 7 Date: 09/10/14 02:19 Re: How to paint an Overland Brass Diesel Author: BigDave fbe Wrote:
------------------------------------------------------- > Your choice of paint layout looks to be pretty > easy to set up, I don't see you will have any > masking beneath details. I am sort of wondering > why the high short hood unit is painted nearly > reverse of the low nose diesels. I think he's set them up to run high hood first, SOU style. Date: 09/10/14 05:00 Re: How to paint an Overland Brass Diesel Author: bigmc83 Having painted a few brass projects (steam and diesel), heres are some things I've learned. I've not dealt with any really tarnished or worn brass, so your prep may need some sandblasting.
1) Thoroughly disassemble and wash the shell and non mechanized parts in soapy water. A hair dryer or compressed air can aid in drying 2) Careful using strippers and chemicals to clean, as some of the grills and other details on OMI models are glued on with ACC. Harsh chemicals will disassemble your model right in the bath. 3) Now's the time to tweak it and test for smooth running. Might as well file, clip, or reconfigure as many details as needed before you're trying to put it back together with a nice paint job. 4) Scalecoat I without primer really does work well, but I'm sure you have your paint preference, so I'll leave it at that. Good luck and your paint scheme looks sharp! -Sean McCaffery Date: 09/10/14 06:32 Re: How to paint an Overland Brass Diesel Author: georgiaroad Thank you all for the advice. The white separation stripe is a decal, and it has worked well in plastic models so all I have to do is make a clean break centered where the stripe will be located.
I really do appreciate the hints on disassembly. There are three of these things, all SOU version. The SD25M is a rebuild of my own concoction looking at prototypes such as the MRL SD19-1 and the BNSF SD9-3 units such as the superb model posted a few days ago on this same forum. I do not have a grit blaster, so stripping will be with lacquer thinner or Scalecoat 1 as has been recommended. Paints will be new old stock of Cornell Red from Polyscale acrylic and Floquil RR colors weathered black and platinum mist. I have Tru-color acrylic also as a fall back plan when the Floquil stock runs out. Maybe one day I can get a grit blaster. As for the flipped paint on the NS units, as was suggested, the old SOU units are still set up long hood forward. The paint specification requires red on the front. It may seem strange, but these are visual cues to the hostler in the yard when he is setting up power out of dozens of units. Georgia Road also has second generation four and six axles from SOU and early NS heritage, so there is a small group running around still set for long hood forward operations complete with the reversed control stand. As with the real NS, Georgia Road is quietly rebuilding these units into SD40-3s with new cabs and short nose front orientation. The days of the "back-slash" painted units is about over, but I just cannot break with my roots working in MofW with NS back in the 1990s. Thank you all for your suggestions. I will hopefully post finished models down the road....Georgia Road, that is! (Sorry, I could not help myself!) H in AL 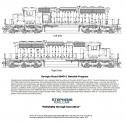 Date: 09/10/14 06:49 Re: How to paint an Overland Brass Diesel Author: brfriedm Just curious. How is the layout coming? Maybe a layout update is in order. You need a place to run these units.
Bruce Date: 09/10/14 09:34 Re: How to paint an Overland Brass Diesel Author: NSDash9 Just an FYI...the Southern SD24's were not setup with the long hood designated as the front.
Chris Toth NSDash9.com Date: 09/10/14 09:55 Re: How to paint an Overland Brass Diesel Author: Shogun Another FYI. That SD24 cannot be designated an SD24M. AS the "M" designates a comfort cab, or wide cab. And your drawing clearly shows a Spartan cab on the drawing. The correct designation would be simply SD24.
Date: 09/10/14 10:22 Re: How to paint an Overland Brass Diesel Author: unit Shogun Wrote:
------------------------------------------------------- > Another FYI. That SD24 cannot be designated an > SD24M. AS the "M" designates a comfort cab, or > wide cab. And your drawing clearly shows a Spartan > cab on the drawing. The correct designation would > be simply SD24. Many railroads use the "M" designation for modified, upgraded, or rebuilt locomotives, so its usage here is consistent with 1:1 scale usage. Posted from iPhone Date: 09/10/14 10:28 Re: How to paint an Overland Brass Diesel Author: NSTopHat Shogun Wrote:
------------------------------------------------------- > Another FYI. That SD24 cannot be designated an > SD24M. AS the "M" designates a comfort cab, or > wide cab. And your drawing clearly shows a Spartan > cab on the drawing. The correct designation would > be simply SD24. Please explain then why DMIR #301 - 322 are called SD-M's? They are re-built SD9's and SD18's, and they do not have comfort cabs. Date: 09/10/14 11:48 Re: How to paint an Overland Brass Diesel Author: fbe I see, the chop nose SD24M diagrams are for modifications which may not be done to the models at hand.
Warning: Tru Color paints are not acrylic paints. Their thinner is acetone based. I don't think you can thin these with water. They do not cover well when used with a brush and following coats tend to soften earlier coats. Practice before you put another solvent paint over it. I suppose these might be acrylic pigments and binders in an acetone base. They get very good coverage with an extremely fine coating. Don't count on the paint to cover any sanding scratches. A blast booth is not a necessity. Brasso or smokers tooth paste with a stiff tooth brush will remove tarnish and give the brass some tooth. The Overland models have a factory overcoat so they should be tarnish free if you do not strip them more than a few months before painting. Posted from Windows Phone OS 7 Date: 09/10/14 15:29 Re: How to paint an Overland Brass Diesel Author: sd39u My thoughts exactly...seen a lot of armchair railroading. Where are the layout pics?
Eric brfriedm Wrote: ------------------------------------------------------- > Just curious. How is the layout coming? Maybe a > layout update is in order. You need a place to run > these units. > > Bruce Date: 09/10/14 20:49 Re: How to paint an Overland Brass Diesel Author: georgiaroad NSDash9 Wrote:
------------------------------------------------------- > Just an FYI...the Southern SD24's were not setup > with the long hood designated as the front. > > > Chris Toth > NSDash9.com This is why I post here! I learn new things that I take for granted all the time. I always thought they were LH forward. I have this set of pictures from Opelika, Alabama taken by Glenn Marsh from the late 70s or early 80s on the P-Line. The SD24s are leading LHF...cannot see an F stencil anywhere though. Wish I could. Thank you for the correction, but these pictures are why I reversed the paint on the SD24s like I did. H in AL Edited 1 time(s). Last edit at 09/10/14 21:24 by georgiaroad. 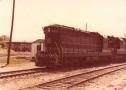 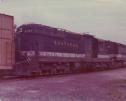 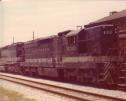 Date: 09/10/14 20:53 Re: How to paint an Overland Brass Diesel Author: georgiaroad brfriedm Wrote:
------------------------------------------------------- > Just curious. How is the layout coming? Maybe a > layout update is in order. You need a place to run > these units. > > Bruce It is very slow. I have base benchwork up, but still have final track plan to hash out. I would say I am about 85 percent there. I have a lot to do to the shop this fall. Hope to get the Herrin helper pocket done as a module of the complete plan. I hope to get the locomotives and a scenicked section of the layout done about the same time. I sure do need a place to run, that if for sure! No clubs or finished layouts nearby anymore. H in AL Date: 09/10/14 21:08 Re: How to paint an Overland Brass Diesel Author: georgiaroad I am an "armchair" modeler more than not these days, and not by choice. One thing I have focused very hard on is to get all the decals done for my concept. Drawing is very time consuming and tedious at times. However, I have to get them while I can. I used to do NS modeling, the reason I have such a NS persuasion in my Georgia Road concept. I used to operate on and photograph a friends layout. We got busy with life and lost touch. Now I am back to square one and on my own again. I practice the hobby as best I can.
Nothing new as far as layout pictures but there are some when I worked with a friend over in AL. Note the FGC hopper in picture one. Second is a GSWR pulpwood car ex SCL/ACL that I did out of a Walthers GSC with a full load of hand cut Crepe Myrtle branches cut to scale stick wood. I took all the pictures and some of he equipment I did or helped complete. I built the woodchip cars also 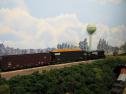 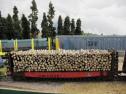 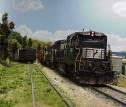 Date: 09/10/14 21:22 Re: How to paint an Overland Brass Diesel Author: georgiaroad My layout--not much in the way of finished track or scenery yet. When you have to custom design all your decals, strip, paint and decal everything custom, it takes a lot of time. My layout needs about 40 woodchip cars to work. I have about half that.
Much of my decaling is done in the armchair I guess. H in AL 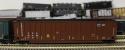 Date: 09/11/14 01:04 Re: How to paint an Overland Brass Diesel Author: fbe In related SD24 history, Precision National bought these when they were retired from the SOU. Power hungry Milwaukee Road leased a bunch of them and put them into service across the lines. Some went to the Mikwaukee shops for a complete rebuild. They were deturboed and rebuilt to 1800 hp, dynamic brakes were removed but the units were left with a high short hood. Effectively they became SD18 units. Precision also rebuilt some in Paducah, KY and all ended up in a nice green carbody with a proud yellow precision logo.
They did not last too long in lease service when the C&NW took them all on long term lease and repainted them in yellow with a dark green high hood and cab with dark green lower side panel. So perhaps your Georgia Road got some of the original units from the SOU before Precision got their hands on the rest. The low nose locos might have come later when the UP purged them after the C&NW merger. They would have been about ready for a major overhaul at which time the Georgia Road chop nosed them along with other improvements. I actually have no idea where they went from the CNW/UP. The original C&NW SD7/9 units were light weight units for light rail branchline service. The SOU units were built for high tractive effort on mainline rail and ballasted accordingly. Your Georgia Road will have to keep these of those 56# rail branchlines if they have any left. Posted from Windows Phone OS 7 |