| Home | Open Account | Help | 363 users online |
|
Member Login
Discussion
Media SharingHostingLibrarySite Info |
Model Railroading > Kaslo CN GP9RM upgradeDate: 02/21/17 19:00 Kaslo CN GP9RM upgrade Author: andrewcastle Hello everyone.
Somewhere between 10 and 15 years ago I built CN 7068 using a Kaslo GP9RM shell kit on a Proto 2000 chassis. Back then DCC sound was in its infancy, speakers were either huge or sounded crappy (or both) and 1.5 volt micro bulbs were as good as it got for headlights. I put a basic NCE DCC decoder in the model and un-lighted MV lenses. When much of my loco fleet got Tsunami sound decoders a while back 7068 never got one as the distinct sound of the EMD 645C (567 block with 645 power assemblies) was not available. The model has spent the past years sitting on my display shelf looking pretty but not running. Fast forward to today and I am converting my whole loco fleet over to Loksound. Loksound offers a 645C sound file so it was time to run 7068 through the shop. The model got a Loksound Select decoder, dual ESU 50321 sugar cube speakers, and SMD LED lighting for the headlights and ditch lights. No more display shelf for this model, it is now on my layout ready to earn its keep moving freight! Thanks for looking. Andrew C 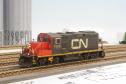 Date: 02/21/17 19:30 Re: Kaslo CN GP9RM upgrade Author: Jimmies A great looking model you've got there! Really looks good.
Jim Date: 02/21/17 22:16 Re: Kaslo CN GP9RM upgrade Author: Chooch Love that re-railer.
Jim Hatboro, PA Date: 02/22/17 04:25 Re: Kaslo CN GP9RM upgrade Author: kgmontreal Very nice work. Those Kaslo resin kits are not easy to build. Yours has come out very well. Just remember when you run it that on those 7000's the long hood is the front.
KG Date: 02/22/17 06:24 Re: Kaslo CN GP9RM upgrade Author: andrewcastle Thanks guys.
KG, thanks, I actually forgot about that when I was programming the loco. Andrew C Date: 02/22/17 06:45 Re: Kaslo CN GP9RM upgrade Author: Dilworth super job what kind of paint did you use
Date: 02/22/17 08:59 Re: Kaslo CN GP9RM upgrade Author: ALcocentury Enjoy, you did some very nice modeling.
Date: 02/22/17 09:11 Re: Kaslo CN GP9RM upgrade Author: andrewcastle Paint is the old AccuPaint with MIcroscale decals.
Andrew Date: 02/22/17 09:33 Re: Kaslo CN GP9RM upgrade Author: jsnoy kgmontreal Wrote:
------------------------------------------------------- > Very nice work. Those Kaslo resin kits are not > easy to build. Yours has come out very well. > Just remember when you run it that on those 7000's > the long hood is the front. > > KG Can you clarify your "long hood is the front" comment? I assume, as originally built" the long hood was the front "F", but after the nose was chopped, the loco was operated "short nose first". I imagine the "F" could still be on the long hood, but actual operation was opposite. Maybe there are some subtleties I don't understand. Date: 02/22/17 11:14 Re: Kaslo CN GP9RM upgrade Author: kgmontreal >
> Can you clarify your "long hood is the front" > comment? I assume, as originally built" the long > hood was the front "F", but after the nose was > chopped, the loco was operated "short nose first". > I imagine the "F" could still be on the long > hood, but actual operation was opposite. Maybe > there are some subtleties I don't understand. > First it's important to remember that all CN first generation roadswitchers were built to run long hood forward. When CN did the GP9 rebuilds they did some for road use, the 4000 and 4100 series units, and some for yard use the 7000 series. Both series had chopped noses. The road rebuilds were set up for short hood forward operation with their control stands moved to the appropriate side. For the yard units the lond hood was retained as the front and the control stand left in its as built position. When switching the long hood was to be coupled to the cars with the low nose used for improved visibility when backing up because the engineman was alone in the cab. KG Edited 2 time(s). Last edit at 02/22/17 14:20 by kgmontreal. Date: 02/22/17 17:13 Re: Kaslo CN GP9RM upgrade Author: DrLoco I can add as an engineer, having the "long hood forward" setup in the yard helps. As aforementioned, putting the cut of cars against the long hood (front) and having the engineer "Back up" and go away from the conductor standing on the lead allows me to both have good visibility while backing up (where I'm responsible for watching where I'm going), and also when I do shove back or kick cars into another track I can see the conductor by looking "forward" out the window to see the conductor.
Invariably, there will be situations where the control stand is on the "wrong" side...but by and large, when on a yard job that drills cars (either by kicking in motion or shoving to rest in the yard) i prefer to run backwards. |