| Home | Open Account | Help | 389 users online |
|
Member Login
Discussion
Media SharingHostingLibrarySite Info |
Model Railroading > ST SD40T-2 – Inside the Beast – Phase 8 - “Weld Beads”Date: 07/19/19 00:26 ST SD40T-2 – Inside the Beast – Phase 8 - “Weld Beads” Author: tmotor (This is Phase 8 of this project to superdetail the interior space behind the grillwork found at rear of the ScaleTrains Tunnel Motor. The earlier 7 Phases were posted in previous weeks.)
To attach the Diamond Plate to the chassis, EMD welded a bead around the entire perimeter of each Diamond Plate. This creates a raised quarter-round that can be as high as the tops of the treads of the Diamond Plate. The weld bead could be simulated with a small diameter rod, but weld beads are not “perfect”. Even automated welding equipment is programmed to travel at a speed that allows the weld puddle to pool (to penetrate both pieces) and then move further down the joint to let the puddle cool (molecularly joining them as one piece), which will look like ripples. One method to create a bead along an edge is to dip the entire edge into a thin layer of wet paint. The paint will adhere only to the edge, creating a layer of material that creates the quarter-round profile. The issue is the paint bead will usually look too uniform; better than a small diameter wire, but still too smooth for my liking. Body filler has a thicker consistency, but dries rapidly. There is not much surface area for it to bond with, so it can be too fragile and easily flake-off. Oil-based artist paint has a thick consistently, and remains fluid for days. Some paint colors, such as Raw Sienna, dry faster than other colors. Spreading the paint in a thin layer also accelerates the drying time. Adding a “dryer” to the paint speeds the process, but will make the paint more fluid, so it was not used. Straight from the tube is still a bit too fluid, so a small amount of paint was spread out and allowed to dry for 2 days until it had the right consistency for creating a weld bead that is “not perfect”. The paint needs to have “body”, so it is a bit “stringy”. Build a jig to create a thin layer of paint. Attach a pair of 0.005” thick strips to an ABS sheet, about 1” apart. Apply some paint to the area between the strips. Span the strips with a rigid screed (such the edge of a flat bar), to create a thin, consistent layer of paint. Spread the paint and let it dry for 2 days before use. Carefully dip 2 adjacent edges of the Diamond Plates into the paint. Also dip a scrap piece to serve as a test sample for when the paint is dry. The dipping motion is not straight down, but rather at a slight angle. This deposits more paint against the edge and face, with little on the back of the part. If not satisfied with a bead, remove the paint and try again. It is tempting to dip all 4 edges at once, but then handling the part becomes a nightmare. It is better to dip half of the edges, let them completely dry, then dip the remaining edges. If in a hurry, using a pair of tweezers it is possible to avoid all 4 edges while holding the part, but practice on scrap pieces first. Too much pressure on the resin tread detail will ruin it, so wrap some foam around the tips of the tweezers. However, I found there is more control being able to use fingertips to hold the part by one corner. I’m in no hurry, so doing half of the sides at a time was no problem. (Of course, if one is in a hurry, this whole process is not even on one’s radar!) Wipe the bottom of each edge to remove any excess paint, going from the center of the part, to the outside edge. Use a sheet of paper to wipe against. Ensure no paint extends below the bottom of the Diamond Plate. The edge of the part should have most of the paint, with a little ridge built-up along the face. The goal is to soften the edge with a “random” round-over, to get away from the look of a flat, machined edge. Set aside to dry for several days. Use the scrap piece (dipped at the same time as the production parts) to test whether the paint is dry enough to handle. Test every few days, or just wait a week and it will be good to go. Assuming the paint has a stiff consistency (like peanut butter), it should create a nice looking weld bead. Sometimes the paint deposited on an edge will look fine, except for a single long string that sticks out from the edge and looks exaggerated. To try to correct this by redipping the edge will most likely ruin the rest of the edge by causing too much buildup. Leave this anomaly; it can be trimmed away after it has dried. For dipping the 2nd half, use a different color of paint so the dry edges can be easily identified. After the 1st pair of edges are done, wait about 4 days, then spread the paint in the jig. This way the paint will be ready by the time the 1st pair of edges are dry. Edited 2 time(s). Last edit at 07/20/19 16:02 by tmotor. 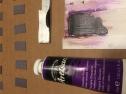 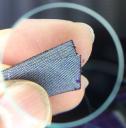 Date: 07/19/19 00:27 Re: ST SD40T-2 - Inside the Beast - Phase 8 - "Weld Beads" Author: tmotor Prior to gluing components to the Floor Cover, wash away any soldering flux with water. Brush with acetone to remove any residue, taking care to NOT apply acetone to the plastic J-boxes.
In theory, using slow-setting CA would allow plenty of time for fine-tuning the placement of the finished Diamond Plate. Perhaps it was a quirk of the Slo-Zap brand, but it did NOT allow any adjustment time at all. The CA was spread onto the Floor Cover. The Diamond Plate was positioned relative to the edges, and allowed to come in contact with the CA. When they met, the CA immediately grabbed hold of it. There was absolutely no allowance for fine-tuning. Luckily the Diamond Plate was reasonably straight on the first try, so it worked out. However, for the next time I will try a different brand of Slow CA, or perhaps a different glue altogether. There are two pieces of Diamond Plate to be installed. The Diamond Plate toward the rear was applied first. It does not have the conduits in the way, so it can use the edges of the Floor Cover as reference points. Trim the 2nd Diamond Plate to fit around the conduit runs, using the already installed Diamond Plate as a reference. The edges of the 2nd Diamond Plate must line-up with the 1st. Trim enough to ensure there will be no interference with the conduit while placing it in its final position. If there is a bit of a gap between the conduit and the trimmed area, that is fine. There will be plenty of debris deposited at the base of the conduit to hide the gap later during weathering. (If a factory-fresh unit is being modeled, then more care must be taken to minimize the gap.) Test-fit the Floor Cover by sliding it into position on the model. If either of the Diamond Plate ends cause interference, trim them flush. The Floor Cover should slide on and off with ease. Note that it will only slide toward the engineer’s side, since the conduit will interfere with the rib on the wall if slid the other direction. Archer does offer weld beads as resin decals. It was tempting to add the Archer weld bead decal, but the addition of a decal edge on top of the Diamond Plate didn’t seem worth the trade-off. Also, the additional Archer weld bead decals are not exactly cheap, which was the deal breaker. An argument could be made to have the CA that oozes from under the Floor Cover could be used to represent the weld bead. The trick would be to have it form a consistent bead. Considering it is a clear color (hard to see), and will start to set soon (tick tock!), this was beyond my comfort zone. The Archer decal could have been applied directly to the metal Floor Cover without the Evergreen plate substrates, but then the edges would not have the depth to cast a realistic shadow. Applying a weld bead would help raise the profile, but would be problematic to create with paint. (Most likely a candidate for the Archer weld bead decals.) Edited 4 time(s). Last edit at 07/20/19 15:30 by tmotor. 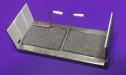 Date: 07/19/19 09:08 Re: ST SD40T-2 - Inside the Beast - Phase 8 - "Weld Beads" Author: ChrisCampi Very interesting technique and it looks great.
Date: 07/19/19 09:39 Re: ST SD40T-2 - Inside the Beast - Phase 8 - "Weld Beads" Author: SPDRGWfan Crazy! In a good way!
|