| Home | Open Account | Help | 227 users online |
|
Member Login
Discussion
Media SharingHostingLibrarySite Info |
Model Railroading > New 3D Printer (Part 4) – LinesDate: 04/14/21 22:54 New 3D Printer (Part 4) – Lines Author: tmotor This is Part 4 of a series on my recent experience with a Phrozen “Mini 4K” 3D printer. (Parts 1 thru 3 were posted earlier.)
Nothing will detract from a 3D part faster than visible lines on the surface. Horizontal Lines The horizontal lines are the ones most often used to identify 3D printed parts. We grew up with injection molded parts, so we use them as the criteria to judge 3D printed parts. Being able to print a part that is free of lines has been my goal ever since I began 3D printing last year. With the Photon S, it was achieved if the part was positioned on the Build Plate, at a certain angle, and twist. It wasn’t consistent, but there were enough positive results to encourage me to continue. With the Phrozen Mini, the parts can be consistently line-free. This is HUGE! There are some faint lines, but when I drag my thumbnail across them it doesn’t catch on anything. Some appear to be the result of the resin changing color due to UV exposure (which is normal), and creates internal color variations inside the resin (even though the wall surface is smooth). After a coat of paint, they disappear. This is important because many of my parts have lots of flat surfaces. When printing something with texture (like a troll figure holding an axe), lines are not as obvious. However, on flat surfaces lines really stand-out. One trick is to keep the side walls at a right angle to the Build Plate. Combined with thin layers, accurate linear bearing to guide the Build Plate, and Anti-Aliasing cranked to 8 (the max setting), I am thrilled to be able to have found a Sweet Spot where I have a high probability the parts will print line-free. Vertical Lines If horizontal lines are not bad enough, vertical lines can also appear. Vertical lines are a different animal. My theory is they are caused by the LCD screen. With the sidewalls of the part at right angles to the Build Plate, but rotated (relative to the edge of the Build Plate), the same line of pixels will be creating the mask for the sidewall layers. If there is a slight variation in the pixel alignment, that “error” will be repeated in every layer. Stack those layers, and the slightly misaligned pixel will appear as a vertical line. On the Photon S, the solution was to twist the part 30 degrees. This ensured the mask line was created by different rows of pixels for each layer. There were still misaligned pixels, but they were different (for each layer) so they create a slightly “rough” texture on the flat surfaces. The 4k LCD screens appear to have fewer misaligned pixels, possibly because they are monochromatic. Rotating the part on the Build Plate can decrease, or increase, vertical lines. I’m having good luck with the walls perpendicular to the Build Plate face, and at right angles to the edge of the Build Plate. Presumably this is because the LCD pixels are in a regular “checker board” arrangement. As always, test with Trial and Error. Edited 1 time(s). Last edit at 04/14/21 23:24 by tmotor. 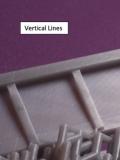 Date: 04/14/21 22:54 Re: New 3D Printer (Part 4) – Lines Author: tmotor Slicer Lines
This is an odd one, and I have only seen it with Chitubox. The ribs on the NSC Well Car have a very sight taper on their face. Some lines were introduced by the Slicer software, which appears as stair-stepping on the rib faces. When the part is rotated 90 degrees on the Build Plate, the lines disappear. The same file was printed on a friend’s Mars 2 printer, with the same results. Even if the part was angled at 60 degrees, the stair-stepping persisted. This means it is NOT a printer issue, but a Slicer issue. If the part was oriented to be going with the length of the Build Plate, the ribs had stair-stepping. As long as I avoid the orientation that creates the lines, it isn’t a problem. By rotating the parts to go with the short edges of the Build Plate, and angle them at 60 degrees so they will fit, both halves of the NSC Well Car can be printed in a single run. It takes nearly 14 hours, but well worth the wait. With the part at 60 degrees, it is quite "tall" and requires a lot of Supports to keep it rigid enough to prevent flexing (which creates the dreaded lines). Nearly 80% of the resin consumed is in the Supports. However, resin is cheap, compared to a failed part after half a day of print time. Cost of doing business. Edited 4 time(s). Last edit at 04/14/21 23:08 by tmotor.   Date: 04/15/21 06:34 Re: New 3D Printer (Part 4) – Lines Author: Arved tmotor Wrote:
------------------------------------------------------- > With the Phrozen Mini, the parts can be > consistently line-free. This is HUGE! This was the one thing (besides price) that was holding me back. Dammit! Now I'm going to have to buy one. I really appreciate your postings on your experience with 3D printing, as you've addressed many questions and concerns I've had from the outside looking into making the investment. Arved Grass Fleming Island, FL Date: 04/15/21 10:20 Re: New 3D Printer (Part 4) – Lines Author: tmotor Hey Arved!
At the risk of sounding like a salesman, without a doubt, the Phrozen Mini is worth a serious look. The parts are so much better than those generated by the Photon S printer I purchased just a year ago. Dave Arved Wrote: ------------------------------------------------------- > tmotor Wrote: > -------------------------------------------------- > ----- > > > With the Phrozen Mini, the parts can be > > consistently line-free. This is HUGE! > > This was the one thing (besides price) that was > holding me back. Dammit! Now I'm going to have to > buy one. > > I really appreciate your postings on your > experience with 3D printing, as you've addressed > many questions and concerns I've had from the > outside looking into making the investment. Date: 04/15/21 15:11 Re: New 3D Printer (Part 4) – Lines Author: tmotor Hey 4thDistrict!
Thanks for sharing! Dave 4thDistrict Wrote: ------------------------------------------------------- > There are videos out there discussing how to > eliminate these lines. Part of the solution is how > the part is tilted when printed, and part of it is > how to use anti-aliasing settings. Here is one > that discusses how to determine the best print > angle to match your printer's specs. > > https://www.youtube.com/watch?v=Qs2Rb0ExnIM > Edited 1 time(s). Last edit at 04/15/21 15:51 by tmotor. |