| Home | Open Account | Help | 280 users online |
|
Member Login
Discussion
Media SharingHostingLibrarySite Info |
Model Railroading > The making of UP #2537Date: 03/19/23 17:06 The making of UP #2537 Author: funnelfan For the past month or more I've been slowly transforming a BLI Light Mikado into UP #2537 that currently resides in a park in Walla Walla, WA. I got a great deal on the locomotive on E-bay and the model is already fairly close to the prototype, one of 20 that UP acquired for service on the Oregon Short Line. Most UP 2-8-2's are of their own design, but these 20 USRA types were acquired second hand.There are a number of detail changes that need to be made to more closely match the prototype. And there are some things I cannot change as it will affect operation. For instance the water pipes from the tender to the injectors hangs well below the firebox and would interfere with the swing of the trailing truck. So I will be forced to leave those pipes on the side of the firebox.Among the changes I made so far include;
On the Locomotive; . Change out the headlight for a Cal-Scale Pyle type #190-205. Required drilling the brass casting and reworking the lens and headlight mount of the original model to fit the brass part and still be operable using the LED light in the smoke box. Used a cordless drill like a lathe to turn down the original lens to fit. . Reposition the whistle. . Raise the forward part of the walkways and removed ladders, and add drop steps (precision scale part). Walkways had to be narrowed and brass supports added. . Fill in slots in the steam pipes to the cylinders with some .040" styrene to fill gap where walkways were. Requires a 1/8" half round cutout to fit the gap properly. . Add pilot pedstals and a bar across front of pilot (not shown). . Modifiy air pipes under the walkways on both sides. . Add pipes to the front of the main reservoirs. . Add train indicator boards next to smoke stack (Precision Scale Part). . Replace the smokestack with a large "Sweeney Stack" (in the future, will probably have to design and 3D print one) On the Tender. . Move rear ladder to the engineer's side of the tender. . Replace the large flat water fill hatch with a smaller raised hatch (Cal-Scale #190-233) . Add rear headlight (Cal-Scale #190-205) . Add tool box to frame on the conductor's side (Cal-Scale #190-295). Ted Curphey Ontario, OR Edited 1 time(s). Last edit at 03/19/23 17:07 by funnelfan.  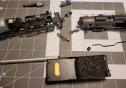 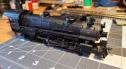 Date: 03/19/23 17:08 Re: The making of UP #2537 Author: funnelfan In service photo of the prototype.
Ted Curphey Ontario, OR 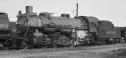 Date: 03/19/23 19:02 Re: The making of UP #2537 Author: wabash2800 Thanks for sharing Ted. I'll be doing that for some Wabash engines too. The Wabash had some K-2 light USRAs, but I would also like to kitbash some Wabash K-4 "Big Mikes". The layout is coming first though.
Victor Baird Edited 2 time(s). Last edit at 03/23/23 07:36 by wabash2800. Date: 03/19/23 19:30 Re: The making of UP #2537 Author: superfleet My older brother snapped a photo of that engine on a business trip many years ago, I will have to try to find that picture. Your modeling looks good!
Dan Date: 03/19/23 21:55 Re: The making of UP #2537 Author: TomG Wow that is a fat stack! Keep us up on your progress.
Date: 03/20/23 02:50 Re: The making of UP #2537 Author: Hiroshi Ted-san:
Thank you very much for sharing the photos. #2537 does ring my bell. When I first visited Walla Walla, WA, my friend, Dave, took me to the part and showed my this steamer. That was the Summer of 1972. Yes, this engine also reminded me of the good ole times in Milton-Freewater, Oregon. Thank you again for sharing the photos. Hiroshi funnelfan Wrote: ------------------------------------------------------- > For the past month or more I've been slowly > transforming a BLI Light Mikado into UP #2537 that > currently resides in a park in Walla Walla, WA. I > got a great deal on the locomotive on E-bay and > the model is already fairly close to the > prototype, one of 20 that UP acquired for service > on the Oregon Short Line. Most UP 2-8-2's are of > their own design, but these 20 USRA types were > acquired second hand.There are a number of detail > changes that need to be made to more closely match > the prototype. And there are some things I cannot > change as it will affect operation. For instance > the water pipes from the tender to the injectors > hangs well below the firebox and would interfere > with the swing of the trailing truck. So I will be > forced to leave those pipes on the side of the > firebox.Among the changes I made so far include; > > > On the Locomotive; > > . Change out the headlight for a Cal-Scale Pyle > type #190-205. Required drilling the brass casting > and reworking the lens and headlight mount of the > original model to fit the brass part and still be > operable using the LED light in the smoke box. > Used a cordless drill like a lathe to turn down > the original lens to fit. > > . Reposition the whistle. > > . Raise the forward part of the walkways and > removed ladders, and add drop steps (precision > scale part). Walkways had to be narrowed and brass > supports added. > > . Fill in slots in the steam pipes to the > cylinders with some .040" styrene to fill gap > where walkways were. Requires a 1/8" half round > cutout to fit the gap properly. > > . Add pilot pedstals and a bar across front of > pilot (not shown). > > . Modifiy air pipes under the walkways on both > sides. > > . Add pipes to the front of the main reservoirs. > > . Add train indicator boards next to smoke stack > (Precision Scale Part). > > . Replace the smokestack with a large "Sweeney > Stack" (in the future, will probably have to > design and 3D print one) > > > On the Tender. > > . Move rear ladder to the engineer's side of the > tender. > > . Replace the large flat water fill hatch with a > smaller raised hatch (Cal-Scale #190-233) > > . Add rear headlight (Cal-Scale #190-205) > > . Add tool box to frame on the conductor's side > (Cal-Scale #190-295). > > Date: 03/23/23 18:38 Re: The making of UP #2537 Author: wabash2800 Well, Ted, if you can draw 3D files or get someone to do it for you, send them to Shapeways.com, and that way other modelers can get the UP stacks too
If not, there is another way but a little labor intensive: chuck stacked tube onto a lathe or at the end of heavy duty drill and turn it down, including the flange at the top of the stack. . You'll also have to get the radius for the base of the stack by forming a tube with the correct radius of the smokebox and sand the base until you get it right. Of course, doing that all with brass would be nice, but if you have to do it the hard way with a drill, use plastic. Victor Baird Edited 1 time(s). Last edit at 03/24/23 10:01 by wabash2800. |