| Home | Open Account | Help | 383 users online |
|
Member Login
Discussion
Media SharingHostingLibrarySite Info |
Railfan Technology > Recommendations for Night Shooting SettingsDate: 07/07/17 13:30 Recommendations for Night Shooting Settings Author: SD80MACfan I've been trying for a while to figure out how to take good night shots that don't come out grainy or overexposed. I work with a Panasonic DMC-FZ70 with the standard 20-1200 lens. Does anyone have any recommendations for settings I might want to try using when shooting at night?
Date: 07/07/17 13:59 Re: Recommendations for Night Shooting Settings Author: BRAtkinson From my own experience, there is nothing more challenging to the photographer than low light photography. A thorough understanding the exposure triangle and how to 'push' your gear to the limits is necessary.
To be successful at night photography, one has to know for certain what is the maximum ISO speed that can be used with acceptable, including post-processing correctable, levels of noise with your camera gear. You'll most likely be shooting at that speed. In general, the smaller and/or older the sensor, the lower the maximum acceptable ISO speed for noise. Once the maximum has been determined, complete the rest of the exposure triangle settings to freeze motion and lastly the aperture. Photographing a train passing through a well lit area will require a shutter speed of about 1/500th...same as in daylight. Anything slower will likely end up with a blurred train. Put another way, there is no 'set' group of settings for nighttime photography. Nor are there any for daytime, either. It all comes down to how much light is on the subject and what exposure triangle compromises are required to achieve your goal. Trial and error is the best teacher. Learn how to read histograms as well as to look at your photos in the LCD and make setting adjustments from there. Date: 07/07/17 14:45 Re: Recommendations for Night Shooting Settings Author: cozephyr May I suggest...
ISO 100 and F 5.6 or F8 and manual setting 25-30 seconds using a tripod. Use timer to eliminate vibrations. Set lighting for florescent. Get out and give this a try! Bring a flashlight to check your Camera settings & watch where you're going.  Date: 07/07/17 15:42 Re: Recommendations for Night Shooting Settings Author: K3HX 1, Visit the "other" site whose name we dare not mention (smile) and do a search of "night-time" images.
Note how the same names keep coming up as photographer. 2, Sign up for a night-time photo shoot and watch and learn how the folk do their preparations. 3, For aesthetics, make a pilgramage to the O Winston Link museum and be staggered by what had been done with equipment which is primitive by today's standards. Steps 1-2-3 may not provide specific stops. ISO setting and speeds but they will give an oversight of what you want to see as the final product. 4, You do not need a hive of "Alien Bees" to get a good image. Consider available light, just make sure to include something like a Gertrag-MacBeth Colour Chip Chart in the image if you need to later correct the artificial colour's temperature in the digital darkroom. With the essentially zero cost of making an image and virtually instant feedback, get out after the sun goes down and take a swat at it. The vibration reduction technology and "dial an ISO" ability of the newer cameras should allow much room for experimentation. If you are shooting a moving object from a tripod, experiment with Vibration Reduction, auto focus, focus lock. Disclaimer: I started with: "hand me that grocery bag of #2 flashbulbs." Later moving to the "Lumedyne lotsa-watt seconds.....this flash has recoil (smile).....POP, move, POP, move, POP, move technique. Take lots of photos and see what works for you. Be Well, Tim Colbert K3HX Date: 07/07/17 23:07 Re: Recommendations for Night Shooting Settings Author: wa4umr Since it doesn’t cost anything to try things today (or tonight) with digital photography, the best way to learn is to just get out there and try a few things and see what you get. Make notes of what worked and what doesn’t. The above comments from others should give you some good starting points. If you don’t understand the relationship of ISO, shutter speed, and aperture, find a book on basic photography and read that. A tripod is just about a must along with a remote release.
I took a couple of photos last week that were sort of an exception to some of the rules. I let the camera do all the work. I let it figure out the exposure. The photos were taken handheld. My intention was to see about what the camera would do and then use that as a starting point. These photos were intended to be throwaways but they came out pretty decent. https://www.trainorders.com/discussion/read.php?2,4328062. It would probably be easier to start with a place with some decent streetlights. In other words, don’t go for the most difficult situation until you can make a decent “low light” image. You don’t need a bunch of expensive lights or flashes. I haven’t done it in a while but you can use a $30.00, “12 Volt spotlight” that you can find in Wal*Mart or most sporting goods stores. The technique is a form of “Light Painting.” It’s like painting a wall but you stand back with the light instead of a brush and paint the light onto the subject. Open the shutter, turn on the light, and start painting side to side. Start at the top and work your way down. Then repeat but use a vertical motion while you move from one side to the other. Then use a diagonal motion. Exposure depends on the distance the subject is from the light, how bright the light is, and how you paint it. This is just something you have to use trial and error until you get it right. Stand a few feet off to the side of the camera (and out of the field of view) to control shadows. If you are doing "cityscape" night time photos, they often look better just before and after the sun is below the horizon when there is still a bit of color in the sky. 1. It was well after sunset when I took the photo of the signal. There was still the after glow of the sunset. The flexibility of a digital camera makes this possible. 2. My hometown, Louisville, Ky. This was a bit late but there is still a bit of color still in the sky. I tried this thing about 10 years ago with an earlier DSLR and it was nothing like this. It was grainy, the sky was gray, and the colors of the light were sort of dull. John 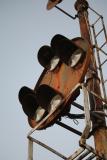 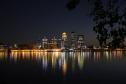 Date: 07/08/17 00:20 Re: Recommendations for Night Shooting Settings Author: wko Good old-fashioned trial and error is kind of how I got better. I knew roughly to keep the ISO low, the f-stop in the middle, and adjust the exposure accordingly, but there were little things that just need tampered with every time you try it. I'll give you 3 examples of my evolution from the time I got my first DSLR until now.
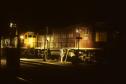
Photo 1: Fall, 2009, Hastings, NE. Photo was taken at ISO 400, 30 seconds @ f8 on my Nikon D40. As you can see, the road, box, and pole are well-lit. The main point though was the crossing gates, and in this photo, they're just simply too bright (and "that other site" dinged it for being overexposed). Also, the filter I had on the camera caused 'light streaks' due to the way the light was diverted through the UV Filter. If I were to try this again, I would try setting it to ISO 200, keep the 30 seconds, and change the F-stop to f11. If those settings are too bright, then next time I'll try f15 and see from there! Photo 2: May 3, 2012, Hastings, NE. After I had finished a radio show in college, a tornado warning hit, stranding me and a couple buddies in the communications building, where the newspaper crew was finishing their weekly paper. Shortly after it ended, myself, a couple of them, and their adviser decided to look outside to see what things looked like. The lightning show we got was unreal! The adviser, Brett L. Erickson (a Google search will link you to his work, which is very good) said anyone who wanted to learn to shoot lightning needed to grab cameras ASAP. We tried them on our own, and my results were less than stellar: out of focus, underexposed, dark skies, etc. Finally, he gave us the info we needed. For shooting lightning, always keep your camera at its lowest ISO (for my D40 it was 200, I had been trying on 400), and always keep your f-stop between f13 and f18, and always at 15 seconds. So, this photo was taken at ISO 200, 15 seconds @ f15, again on my D40. Photo 3: November 6, 2016, Levy, NM. I really liked the look of this scene, with the single green light on the semaphore, even though we were 19 hours from the next movement through here, so I used my flashlight to set everything up, then just started going. I took 5 or 6 pictures before settling for this one. A couple days before, my trusty D40 suffered a serious issue, forcing me to purchase a D3400 at the closest WalMart. The 40 had only 5 ISO options: 200, 400, 800, 1600, and Hi-1. The D3400 goes from 100 all the way up to 25600 (I've only tried that once as a goof and wasn't thrilled - LOTS of grain). So for this photo, I set the ISO to 800, then set it for the longest exposure, 30 seconds, and adjusted the f-stop for each picture until I got to f7.1, which was this one, where I was most satisfied (I tried f6.3, but didn't feel it). I hate to add on to the "just get out and do it" answers, but for me, trial and error is simply how I learn best, with everything from photos, to computer stuff, to even my job (just, um, ignore the errors part. My bosses don't need to know! Haha). Always remember: if you're having fun and are satisfied, then you're doing it right! ~wko 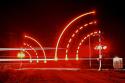 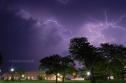 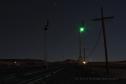 Date: 07/10/17 21:25 Re: Recommendations for Night Shooting Settings Author: dt8089 Set at F8 focus on infinity if you can't see to focus, use cable or remote release and experiment with timed exposures. In the digital world I shoot at ISO 200 to cut down the grain. First shot was taken with Kodachrome 64 slide film and second shot was taken with a digital camera. Dan
  Date: 07/13/17 17:22 Re: Recommendations for Night Shooting Settings Author: cozephyr September 10, 2015 Route 7 Tram at night in front of the Savoy Hotel, Paradeplatz, Zurich, Switzerland.
Making the best of the night! 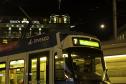 Date: 07/26/17 19:29 Re: Recommendations for Night Shooting Settings Author: video7105 Don't want to be late for the party but the information on this website would probably help you a lot not only in night shooting but day shooting. I found it very informational when I got my Canon 7D MarkII, last year
Blog.traingeek.ca/2014/10/recommended-camera-settings-for-railfans.html Good Luck Dave Mount Joy, PA Edited 1 time(s). Last edit at 07/26/17 19:29 by video7105. |