| Home | Open Account | Help | 248 users online |
|
Member Login
Discussion
Media SharingHostingLibrarySite Info |
Model Railroading > brass locomotive headlights ?Date: 08/18/10 20:45 brass locomotive headlights ? Author: sphauler I recently picked up a SP Westside GS-6 that is missing both the headlight and tender lenses. The front headlight just has the bulb barely stick out of the housing. The tender has nothing which is no problem to install a light. I would like to add some clear lenses but I am kinda of lost on were to find them. I am familiar with MV Products but I am not aware if they sell the clear lenses. I thought they only sell non-operating lens. Any help would be much appreciated.
 Date: 08/18/10 21:28 Re: brass locomotive headlights ? Author: up421 The backside of the MV lenses is a coating. I have drilled a small hole in the back of the lens to let the light through for a Westside Espee GS-4 and UP FEF-3. Looks pretty good in my opinion. Sorry no photos of the models. 8^(.
Hope this helps. Bob Date: 08/19/10 00:19 Re: brass locomotive headlights ? Author: smallplanet2 When done correctly, the MV lenses actually make for a very realistic looking headlight. If I remember, the package has instruction how to prepare them. I read the instructions the first time, and now do the procedure from memory. They are a bit difficult to clamp, but you can develop your own system as I did. Use a drill to make a depression in the back of the lens, cutting through the foil. Use a drill bit that matches the diameter of the grain-of-wheat style bulb, another note from memory. Use 5 minute epoxy or AC to glue the end of the bulb, t-boning the lens. Because a bit of the bulb extends deeper than the foil, it lights up the entire foil area, just as a bulb illuminates the reflective lens inside a real headlight.
Steve Date: 08/19/10 06:39 Re: brass locomotive headlights ? Author: tomstp Take a drill the size of the lens you want, drill a hole in a piece of metal. On the same drill bit, grind the opposite end totally flat. Then take a clear plastic sheet and place over the hole, use the butt end of the drill and press it through the plastic sheet. You will get a perfect headlight "glass lens". Take a toothpick and put some white Elmer"s glue on it and make a circle of glue inside the edge of the headlight. Put the lens in and let the glue dry. It will dry clear.
Before you do all that, decide if you want the inside of the headlight to have a brass color to help get a little yellow in the glow of the light, or if you want a bright lite. You can take a brush and paint the inside of the light a brass color or silver depending on the type of light color you want in the reflector part. Edited 1 time(s). Last edit at 08/19/10 15:11 by tomstp. Date: 08/19/10 07:13 Re: brass locomotive headlights ? Author: wildcat12 Microscale has a solution called Krystal Klear, I used it on my brass Alco RS-1 Locos to create lenses, it works very well, and is easy to use. I have also used it on my cabooses to create windows.
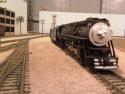
Date: 08/19/10 07:58 Re: brass locomotive headlights ? Author: wprrsteam An example of MV lenses with a light glued to the back using epoxy. In this case applied to an O-scale GS-64. Western Pacific livery my preference for this class of locomotive.
 Date: 08/19/10 08:14 Re: brass locomotive headlights ? Author: Krokodil Micro-Mark sells a neat micro punch set (Item # 83513) that can be used to punch a headlight glass of clear styrene at the appropriate size.
ThomasE Date: 08/19/10 09:13 Re: brass locomotive headlights ? Author: SP8404 I found that placing the MV lens face down on a piece of masking tape held it while using a twist drill.
Date: 08/19/10 13:30 Re: brass locomotive headlights ? Author: Frisco1522 The way I have done brass headlights for years now is thus:
I have a bag of cotton swabs with wood "handles" and a can of Brasso (believe it or not, left over from my Army days in the early '60s) and a variable speed Dremel. Cut the wood handle down to where the whole swab/handle is an inch or so long. Moisten the swab lightly with Brasso and blot it with a paper towel so it isn't too wet. With the swab chucked in the Dremel tool, run at a low speed and polish the reflector of the headlight casting until it has a mirror finish. This takes about 20-30 seconds. Let the Brasso dry to a haze and take a clean swab and swab it out by hand. You'll find it looks exactly like a headlight reflector should. I use home made punches to punch a lens out of clear ABS and put it on with Future floor polish. Looking at the photos almost look like there's a bulb burning in the headlight, but this was before I put a micro bulb in it, it's just reflecting the light. I also used Brasso on the Bell. So easy a dummy like me can do it.   |