| Home | Open Account | Help | 336 users online |
|
Member Login
Discussion
Media SharingHostingLibrarySite Info |
Model Railroading > A complicated bookshelf layout begins.Date: 11/17/12 21:56 A complicated bookshelf layout begins. Author: inCHI For awhile I've needed more bookshelves, and last week I grabbed a few IKEA ones cheap on craigslist (the three skinny ones) I lined them up alone the curve of my tiny apartment's living room, and the curve was so gradual, that it strangely made me think of an easy curve on a railroad track. The wheels started turning, and a week later I've rebuilt the bookshelves and laid a basis for a layout. The good thing about used IKEA bookshelves is there is no reason to worry about destroying them, but it was quite a challenge to get them somewhat level on my outrageously wavy apartment floor.
Posted below are some photos and a trackplan. I am really trying to make maximum use of the space - this will be a detail rich, complicated layout. It includes a ground level of freight trackage, an elevated mainline above it connected by an unprototypically steep ramp, and above all that will be a doubly elevated "L" line. I don't want the L to block everything, though, so half of it will be subway below everything. A major goal was to have a loop for continuous operation; that will be accomplished by the L trackage, which will have some pretty sharp roughly 11-12 inch curves at each end. The freight trackage is a switching layout, with a goal that the ramp between levels allows for 3-4 cars +loco to switch levels at a time. Several industries will be on the back wall, and the lower freight level will have enough yard trackage to store 15-20 cars. One of the industries will be two levels, in imitation of Bloomer chocolate in Chicago. It also has a space for trucks to unload bulk commodities. The yard/industry trackage I plan to handlay with code 55 rail, the run-arounds and siding with code 70, and the mainline with code 83; some trackage will be abanadoned, and the track plan isn't yet final. I am intending for a very realistic, gritty, urban environment and hope to have alot of lighting - for the two L stations, the road under the elevated trackage, the industries, etc. The only engine I plan to need is a "bandit" Soo ex-MILW MP15 that will hopefully save a few scale feet for the run-around element. I'm also about to get an Island Model Works CTA 3200 series pair to operate on the L portion. I'm curious what folks think of the track plan - too wild? A decent use of available space? Also, has anyone built Central Valley switch kits? They look like a good way to build a nice turnout and save some money. 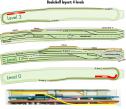   Date: 11/17/12 21:59 Re: A complicated bookshelf layout begins. Author: inCHI More photos.
The final one is of my last layout, worked on about 8-9 years ago when I was in high school. I'm hoping to surpass the look of that layout.  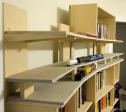 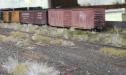 Date: 11/17/12 22:06 Re: A complicated bookshelf layout begins. Author: wpdude A Man's gotta do what a man's gotta do. If it works for you, then it works, PERIOD! You'll be running trains while some are still planning.
Date: 11/18/12 00:30 Re: A complicated bookshelf layout begins. Author: RustyRayls Can't figure this one out??? 1.) What is the grade between level 0 and level 3? 2.) How do the trains get from level 1 or 2 to level 0 or 3? (I don't see a connection on your drawing) 3.) How long and how wide is the layout? 4.) Have you drawn this out to scale using the correct frog angles for the turnouts?
This looks like it would be tough to impossible in N-scale let alone HO. Just my $0.02 worth. Bob Date: 11/18/12 03:05 Re: A complicated bookshelf layout begins. Author: rschonfelder I think you are going to need a cog railway to get to the other levels let alone the ascent/descent from Level 0 to 3. I am very interested in how this will work but in my experience, a multilevel switching layout needs a helix in the room behind where the shelves are. Switchbacks between shelves do not work and it is an even bigger headache if you have hidden switchbacks.
I like your inspiration so please keep us posted. I wanted to do a lesser version of what you are talking about but I quickly decided I needed a longer layout. Less is more. You might find a bit of inspiration through reading Lance Meinheim's books on building shelf/switching layouts. I'm not trying to rain on your parade and I hope you do what you are planning. Let us know how you go. Rick Edited 1 time(s). Last edit at 11/18/12 03:08 by rschonfelder. Date: 11/18/12 07:44 Re: A complicated bookshelf layout begins. Author: inCHI Thanks for the comments. I've made a new diagram that changes some things and answers some questions. It only shows the two freight levels, not the subway/elevated, since that is a somewhat seperate problem. To clarify, that would not have any connection with the freight trackage.
It has dimensions to give a better sense of exactly how ridiculous those grades might be. I'm estimating that the 2nd freight level will be 3.25 inches above the first. In this plan I'm toying with the idea that a longer grade could be achieved by using a 18 in. radius 180 degree turn to bring the connection track back into the second level. Through that I get at least 45 inches for the rise, compared to perhaps 30. I eyeballed it with a ruler and it is still very steep, but I don't think impossible - it would only be for 3-4 cars at a time. I can't do a helix in another room as the wall is thick plaster, plus I am renting. Adding this curve, which would swing out a few inches from the bookshelf ledge, is a bit less than appealing (perhaps especially to my girlfriend) but if needed could be done. As for the grade from level 0 to 3 for the subway/elevated loop, that is a roughly 10 inch rise over perhaps 50 inches of distance. That is incredibly steep, but given that it would be a two car subway set, I thought it was doable. 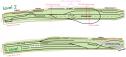 Date: 11/18/12 08:44 Re: A complicated bookshelf layout begins. Author: TCnR Radius is from the center of the curve to the outside, diameter is from the two outermost points of the curve.
The 18 inch radius needs to be 36 inch diameter, the outer rail needs 36 inches from the wall plus some clearance. Building the return loop or helix in the corner of the room may be an option, but it doesn't work on an 18 inch shelf. The shelf dimensions may have worked in N-scale, which threw me off for a cup of coffee or two. Great job on the weeds in the last photo. Edited 1 time(s). Last edit at 11/18/12 08:45 by TCnR. Date: 11/18/12 08:57 Re: A complicated bookshelf layout begins. Author: RustyRayls 3.25" over 45" = 7.22% !!! Thats one hell of a grade!
Bob Date: 11/18/12 09:13 Re: A complicated bookshelf layout begins. Author: inCHI > The 18 inch radius needs to be 36 inch diameter,
> the outer rail needs 36 inches from the wall plus > some clearance. Wow, I sure was off on that. Just moving the cars around made that obvious. Scratch that idea... > 3.25" over 45" = 7.22% !!! Thats one hell of a grade! True. But is it not possible for a few cars in HO? Aren't there some real life spurs that are 4, 5, maybe even 6%? My new idea, which I need to mockup - a switchback. As some have said, it is not good to have stuff like this in the back, but the depth is so shallow I think I can manage. Edited 2 time(s). Last edit at 11/18/12 09:19 by inRVA. Date: 11/18/12 09:22 Re: A complicated bookshelf layout begins. Author: TCnR There are some ideas to use elevators or ramps to move cars between levels. Some of the British and European layouts designed for extremely small locations have some ideas. I'd go with a return loop that can be removed or folded away for storage, allows room for storing and displaying cars, room for scenery building and then put everything away for those real-life activities.
Date: 11/18/12 10:37 Re: A complicated bookshelf layout begins. Author: NGotwalt You just can't get a continuous running loop in there...unless you shift away from Chicago and model either Boston or Philadelphia because these two cities have underground trolley lines. You could get a pair of PCC to take 6.25 inch radius (half the width of the circle, full width is diameter) curves which would only take up about 14 inches, plus the stations could be much smaller, then patch the "bandit" to LTEX, you have a good excuse for that nice Conrail power to be there too. Honestly I've been trying to make this work in Xtrakcad for two hours, and it's just really not happening. Now that I have the dimensions though, I am going to take a crack at it again.
Cheers, Nick Date: 11/18/12 10:46 Re: A complicated bookshelf layout begins. Author: inCHI Taking out my huge curve blunder, here is a new version with a switchback between freight levels. It looks like it would have a 5% grade - seems usable. There is perhaps still to much track involved... obviously aim high, then cut back! I need to print out some scale switches/curves and lay out it by hand to see what happens.
>You just can't get a continuous running loop in there...unless you shift away from Chicago and model either Boston or Philadelphia because these two cities have underground trolley lines. You could get a pair of >PCC to take 6.25 inch radius (half the width of the circle, full width is diameter) curves which would only take up about 14 inches, plus the stations could be much smaller, then patch the "bandit" to LTEX, you >have a good excuse for that nice Conrail power to be there too. Honestly I've been trying to make this work in Xtrakcad for two hours, and it's just really not happening. Now that I have the dimensions though, I >am going to take a crack at it again. >Cheers, >Nick Nick, thanks for the attempt at figuring a continuous running loop. I clearly did the estimation wrong on that. That said, considering your PCC example: I wonder if these Island Model works CTA cars can handle, a say, 9" radius curve with a swing coupler and some tweaking. I could probably pull off 18 inches, as a few inches could overhang on each side of the bookshelf. The amount of overhang on the front of the shelf is ultimately tempered by the severity of the scowl on my girlfriends face, I imagine. Edited 2 time(s). Last edit at 11/18/12 11:22 by inRVA. 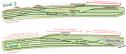 Date: 11/18/12 11:38 Re: A complicated bookshelf layout begins. Author: imrl Interesting idea. The best way to check and see if something will work, just mock it up and see if it will work. Wanna check a grade and if your equipment will work, set up some track on a 2x4 on the grade you want and give it a shot.
Date: 11/18/12 12:59 Re: A complicated bookshelf layout begins. Author: TCnR Some traction-action would be interesting. One of my early Hobby shop experiences had an along the wall shelf layout of Sacramento Northern freight.
Edited 1 time(s). Last edit at 11/18/12 12:59 by TCnR. Date: 11/18/12 16:36 Re: A complicated bookshelf layout begins. Author: RustyRayls Another thing that you have to consider is that you will need a vertical curve transition at each end of your grade. This has to be added to the length of the grade. The length of the transition increases with the steepness of the grade.
Bob Date: 11/18/12 18:11 Re: A complicated bookshelf layout begins. Author: inCHI chuchubobnv Wrote:
------------------------------------------------------- > Another thing that you have to consider is that > you will need a vertical curve transition at each > end of your grade. This has to be added to the > length of the grade. The length of the transition > increases with the steepness of the grade. > > Bob True... I'm mocking things currently. I am also beginning to think of having the L with loops of perhaps 12 in. radius, but 1/3rd-1/2 the loop is hinged to drop down when not in use, and be flush with the front of the bookshelves. Interesting, I measured some CTA loops roughly via Google Earth. At Howard on the Red Line one is 200 feet across; at Linden on the Purple line an enclosed one is 185~ ft., which works out to 24 inches in HO. Edited 1 time(s). Last edit at 11/18/12 20:40 by inRVA. Date: 12/17/12 11:55 Re: A complicated bookshelf layout begins. Author: cajonjon I have built over 20 Central Valley turnouts and I think they are the way to go. However turnout construction is like favorite car manufacturers-everyone has there own favorite, usually based on past experience.
 |