| Home | Open Account | Help | 254 users online |
|
Member Login
Discussion
Media SharingHostingLibrarySite Info |
Model Railroading > Layout progress plus layout diagram farther downDate: 06/03/19 12:48 Layout progress plus layout diagram farther down Author: santafedan I posted the first photo back in April.
Second one is the cardboard form. Third is a single layer of plaster cloth. I am doing this layout for a relative. Edited 2 time(s). Last edit at 06/04/19 05:57 by santafedan. 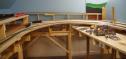 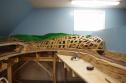 Date: 06/03/19 12:50 Re: Layout progress Author: santafedan This is where I stopped today. Trees and more details will come later as I progress around the layout.
  Date: 06/03/19 13:50 Re: Layout progress Author: atsf121 Nice work!
Posted from iPhone Date: 06/03/19 14:01 Re: Layout progress Author: SPDRGWfan Go big red!
Looking good! Date: 06/03/19 16:42 Re: Layout progress Author: CSXperiment looks excellent!
always nice to see the progress shots, and the big hillside has a cool aesthetic Date: 06/03/19 23:30 Re: Layout progress Author: BigDave Does thye upper line dead end behind the hill, or continue through the wall/backdrop?
Date: 06/04/19 03:58 Re: Layout progress Author: SPDRGWfan I'd use a somewhat faded paint on the wall to give the impression of a bit of distance, forced perspective. It's a technique I want to try as well when get the next layout going.
Date: 06/04/19 05:55 Re: Layout progress Author: santafedan SPDRGWfan Wrote:
------------------------------------------------------- > I'd use a somewhat faded paint on the wall to give > the impression of a bit of distance, forced > perspective. It's a technique I want to try as > well when get the next layout going. I wanted them to look closer this time. Date: 06/04/19 05:59 Re: Layout progress plus layout diagram farther down Author: santafedan Here is an approximate plan for the layout. HO scale. There will be staging/storage to the lower right beyond the round house.
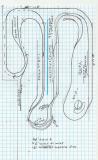 Date: 06/04/19 07:05 Re: Layout progress plus layout diagram farther down Author: SPDRGWfan Nice track plan - looks like the scale is 1 foot per square.
I also drew my track plan old school - pencil and paper on graph paper to see what I could fit in a somewhat smaller space. Photo 1 Here is the basement when we purchased the home. Photo 2 Before layout construction can begin, need to finsh the ceiling and floor - drywall is now in, taped, mudded, sanded and painted. I used a similar shade of sky blue - Valspar Clear Blue Sky. Drop ceiling perimeter rails are all in now and plan to work on the runners this weekend. Photo 3 Edited 1 time(s). Last edit at 06/04/19 07:07 by SPDRGWfan. 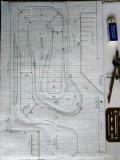 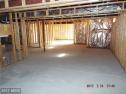 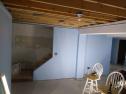 Date: 06/04/19 13:14 Re: Layout progress plus layout diagram farther down Author: santafedan Waiting to see your progress as you move along.
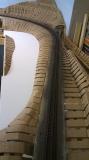
I like the plan and it looks like good senery prospects. SPDRGWfan Wrote: ------------------------------------------------------- > Nice track plan - looks like the scale is 1 foot > per square. > > I also drew my track plan old school - pencil and > paper on graph paper to see what I could fit in a > somewhat smaller space. Photo 1 > > Here is the basement when we purchased the home. > Photo 2 > > Before layout construction can begin, need to > finsh the ceiling and floor - drywall is now in, > taped, mudded, sanded and painted. I used a > similar shade of sky blue - Valspar Clear Blue > Sky. Drop ceiling perimeter rails are all in now > and plan to work on the runners this weekend. > Photo 3 > > Date: 06/05/19 04:03 Re: Layout progress plus layout diagram farther down Author: SPDRGWfan Dan, it looks like your benchwork construction is pretty similar to mine. (photo 1) Last layout torn down summer of 2017 when scenery had just gotten started (photo 3). Went a little nuts with the cardboard (photo 2)
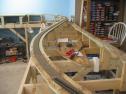  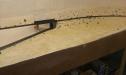 Date: 06/05/19 05:23 Re: Layout progress plus layout diagram farther down Author: santafedan Here is a close up photo of the lattice of cardboard. I use screws to attach some of the webs for better grip in places. I use a glue gun at all of the joints held with small clamps while setting up. Where joints are more in mid-air I also use screws to make the joint stiffer. I know it is probably overkill. But it stays put. Remember, I just use single sheets of plaster cloth with very little overlap. About one to one and a half overlap. Screws are less costly than plaster cloth.
 Date: 06/05/19 06:07 Re: Layout progress plus layout diagram farther down Author: SPDRGWfan Nothing wrong with overkill! I put way too much cardboard on, but I decided to try to create fairly specific landforms with the cardboard - sort of like raster scanning from right to left or visa versa.
I used scrap wood to create support structures along the top back and underneath as where needed. Under the curved corner section, there are actually 3 crescent shaped pieces of scrap wood hot glued horizontally on wooden arms and then the strips were bent and attached in a step-wise fashion. I was going for desert cliffs with resistant rock layers on the ridges with softer layers in between which had eroded into slopes in-between. It seemed to work pretty well so I plan on using similar techniques on the planned layout. 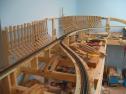 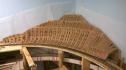 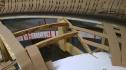 Date: 06/05/19 08:50 Re: Layout progress plus layout diagram farther down Author: santafedan You use what works for the situation.
I look forward to seeing the results. |