| Home | Open Account | Help | 346 users online |
|
Member Login
Discussion
Media SharingHostingLibrarySite Info |
Railfan Technology > Shadows and Train PhotosDate: 11/11/16 22:10 Shadows and Train Photos Author: MartyBernard This is my opinion on what to do with shadows, especially deep shadows, during photo editing of railroad photos. If you see this issue differently than I present, please comment. That's how we all learn.
To me there are two types of railroad photos. Those to document the scene and artistic photos. Some photos are a combination of the two, but let's forget those for this conversation.. Concerning documentation, a camera exposes the whole scene the same, e.g., f5.6 at 100th of a second. The human eye in looking around the scene changes the exposure by adjusting its iris. Thus the human eye can see details in shadows by opening its iris wider and details in bright areas by closing its iris some. A camera still can't do that. But in photo editing we can mimic the eye. Most often the trucks and underbodies are in shadow. When the sun is bright and high in the sky, the shadow on the trucks and underboldies may be so great that no detail can be seen. Parts of the photo may be in the shadow of structures. Part of the nose of a sidelit train is usually in a shadow. And, of course, back lighting leave everything in shadow. What to do? To me, in a documentation photo, I want to see as much detail as possible. I lighten the shadows some and also darken the over-exposed portions of the photo. Shadows come into play in our artistic shots because we take most of our artistic shots during the golden hour and the blue hour. The shadows often become important parts of the photograph. In a glint shot the shadow is an important as the bright area to make the photo work. So I make sure the shadow is dark. My rule of thumb is if the shadow hides important details in the photo, lighten it within reason. Conversely, if the shadow is integral to the photo, make sure it is substantial enough. One more related issue. Many photographers will tell you to stretch the photo down to its black point, i.e., (0,0,0). In train photography that often makes the trucks and underbody detail so dark that no detail can be seen and no lightening will bring it up. Sometimes bringing the photo part way to the black point is satisfactory, or not stretching it at all looks best. Anyhow, in reality, not all scenes include a black point. If you read this far, thanks. I do want to hear about your experience and ideas on shadows. Marty Bernard Date: 11/12/16 08:30 Re: Shadows and Train Photos Author: jkh2cpu Dynamic range is the issue here, right? I shoot RAW
with my DSLRs and process them with Darktable and Gimp, which are linux programs. This chain takes the 14 bit NEF file and processes it as a 32 bit float in both DT and Gimp; the image is moved seamlessly from DT to Gimp. I can manipulate the shadows a bit with the Curves tool, taking care not to drown the shadows in pitch black. I find that tone mapping is a real aid to balancing the whole photo so that the finished tonal range is a bit more like a painting. One has to be careful not to over do the tone mapping, or really 'interesting' effects occur ;-) Setting the black point to 0 tends to loose detail, as you mentioned, and of course much of the interesting stuff in railroad (and especially steam) photos is in the shadows. I'm still learning and and interested in hearing what others do. There's a lot under the hood of our digi 'developers' and 'editors' that needs exploring and experimentation. Sometimes (about 50 percent of the time) our best shots for a given setting have to be taken from the dark side of the illumination. Such is life, and I guess that keeps things interesting. John. Date: 11/12/16 18:19 Re: Shadows and Train Photos Author: qnyla To me, boosting the shadows creates an unrealistic looking image, so I rarely will try to bring out more shadow detail. Personally, I like shadows as they make a scene look dramatic. I must be wierd, because for me all photos are both art and documentation. Interesting discussion.
John Benner http://www.johnbenner.com/ Edited 1 time(s). Last edit at 11/13/16 20:21 by qnyla. 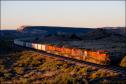   Date: 11/13/16 16:58 Re: Shadows and Train Photos Author: mfmalk Marty,
I definitely lean towards the artistic style of rail photography as opposed to the documentary side. The use of shadow is a popular trait in my portfolio, I often prefer being on the dark side of the tracks, or shooting into the light source to enhance and make more evident shadow and dark areas. I am not a big fan of boosting shadow detail in Photoshop, to my eye it looks over processed, cartoonish, painterly, and/or fake. I have heard consistently that missing shadow detail in my images forces the viewer to reconstruct data with his mind's eye; never a negative comment but much more positive. I agree strongly with Qnyla's statement "personally, I like shadows as they make a scene look dramatic". Review the link below to my gallery, currently the consist of the opening slide show of my website. http://www.losttracksoftime.com/p658205584 The very same can be said about highlight detail, notice in my #611 engine house photo how I purposely metered for the nose of the locomotive, which by design completely blew out the anything outside the doors. The same with the speeder in the EBT back shops; everything through the windows is unrecognizable. I welcome feedback and opinions, Matthew Date: 11/13/16 16:58 Re: Shadows and Train Photos Author: CimaScrambler It may be too long a topic for this board, but try googling "luminosity masking". Generally, it involves selecting only a particular tonal range within the image so that range can be edited in detail, usually through expanding local contrast within it. If you select the shadow areas, you can expand their tonal range to bring out detail. Same thing with highlights. It is a common method used by highly skilled digital photo editors. I think it will answer your need here. I use it on just about every image I process these days, often breaking the image into anywhere from 2 to 6 "luminosity bands", or sections of the tonal scale. I edit in Photoshop Elements, where the "Magic Selection Tool" is available to select sections of the tonal range. I don't know what you would use in other editing packages.
- Kit Kit Courter Menefee, CA LunarLight Photography Date: 11/13/16 18:35 Re: Shadows and Train Photos Author: MartyBernard mfmalk Wrote:
------------------------------------------------------- > > I welcome feedback and opinions, > Matthew I just walked around you site and now understand your comments. You do excellent work. When I used the word documentation I guess I was thinking of rivet counters and model railroaders who want to see the detail and the fan who goes down to the tracks because something different is coming through town and he or she wants a couple of pictures. I would also include those who take vacations traveling around and taking train pictures of what ever they see. The camera is usually set on fully automatic and they accept what ever the photo looks like. In the extreme I once saw a comment on a set of not that good photographs saying "If you can read the number, that's good enough for me." Conversely I was thinking of artistic as someone who often thinks through their photographs even before they arrive at the site. Would return to a site and try again if they were not happy with the results. A photo artist plays with light. A documenter will make sure he or she has "good light" -- direct sun light. Won't go out on a cloudy day. A photo artist often looks for "bad" light. Today a photo artist is very good at photo editing. A documenter is satisfied just with the basics of photoediting, if that. Yes, a photo artist is documenting but is manipulating as he or she works. A documenter takes what ever is there. The nice thing is that both can be happy with their photography. As I looked at your photos I see the work of the photo artist I just described. Marty Date: 11/14/16 09:45 Re: Shadows and Train Photos Author: fbe There are a couple of quick and dirty methods to use if you don't want to learn about curves and such.
1) Reduce the contrast which will give you a pretty "flat" image. Adjust the exposure for the shadows then increase saturation which will improve the highlights. 2) Process the image twice. Do one for the shadows and another for the highlights. Then merge these two images into one with the layers function. This can work especially well with slide scans from contrasty films. Scan once slightly over exposed to get any details in the shadows then another time for the properly exposed parts of the slide. Merge the two scans then adjust the final image. Posted from Android |